The Price of Prophecy (Production)
Pathfinder Second Edition

Snapshot · Oct 28, 2026, 6:09 PM

  • The Price of Prophecy (Production)
    • narrativeCampaign Primer
    • narrativeThe Lore of Druma
    • Module artifacts
      • folderGuides
        • handoutLevel 1-2 Treasure Menu
        • handoutLevel 2–3 Treasure Menu
      • folderTreasures
        • itemCedar Whisper Charm
        • itemBrassbound Hero’s Mark
        • itemAmberglass Reagent Case
        • itemLantern of Last Echoes
        • itemThuld’s Pattern Awl
        • itemSeal of the Fair Measure
        • itemVotive of the Second Vigil
        • itemVeiled Current Pin
        • itemEcho-Ward Wristlet
        • itemStillwater Step Anklet
        • itemHarbor-Chorus Brooch
        • itemAshborn Resolve Torque
        • itemBrass Signal Clasp
        • itemMosswake Circlet
        • itemEdgekeeper Knot
        • itemIron-Shelter Rivet
        • itemCinderline Sight
        • itemGilt Calibration Key
        • itemInquest Lens
        • itemConfluence-Thread Sash
        • itemTarnished Omen Coin
        • itemHushglass Diadem
        • itemThornpath Compass
        • itemEmberblood Signet
        • itemTwinned Thread Pendant
        • itemGilt Wake Sash
        • itemQuiet Ledger Reliquary
        • itemHearthroot Needle
        • itemWarded Margin Bookmark
      • folderHandouts
        • handoutThe Palakar Forest & The Town of Macridi
        • handoutTar Taargadth
        • handoutOath of Everlasting Friendship
        • handoutBlood Price Economy
        • handoutDruma - Profit and Prophecy
        • handoutNew Macridi
        • handoutThe Blight of 4719
        • handoutNew Macridi — Magical Services
        • handoutThe Legacy of Thuld
      • folderItems
        • itemAlchemical Reagent Bundle
        • itemInfernal Blight Reagent Bundle
        • itemCedar Court Amber
      • folderImages
        • imageGolden Hand Seal
        • imageGolden Hand Stamp
        • imageThe Quiet Current Seal
      • folderMaps
        • mapDruma WikiPath
        • mapOld Macridi
        • mapMacridi Area
        • mapDruma Detailed
        • mapNew Macridi (blocks)
        • mapKerse
        • mapNew Macridi
        • mapNew Macridi (blocks color)
        • mapPetitioner's Port
        • mapAlabastrine Map
      • folderPages
        • pageThe Price of Prophecy - PC Guide
        • pageCampaign Arc (FULL Spoilers)
        • pageCampaign Arc (FULL Spoilers) (new CSS)
        • pagePlayer Primer • Pulgari Estate<
        • pageGM Primer • Pulgari Endgame
        • pagePlayer Reference - Lores
        • pageTreasure, Reagents, and Party Size
      • folderMonsters
        • monster blockMacridi Blade Warrior
        • monster blockWood Wraith
        • monster blockSpeaker of the Pale
        • monster blockAnimated Log Servant
        • monster blockBarrow Clay Sentinel
        • monster blockInfernal Blightseed Swarm
        • monster blockInfernal Rootling
        • monster blockInfernal Thornling
        • monster blockInfernal Treeling
        • monster blockInfernal Blight Stalker
        • monster blockInfernal Blight Reveler
        • monster blockBrimorak Demon
        • monster blockOrt (Drudge Devil)
        • monster blockGOLDEN HAND MERCENARY
        • monster blockGOLDEN HAND ARCHER
        • monster blockForeman Hendrik
      • folderBlight Infestations
        • monster blockBlightroot
      • folderArticles
        • articleCedar Court
        • articleCourt of Seasons
        • articleDesolation Blade Mounds
        • articlePulgar Estate v2
        • articlePulgari Estate
        • articleReiver's Right
        • articleMacridi
        • articleMacridi Blades
        • articleCourt of Endless Revelry
        • articleMammon: The Argent Prince
        • articleInfernal Blight — Progression
        • articleThe Quiet Current
      • folderPDFs
        • pdfDruma_and_Northern_Shining_Kingdoms_Player_Reference
      • folderRecaps
        • narrativeStart to 10/28
    • Acts
      • actA1Investigating Reiver's Right
        • narrativeOverview
        • sceneS1Briefing at Karland's Sawmill
          • narrativeMain
          • handoutInvestigate Reiver's Right
          • encounterE1Meeting Danum Karland
            • narrativeMain
            • challengeMeeting Danum Karland Challenges
            • imageBlighted Log
            • checklistTakeaways from Karland's Sawmill
            • sidebarGM Notes
          • checklistKarland's Sawmill — Contract
        • sceneS2Around Town Macridi
          • narrativeMain
          • mapOld Macridi (Unmarked)
          • mapOld Macridi
          • encounterE1Karland's Sawmill
            • narrativeMain
          • handoutOld Macridi — Spellcasting Services
          • encounterE2Fanciful Inquiries
            • narrativeMain
            • sidebarBuying Maps
            • shopFanciful Inquiries — Shop Menu
          • encounterE3The Gilded Ledger Tavern
            • narrativeMain
            • challengeE3 — The Gilded Ledger Tavern Challenges
            • handoutRecover the Boles
          • encounterE4The Salty Bark Tannery
            • narrativeMain
          • encounterE5Sanctitude Saunas
            • narrativeMain
            • articleThe Empty Private Chamber
          • encounterE6The Iron-Root Apothecary
            • narrativeMain
            • challengeAlchemist Rub
            • articleAlchemical Reagent Bundle
            • treasureIron-Root Apothecary — Alchemist Supplies
            • shopApothecary Alchemical Supplies
          • encounterE7Assembly Institute
            • narrativeMain
          • encounterE8The Veridical Scriptorium
            • narrativeMain
            • pageGM Primer • Hidden Conspiracy
            • handoutTakeaways from Veridical Scriptorium
            • challengeIdentify the Seal
            • imageGolden Hand Stamp
          • encounterE9The Watchmaker's Loft
            • narrativeMain
            • treasureWatchmen's Loft List
          • encounterE10Best Fit Furnishings
            • narrativeMain
        • sceneS3The Darkwood at Mudjaw Reach
          • narrativeMain
          • encounterE1Getting the Darkwood
            • narrativeMain
            • mapMudjaw Beach sketch
            • articleMudjaw Beach Field Reconnaissance
            • mapMudjaw Beach
            • monster block2× Balanced — 2× Reefclaw
            • monster blockBlue-Ringed Octopus
            • monster block2× Grindylow
            • monster block3× Mudjaw Lurebloom
            • sidebarMovement in the Shallow
            • handoutTactics
            • articleXP
        • sceneS4The North Road
          • mapNorth Road - Sketch
          • mapNorth Road - Detail
        • sceneS5Pulgari Estate Crossroads
          • encounterE1Golden Hand
            • monster block2x Golden Hand Mercenary
            • monster blockGolden Hand Archer
            • pageXP
            • pageRecall Knowledge
            • imageGolden Hand Crossing
        • sceneS6Reiver's Right
          • encounterE1South Gate (North Road)
            • narrativeMain
          • encounterE2Gatehouse
            • narrativeMain
            • letterLeft for Anyone Who Comes After
            • trapGatehouse Snapbow
            • mapGatehouse Interior
          • mapReiver's Right Sketch
          • encounterE3Central Yard
            • narrativeMain
            • monster block4× Hardwood Scamp
          • encounterE4Foreman's Hall / Camp Hall
            • narrativeMain
            • monster blockForeman Hendrik
            • monster block2× Infernal Rootling
            • pageTactics — Hendrick and Two Infernal Rootlings
            • sidebarThe Corruption of Foreman Hendrick
            • treasureForeman Hendrick's Log Book
            • letterForeman Hendrick's Log Book
            • treasureGolden Hand Log Book
            • letterGolden Hand Log Book
            • treasureHidden Compartment - Golden Hand Log Book
            • mapCamp Hall Inside
            • treasureInvestigator's Field Kit — Lantern and Awl
            • shortcutLantern of Last Echoes
            • shortcutThuld’s Pattern Awl
          • mapReivers's Right Battlemap
          • encounterE5Cookhouse & Mess
            • narrativeMain
          • encounterE6Bunkhouses / Workers' Cabins
            • narrativeMain
            • narrativeHalven's Darkwood
          • mapReiver's Right Sketch (Unmarked)
          • encounterE7Storehouse
            • narrativeMain
            • trapRigged Cargo Collapse
            • mapStorehouse Battlemap
            • mapStorehouse Battlemap 2
            • pageDerrin Hale's Abandoned Satchel
            • letterDerrin Hale's Letter
            • treasureDerrin's Effects
          • pageWorkers Escape
          • encounterE8Smithy
            • narrativeMain
            • letterDarkwood Note
          • pageGM Notes for Party of 5, 2nd Level
          • encounterE9Stables
            • narrativeMain
          • pageFive Relics of Reiver's Right
          • encounterE10Sawpit / Sawyard
            • narrativeMain
            • mapSawpit/Sawyard Battlemap
            • mapSawpit/Sawyard Battlemap Placement
            • monster block4× Infernal Rootling
            • monster blockInfernal Thornling
          • pageThe Long Dividend
          • encounterE11Carpentry Shed
            • narrativeMain
          • imageThe Long Dividend Image
          • encounterE12Log Stacks
            • narrativeMain
            • monster blockWood Wraith
            • monster block4× Animated Log Servant
            • mapLog Stacks Battlemap
          • encounterE13Log Chute & Hoist
            • narrativeMain
            • mapLog Chute & Hoist Battlemap
            • pageThe Lower Works — Western Approach
            • mapCollapsed Tunnel Entrance to Lower Works
            • narrativeCollapsed Tunnel Entrance Notes
          • shopTallow's Odds and Ends
          • encounterE14Lower Landing / Dock
            • narrativeMain
          • pageTraveling Merchant · The Long Dividend
          • encounterE15Watchtower
            • narrativeMain
            • letterFound Letter
          • encounterE16Shrine of Erastil
            • narrativeMain
          • encounterE17North Track (to Ranger Road)
            • narrativeMain
          • subsceneSS1E18 - The Lower Works
            • narrativeMain
            • narrativeLower Works Overview
            • narrativeOverview
            • narrativeEncounter Scaling — 4 or 5 Level-2 PCs
            • encounterE18Concealed Entrance
              • narrativeMain
              • treasureLower Works Shift Key
            • mapThe Lower Works Map 2
            • mapThe Lower Works Map 2 Battlemap
            • encounterE18Access Ramp
              • narrativeMain
              • trapRunaway Ore Cart
            • encounterE18North Gallery
              • narrativeMain
              • mapE18-3 — North Gallery (GM Placements)
              • monster block2× Infernal Thornling
              • monster blockInfernal Rootling
              • sidebarRootling Reinforcement
            • encounterE18Ventilation Shaft
              • narrativeMain
              • trapVentilation-Shaft Collapse
              • treasureCrafter's Eyepiece
            • encounterE18Supply Depot
              • narrativeMain
              • treasureLower Works Emergency Cache
              • treasureStamped Supply Manifest
            • encounterE18Western Excavation
              • narrativeMain
              • monster block2× Barrow Clay Sentinel
              • treasureMacridi Blade Survey Token
              • treasureThe Barrow Reliquary
            • encounterE18Flooded Passage
              • narrativeMain
              • monster block2× Blue-Ringed Octopus
              • sidebarFive-Character Adjustment
              • trapFlood Surge
            • encounterE18Workers' Quarters
              • narrativeMain
              • treasureLower Works Crew Roster
              • treasureDerrin Hale Freight Chit
              • treasureWorkers' Lockbox
              • shortcutAmberglass Reagent Case
            • encounterE18Eastern Tunnels
              • narrativeMain
              • treasureAbandoned Survey Board
              • treasureHauling Crew's Pay Tin
            • encounterE18Deepest Dig
              • narrativeMain
              • treasureDeep Survey Ledger
              • treasureWarded Drill Core
              • treasureGolden Hand Transit Seal
              • mapE18-10 & E18-11 — Tactical Map (GM Placements)
            • encounterE18The Blightroot
              • narrativeMain
              • shortcutBlightroot
              • sidebarRunning the Blightroot Encounter
              • monster block2× Infernal Rootling
              • monster blockInfernal Thornling
              • sidebarFive-Character Adjustment
              • treasureFresh Blightroot Sample
              • sidebarBlight Terminology
        • sceneS7Epilogue to Reiver's Right
          • treasureConsolidated Treasure Menu - Lv1 - 2
      • actA2Kerse
        • sceneS1Corven Vell's Hideout
          • narrativeOverview
          • narrativeHook from Reiver's Right
          • narrativeRunning the Hideout
          • narrativeSecurity & Consequences
          • narrativeFinal Discovery
          • subsceneSS1H1 - Entry Hall
            • narrativeMain
            • trapVell's Courtesy Needle
          • itemCorven Vell's Comparative Assay Kit
          • subsceneSS2H2 - Conservatory
            • narrativeMain
            • trapIrritant Mist Manifold
          • sidebarAlchemical Treasure
          • subsceneSS3H3 - Preparation Laboratory
            • narrativeMain
            • trapVolatile Separation Bench
          • mapCV Hideout
          • subsceneSS4H4 - Specimen Gallery
            • narrativeMain
            • trapCompromised Specimen Case
          • mapCV Hideout Battlemap
          • subsceneSS5H5 - Study & Correspondence
            • narrativeMain
          • mapCV Hideout Sketch
          • subsceneSS6H6 - Lower Laboratory
            • narrativeMain
            • narrativeAfter the Fight
          • subsceneSS7H7 - Comparative Laboratory
            • narrativeMain
            • trapArchive Purge
            • monster block3× Animated Panoply
        • articleKerse Downtime
        • articleKerse Downtime 2
        • articleMacridi to Kerse by Boat
        • articleDruma — Dwarven Rivercraft
      • actA3The Cedar Court
        • sceneS1Getting to the Cedar Court
          • mapCedar Court - Surrounding Area
        • sceneS2The Cedar Court
          • mapCedar Court Sketch
        • sceneS3The Cedar Blightroot
          • subsceneSS1Companions
            • pageCedar Court — Available Companions
            • article1. Sylvara Thornwatch — Cedar Court Ranger
            • article2. Bristlewick, the Cedar Court Rootspeaker
            • article3. Pipkin Vell, Cedar Court Apothecary
        • sceneS4Leaving The Cedar Court
      • actA4Court of Endless Revelry
      • actA5The Court of Seasons
        • narrativeStub Overview
      • actA6Barak Thuld
        • narrativeBarak Thuld
        • articleRagna Stonewake
        • mapBarak Thuld Sketch
        • mapBarak Thuld
        • mapBarak Thuld - Level 1
        • mapBarak Thuld - Level 2
        • mapBarak Thuld - Level 3
        • imageRagna Stonewake
      • actA7Desolation Blade Mounts
        • narrativeStub Overview
      • actA5The Petitetioner's Port
        • narrativeStub Overview
        • sceneS1Around Petitoner's Court
          • encounterE1Petitioner's Port
            • narrativeMain
          • encounterE2Cyneheard Imports
            • narrativeMain
          • mapPetitioner's Port Act
          • encounterE3Vhinigan's Haberdashery
            • narrativeMain
          • encounterE4Bracken & Bell Forge
            • narrativeMain
          • encounterE5The Sturdy Sword
            • narrativeMain
          • encounterE6Stillwater Remedies
            • narrativeMain
          • encounterE7The Wayfarer's Rest
            • narrativeMain
          • encounterE8The Iron Measure
            • narrativeMain
          • encounterE9Executive Seat
            • narrativeMain
          • encounterE10The Ninefold Athenaeum
            • narrativeMain
          • encounterE11The Measure & Mark
            • narrativeMain
          • encounterE12The Lantern Chapel
            • narrativeMain
          • encounterE13Petronax Villa
            • narrativeMain
        • sceneS2Alabastrine
          • narrativeMain
          • mapAlabastrine Map
        • articlePetitioner's Port Overview
      • actA2The Gilded Cage
        • narrativeStub Overview
      • actA3The Court of Seasons
        • narrativeStub Overview
    • Bucket
      • handoutThe Palakar Forest & The Town of Macridi
      • handoutTest Handout
      • handoutGuild Contract
      • handoutFanciful Inquiries
      • handoutThe Iron Root Apothecary
      • monster blockYoung Reefclaw
      • handoutTrouble Up Profit's Flow
      • monster blockZebub
      • articleDesolation Blade Mounds - min
      • articleTreasure, Crafting Materials, and Reagents
      • letterSubject: Reiver’s Right — Halven Dorr Missing
      • mapThe Lower Works Battlemap
      • mapThe Lower Works Map
    • Reference
      • imageShining Lands 1
      • imageShining Lands 2
      • imageKellid
      • imageDruma
      • imagemacridi-2
      • imagemacridi-1
      • articleArchtype - Prophet of Kalistrade
      • articleArchtype - BlackJack
      • imageDruma, Profit and Prophecy
      • imageBlighted Fey - 1
      • imageBlighted Fey - 2
      • imageForest Blight
      • imageBlight
      • pageThe Macridi Sandbox – How It All Ties Together
      • imageMammon
      • imageMammon Watercolor
      • pageMudjaw Reach backup
      • narrativeNew Macridi 2
      • imageKerse 1
      • imageKerse 2
    • Trash
      • narrativeMain
      • shopTraveling Merchant · The Long Dividend
      • pageMain
    • Inbox
      • mailFree Maps!
      • mailA Note from Iron-Root Apothecary
      • mailReiver’s Right — Halven Dorr Missing
      • mailMaps of New Macridi and Kerse compliments of Darno Karland
      • mailA Piece of Timber I Need Back
      • mailA Small Matter at Reiver's Right
      • mailReiver’s Right Follow-Up: Kerse Preparations Underway
      • mailRegarding the Blackjacket Scout
      • mailPersonal Correspondence
    • PCs
      • pcUlysses
        • narrativeCharacter Sheet
        • pageMain
        • pageStat Block
      • pcBashi Dai
        • narrativeCharacter Sheet
        • pageMain
        • pageStat Block
      • pcSkye Flamebelch
        • narrativeCharacter Sheet
        • pageMain
        • pageStat Block
      • pcDoku
        • narrativeCharacter Sheet
        • pageMain
        • pageStat Block
    • NPCs
      • npcSella Varn
        • narrativeMain
        • narrativeCharacter Sheet
        • pageMain
      • npcCorven Vellicus
        • narrativeCharacter Sheet
        • pageMain
act

Act 6 — Barak Thuld

Court of Seasons Quest

Barak Thuld

An Ancient Dwarven Border Fortress Beneath the Palakar

Quest Availability

This quest becomes available after the party reaches the Court of Seasons, delivers the blight-seed antidote, and remains on good terms with the Court. It assumes that the messenger from the Court of Endless Revelry also arrives safely and that the party has taken no action that would give the Court of Seasons reason to distrust them.

Do not use this scene to introduce additional political complications. The purpose of the sequence is straightforward: the antidote works, the Courts can begin responding to the immediate blight, and the party is now trusted with a different problem.

The Antidote Reaches the Court

The party's arrival changes the situation at the Court of Seasons immediately. Once the Court confirms that the substance brought from Macridi can kill the blight seedlings, the queens no longer need to commit every available fighter to containing individual outbreaks.

Samples are divided among the Court's healers, scouts, and war parties. Messengers are dispatched. Fighters who had been holding defensive lines are reorganized into mobile groups capable of destroying infected growth before it can mature.

The change moves through the Court almost at once.

Small vessels of the dark-killing mixture pass from hand to hand beneath the colored boughs. Messengers leave at a run. Warriors who had stood watch over infected groves gather weapons, packs, and bundles of marked arrows.

For the first time since you began seeing the blight spread through the Palakar, the fey are not merely containing it.

They are preparing to hunt it.

The Court of Seasons dispatches a war party to begin destroying known seedlings and reinforcing threatened portions of the forest.

The party, however, is given a different assignment.

A Different Kind of Threat

Scouts operating ahead of the Court's forces have confirmed that the blight has entered Barak Thuld, an ancient dwarven border fortress buried beneath this part of the Palakar.

The fortress was damaged long ago during fighting between dwarven forces and the fey. One of those old breaches was never fully closed. For centuries that mattered little.

Now corrupted growth has found the opening.

Keep the History Simple

The adventure does not need to establish exactly how the old battle ended, why the breach remained unrepaired, or what ultimately happened to Barak Thuld's original garrison. Those questions can remain unanswered unless they become useful later.

The facts required for this adventure are only these: Barak Thuld was a dwarven border fortress, the fey breached part of it during an ancient war, and the blight is now using that breach to enter the complex.

A queen traces one finger across a weathered stone tablet laid upon the ground.

“Barak Thuld,” she says.

The name is dwarven. Old enough that even the fey around her exchange looks before one of them gestures toward a narrow mark carved through the side of the fortress diagram.

“That wound was made during the old wars.”

A dark root has been placed across the carving.

“Something is using it now.”

The Court does not ask the party to conquer the fortress or recover its relics. The objective is narrower: enter Barak Thuld, determine how far the blight has spread, destroy the creatures establishing themselves inside, and close the ancient breach.

The War Camp

The Court sends the party toward a temporary military outpost established near Barak Thuld. The camp is held by a small force of war nymphs and other fey fighters responsible for watching the fortress approaches and preventing blighted creatures from escaping into the surrounding forest.

The outpost serves as the party's staging point throughout the expedition. Unless events inside Barak Thuld change the situation, the characters can return here to rest, resupply, recover, and prepare another descent.

The forest thins around a low ridge of broken stone and enormous roots. Beyond it, the quiet of the Palakar gives way to the ordered movement of a military camp.

Spears stand in bundles beside living-wood barricades. Packs and quivers hang beneath stretched awnings. Warriors move between small fires without music or celebration, their attention fixed on the tree line and the dark slope beyond it.

The outpost faces a jagged cleft in the earth.

Somewhere beneath that opening lies Barak Thuld.

Available at the War Camp

☐ Basic food and water.
☐ Common ammunition and simple adventuring supplies.
☐ Basic medical treatment and a safe place to recover.
☐ Information gathered by fey scouts watching the fortress entrance.
☐ A secure location from which the party can make repeated expeditions into Barak Thuld.
The Camp as a Safety Valve

Barak Thuld is intended to feel like a substantial dungeon rather than a single encounter sequence. The party does not need to clear it in one push. Returning to the war camp should normally be possible once the characters can reach the surface.

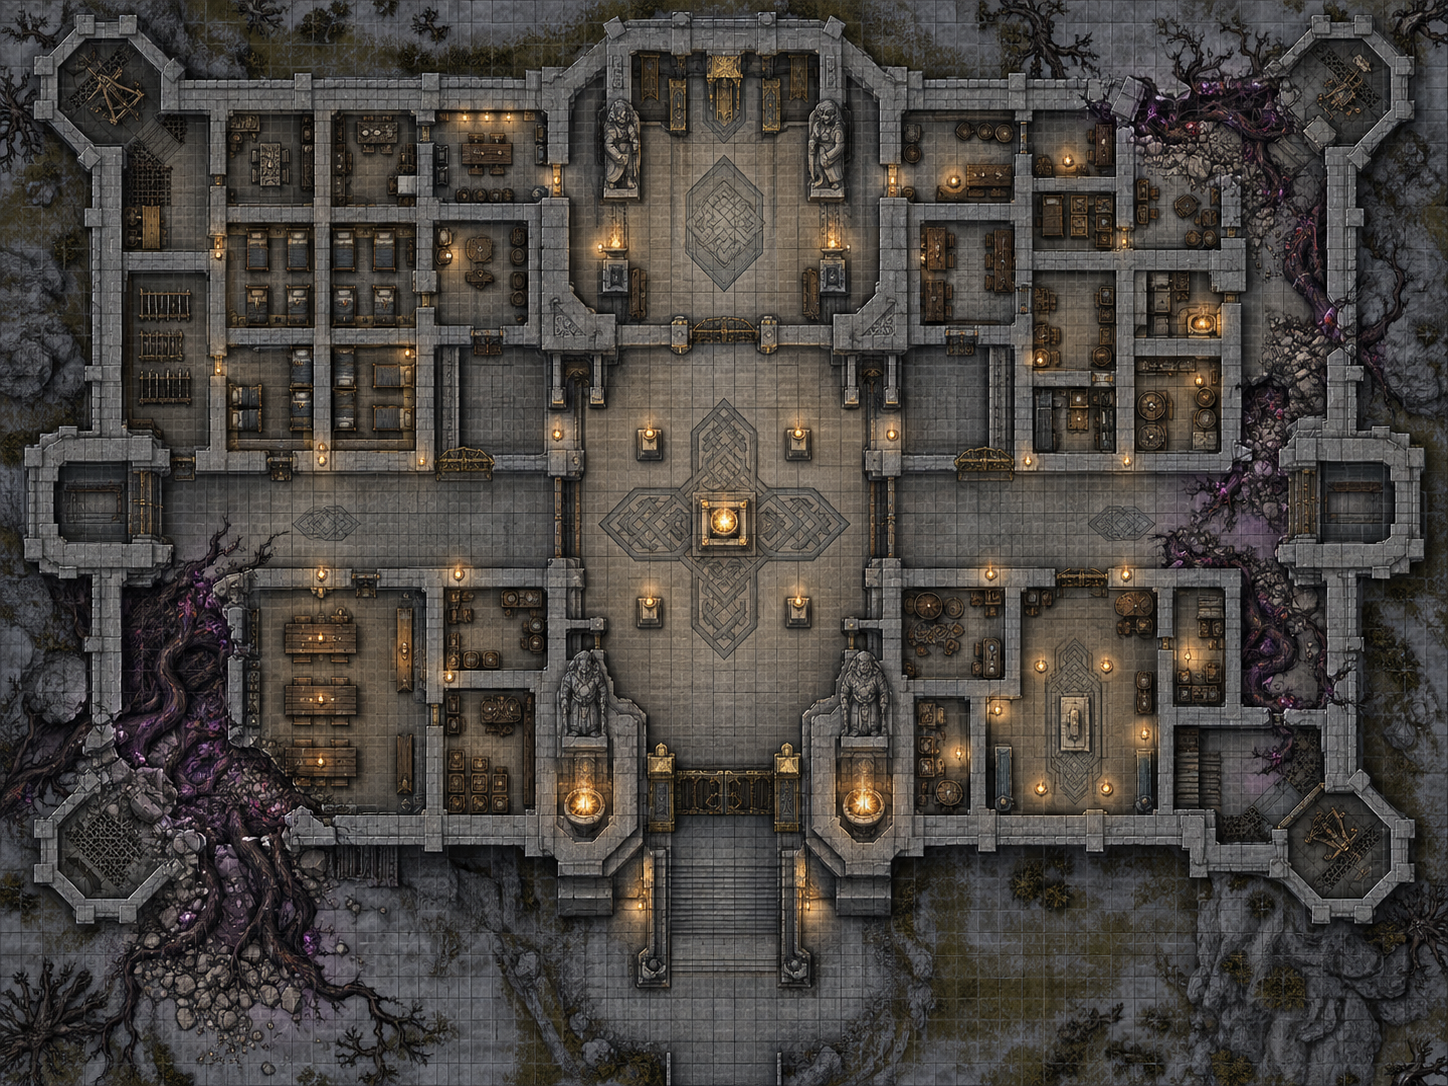
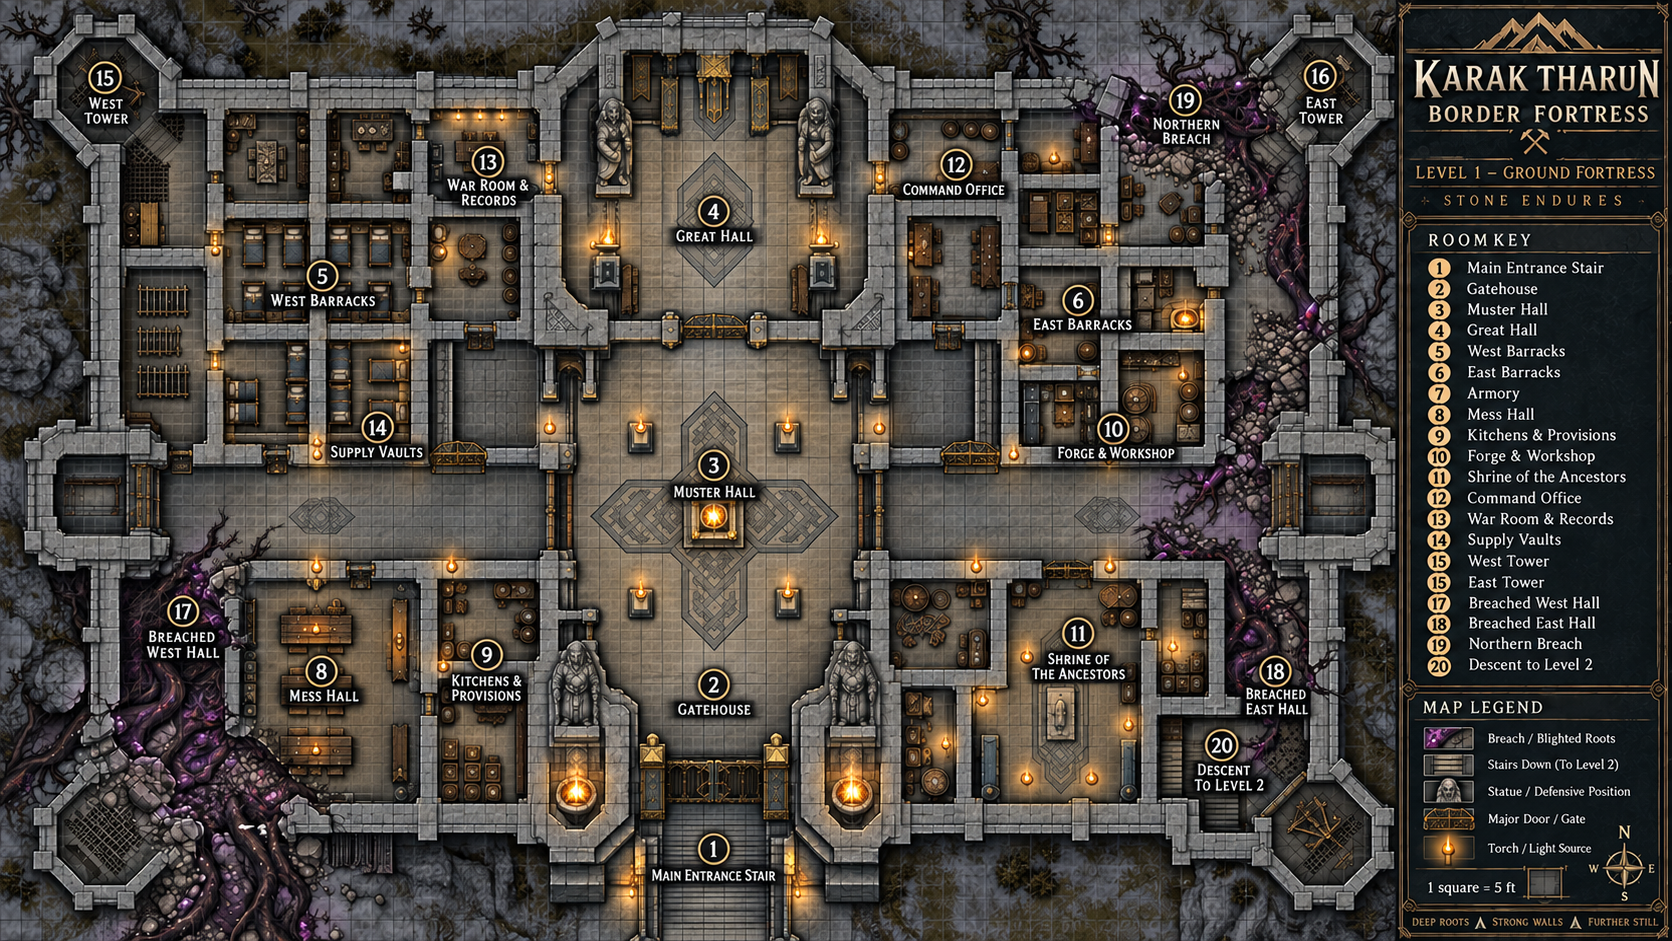
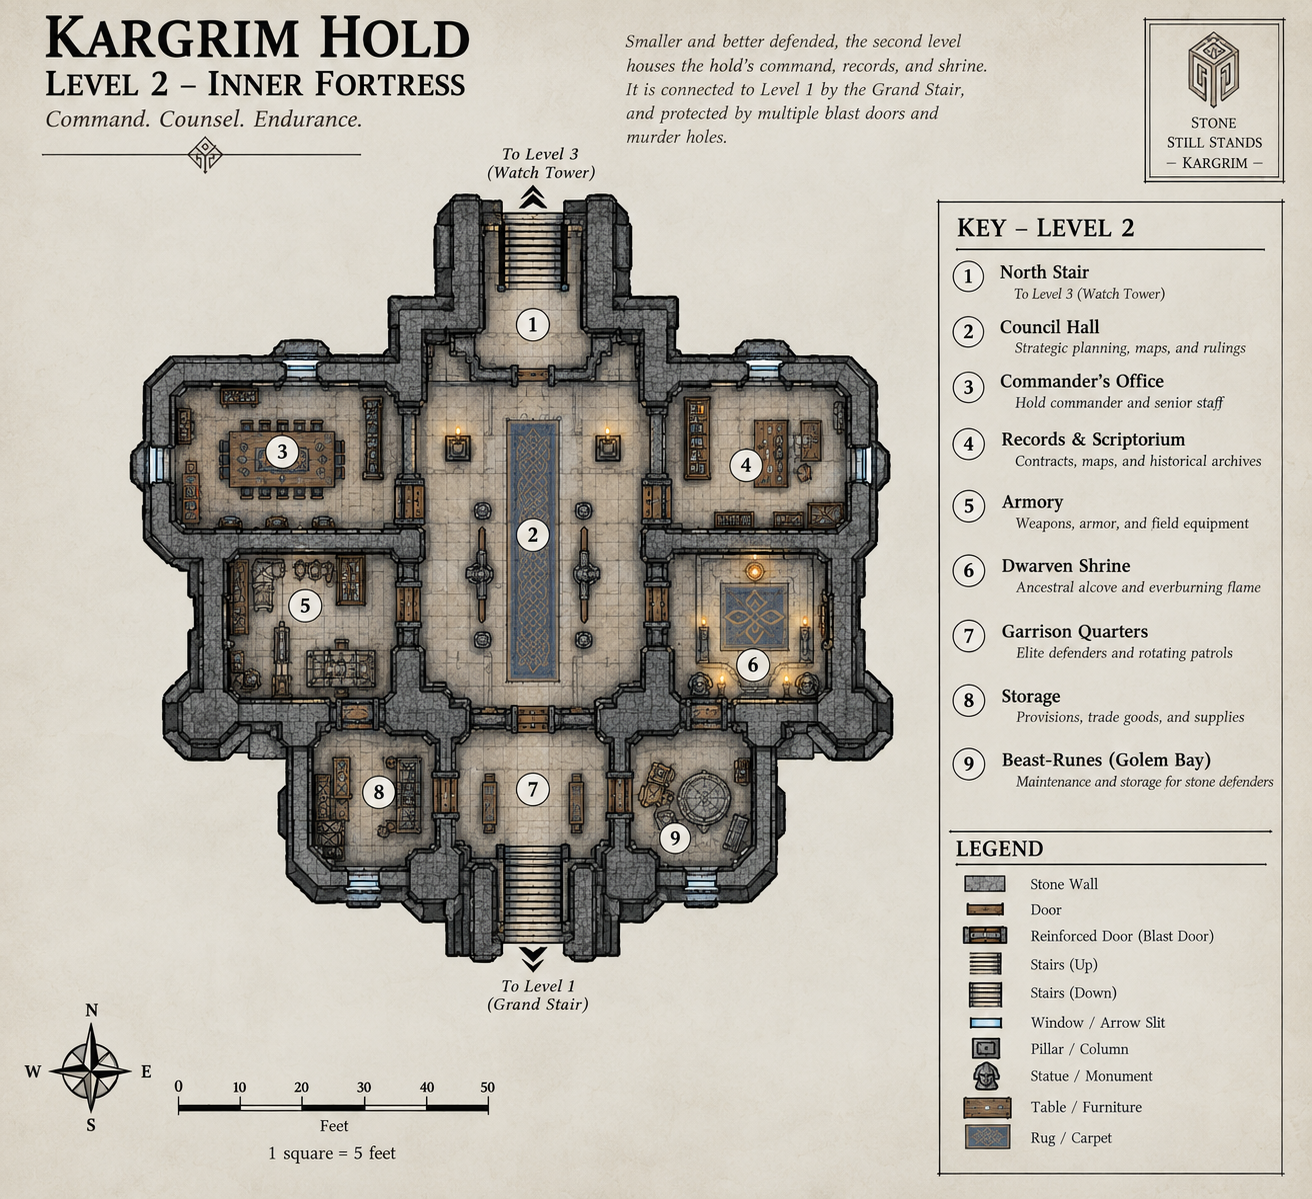
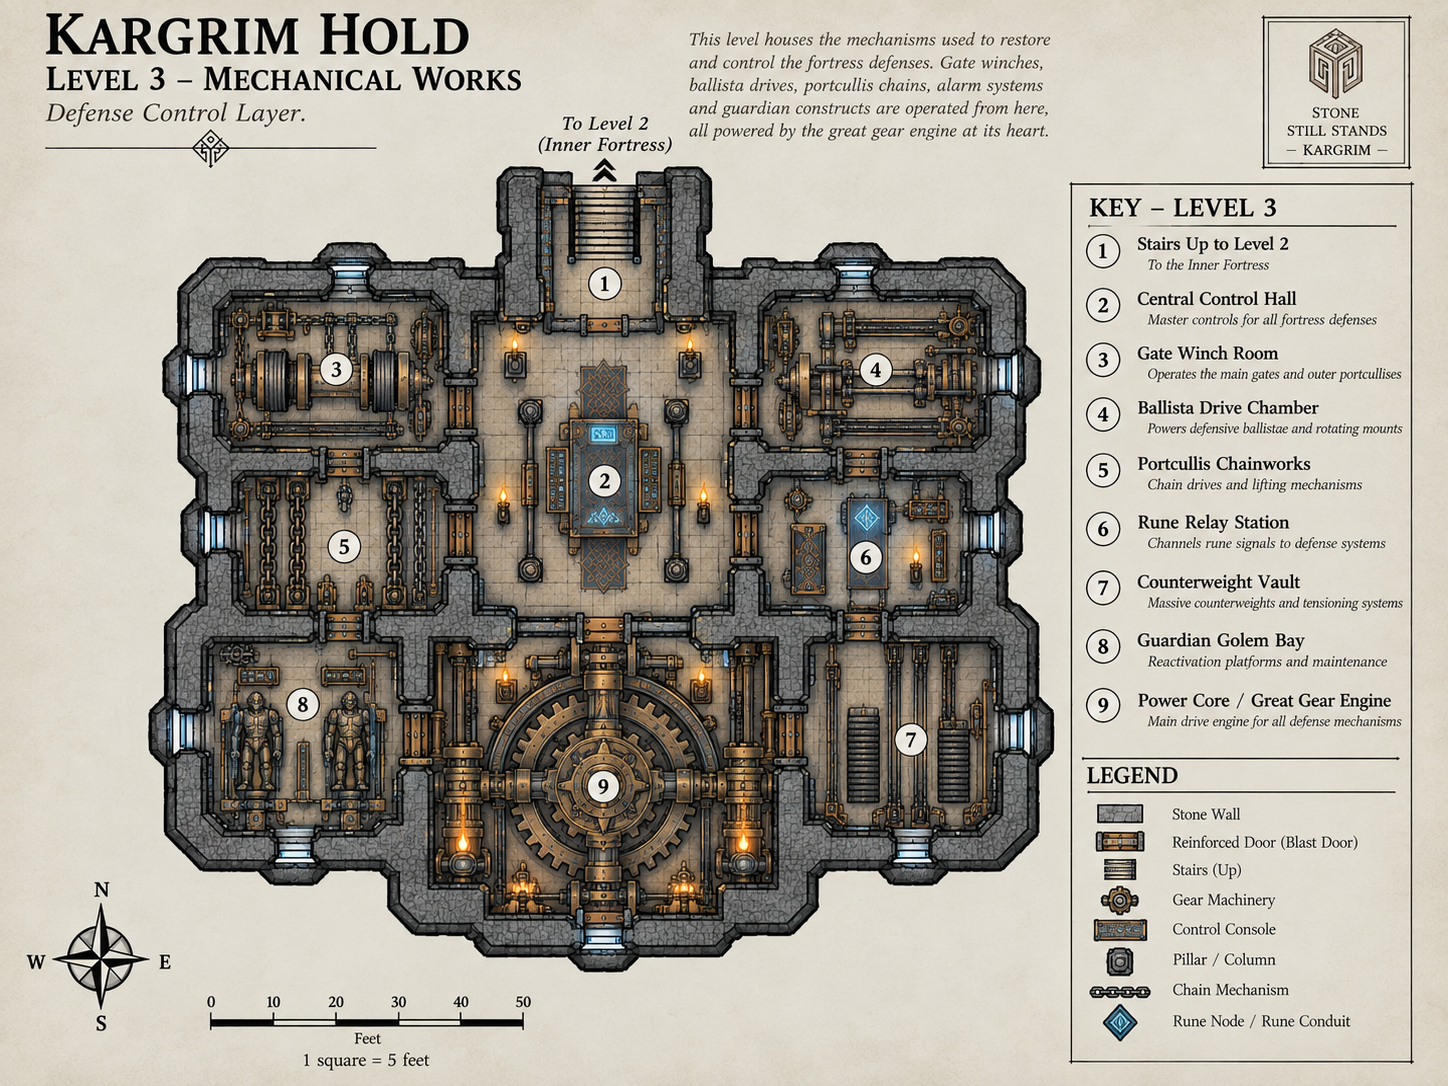
Barak Thuld — Fortress Overview

Barak Thuld consists of three primary levels and a fourth optional level. Movement through the fortress should gradually change the nature of the adventure.

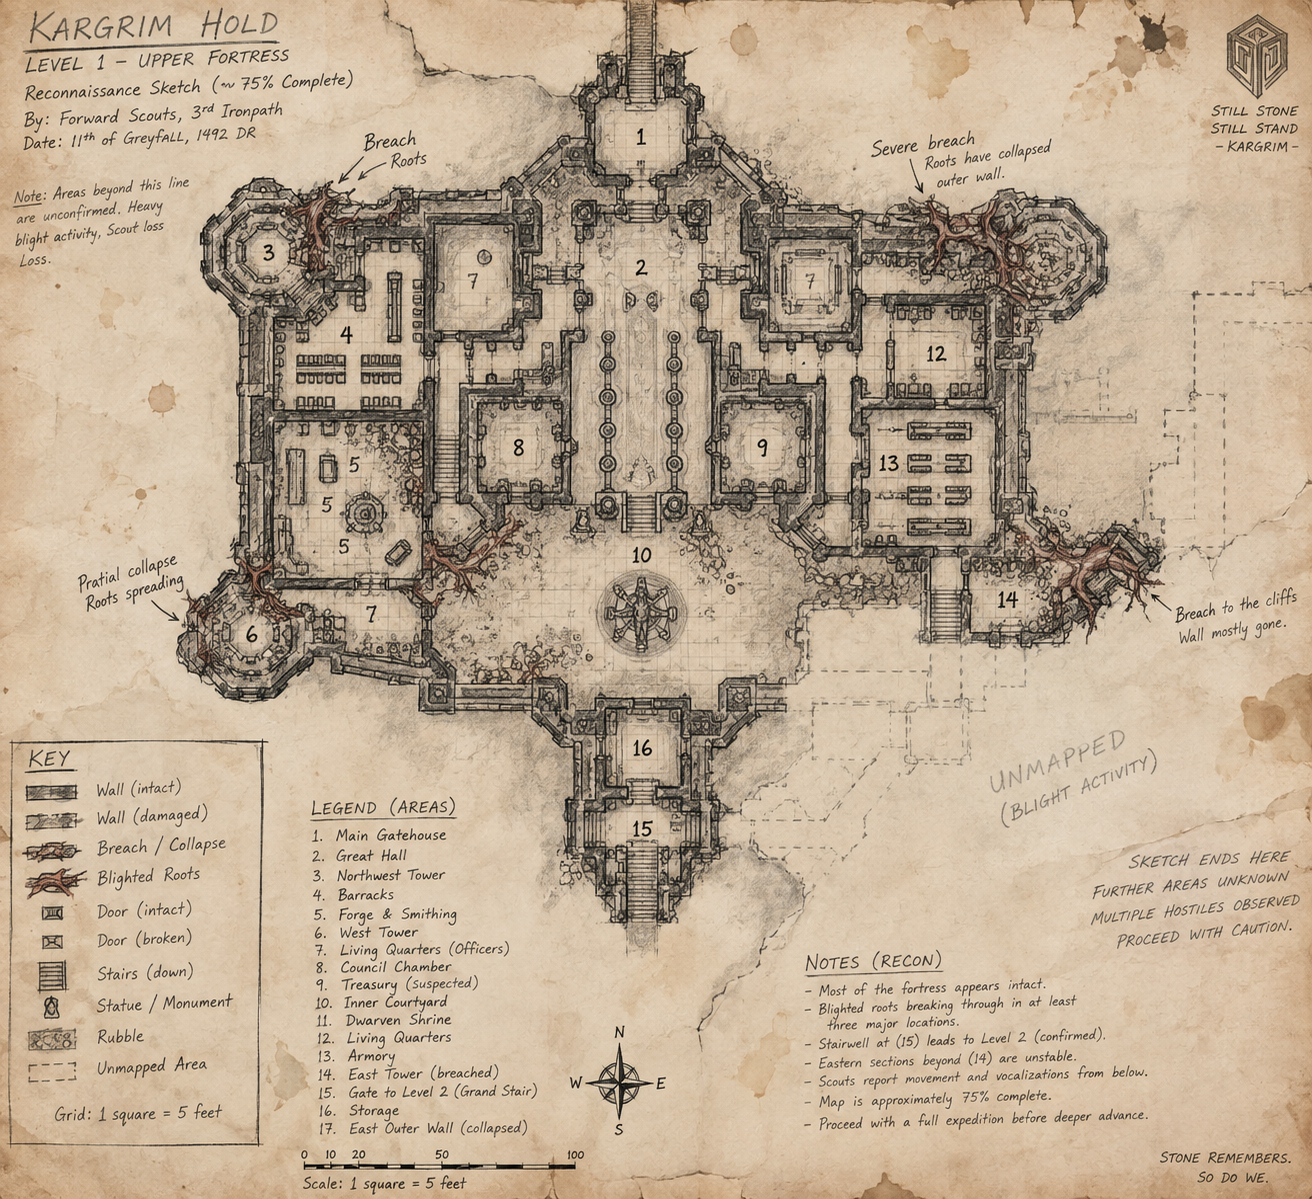
Level One is an invaded ruin. The blight dominates much of the accessible area, but old dwarven traps and defensive mechanisms remain active.

Level Two is an active battlefield. Surviving dwarven defenses are fighting the creatures that have penetrated deeper into the fortress.

Level Three contains the fortress systems needed to restore Barak Thuld's major defenses.

Level Four is optional. It represents an older or more deeply sealed section of Barak Thuld that is not required to complete the main mission.

                           BARAK THULD
                      ROUGH DUNGEON STRUCTURE

                    [ FEY MILITARY OUTPOST ]
                              |
                              v
                 ==========================
                 LEVEL 1 — THE BREACHED HOLD
                 ==========================
                    |
          Ancient breach / blight entry
                    |
        +-----------+------------+
        |                        |
   Overrun halls            Dwarven traps
        |                        |
        +-----------+------------+
                    |
             Descent to Level 2
                    |
                    v
                 ==========================
                 LEVEL 2 — THE WAR LEVEL
                 ==========================
                    |
        Dwarven defenders  <---->  Blight
                    |
              Find the ancient
              dwarven defender
                    |
                    v
              THREE-PART MISSION
                    |
         1. Restore fortress defenses
                    |
                    v
                 ==========================
                 LEVEL 3 — DEEP DEFENSES
                 ==========================
                    |
           Reactivate defense systems
                    |
          Optional access to Level 4
                    |
                    v
                 ==========================
                 LEVEL 4 — OPTIONAL DEPTHS
                 ==========================
                    |
          Exploration / secrets / reward
                    |
                    v
              Return to Level 2
                    |
         2. Drive out the blight
                    |
                    v
              Fight toward Level 1
                    |
         3. Seal the ancient breach
                    |
                    v
                 MISSION COMPLETE
  

Level One — The Breached Hold

An ancient wound reopened

The upper level of Barak Thuld has suffered the greatest direct exposure to the forest and the blight. Roots have penetrated cracked stonework. Black sap stains old carvings. Fungal growth and corrupted vegetation push through corridors that were once dry, square, and meticulously constructed.

This is the portion of the fortress most thoroughly overrun.

That does not make it undefended.

The first corridor beyond the breach is unmistakably dwarven.

Every block is cut square. Every joint was once tight enough to disappear. The ceiling is low, the walls thick, and shallow channels along the floor lead toward drains hidden beneath iron grates.

But the forest has forced its way inside.

Roots split the stone. Pale growth hangs from the ceiling. Blackened vines twist through old arrow slits and around doors that have not opened in centuries.

Beneath it all, somewhere deeper in the fortress, metal strikes stone.

Level One Themes

Level One should alternate between areas visibly controlled by the blight and areas where ancient dwarven defenses remain dangerous to anything moving through the fortress.

Level One Elements

☐ Blighted creatures nesting in abandoned guardrooms and halls.
☐ Roots and corrupted growth spreading inward from the original breach.
☐ Pressure plates, murder passages, falling barriers, firing mechanisms, and other dwarven traps that remain functional.
☐ Evidence that something deeper in the fortress is still actively resisting the invasion.
☐ Signs of recent fighting leading toward Level Two.

Suggested Level One Layout

                   LEVEL 1 — THE BREACHED HOLD

                       [Ancient Breach]
                              |
                              v
                     +----------------+
                     | 1A Broken Gate |
                     +----------------+
                        /          \
                       /            \
              +-----------+      +-----------+
              | 1B Guard  |      | 1C Kill  |
              | Chambers  |      | Corridor  |
              +-----------+      +-----------+
                    |                  |
                    |             [Active Trap]
                    |                  |
                    +---------+--------+
                              |
                     +----------------+
                     | 1D Root Hall   |
                     | Blight Nest    |
                     +----------------+
                              |
                    +---------+---------+
                    |                   |
             +-------------+     +-------------+
             | 1E Barracks |     | 1F Arsenal  |
             | Overgrown   |     | Sealed      |
             +-------------+     +-------------+
                    |                   |
                    +---------+---------+
                              |
                     +----------------+
                     | 1G Deep Gate   |
                     +----------------+
                              |
                           LEVEL 2
  

The party does not need to destroy every blighted creature on Level One during the first descent. In fact, some areas should be difficult to secure until the fortress defenses are reactivated later.

Important Structure

The party passes through Level One twice.

The first time, they are explorers moving through an infested ruin. The second time, after restoring Barak Thuld's defenses, they are fighting their way back toward the breach while the fortress itself begins helping them.

Level Two — The War Level

The fortress is still fighting

Level Two reveals that Barak Thuld is not simply abandoned.

Ancient dwarven defenses remain active in scattered sections of the fortress. Construct sentries, sealed guard posts, defensive machinery, and other surviving guardians are engaged in an ongoing battle against the creatures descending from Level One.

Neither side fully controls the level.

The stairs descend into noise.

Steel crashes against stone somewhere ahead. A grinding mechanism turns behind the walls. Something roars, followed by a flash of pale light and the sharp crack of a weapon striking armor.

The corridor opens onto a hall scarred by fresh battle.

Black roots crawl across one wall.

Across the opposite side, ancient dwarven shields still stand locked together beneath a line of burning runes.

Barak Thuld is not dead.

It is at war.

Finding the Defender

Somewhere within Level Two, the party encounters an ancient dwarven defender who has recently awakened in response to the fortress's emergency condition.

For now, use Ragna Stonewake as a working name.

Ragna is not intended to provide a complete history of Barak Thuld. She knows the fortress, understands its defenses, recognizes the current invasion, and knows what must be done to secure it.

Her memories of events outside her duties can remain incomplete.

Do Not Turn Ragna Into a Lore Dump

Ragna exists primarily to give the party a clear operational objective and a dwarven ally inside the fortress. She does not need to explain the Charcoal Wars, the final fate of the garrison, or centuries of regional history.

A dwarven voice cuts through the fighting.

“You. Living ones.”

A woman in battered armor stands behind a half-raised stone barricade. Dust covers her cloak. Old metal plates are fixed across her shoulders, and faint runes glow beneath the scratches in her breastplate.

She looks past you toward the stairs.

“If you came through the upper breach, then the outer seal has failed.”

Her eyes narrow.

“That can still be corrected.”

Ragna's Three-Part Mission

Ragna explains that simply killing the creatures currently inside Barak Thuld will not solve the problem. As long as the ancient breach remains open, more can enter.

The fortress must be restored in the correct order.

Part One — Activate the Defenses

☐ Reach Level Three.
☐ Restart the fortress's major defensive systems.

Part Two — Drive Out the Blight

☐ Return through Level Two.
☐ Break the largest remaining concentrations of blighted creatures.
☐ Fight upward toward the original breach.

Part Three — Seal the Breach

☐ Reach the damaged outer section on Level One.
☐ Complete Barak Thuld's emergency sealing procedure.
☐ Prevent the blight from reentering the fortress.

Suggested Level Two Layout

                      LEVEL 2 — THE WAR LEVEL

                       From Level One
                              |
                              v
                     +----------------+
                     | 2A Shield Hall |
                     +----------------+
                              |
                +-------------+-------------+
                |                           |
       +----------------+          +----------------+
       | 2B Dwarf Line  |          | 2C Blight Den |
       | Active Defense |          | Active Enemy  |
       +----------------+          +----------------+
                |                           |
                +-------------+-------------+
                              |
                     +----------------+
                     | 2D Broken Hall |
                     | No-Man's-Land  |
                     +----------------+
                              |
                     +----------------+
                     | 2E Ragna's Post|
                     +----------------+
                              |
                    +---------+---------+
                    |                   |
             +-------------+     +-------------+
             | 2F Armory   |     | 2G Engine   |
             | Holdout     |     | Approach    |
             +-------------+     +-------------+
                    |                   |
                    +---------+---------+
                              |
                           LEVEL 3
  

Level Three — The Deep Defenses

Restart the fortress

Level Three contains the mechanisms that once allowed Barak Thuld's defenders to control the fortress above them.

The blight has reached this level, but it has not yet overrun it. The primary danger here comes from damaged machinery, dormant defenses that do not recognize the party, sealed sections, and small groups of blighted creatures attempting to disable the fortress from within.

The Defense Network

The exact technology can remain somewhat fantastical, but the system should feel dwarven: redundant, physical, heavily protected, and designed to continue functioning even when individual components fail.

Restoring the defense network requires activating three stations.

Defense Station I — The Stone Lung

☐ Restore the pressure and ventilation system that powers internal mechanisms.

Defense Station II — The Watch Engine

☐ Return identification and targeting functions to the fortress defenses.

Defense Station III — The Gate Heart

☐ Restore power to barriers, shutters, traps, and the emergency sealing system.

Once all three stations are active, Barak Thuld begins responding.

Something moves beneath your feet.

Not an earthquake.

Machinery.

A deep pulse travels through the stone. Somewhere above, gears begin to turn. Iron shutters slam into place. Old channels open with a rush of air that sends centuries of dust boiling through the corridor.

One by one, lines of dwarven runes ignite along the walls.

Barak Thuld wakes.

Suggested Level Three Layout

                    LEVEL 3 — THE DEEP DEFENSES

                         From Level Two
                               |
                               v
                      +----------------+
                      | 3A Engine Gate |
                      +----------------+
                               |
                +--------------+--------------+
                |                             |
        +---------------+             +---------------+
        | 3B Stone Lung |             | 3C Watch      |
        | Station       |             | Engine        |
        +---------------+             +---------------+
                |                             |
                +--------------+--------------+
                               |
                      +----------------+
                      | 3D Central     |
                      | Mechanism Hall |
                      +----------------+
                               |
                      +----------------+
                      | 3E Gate Heart  |
                      +----------------+
                               |
                +--------------+--------------+
                |                             |
          Return upward                 Optional descent
          to Level Two                    to Level Four
  

The Return Through Barak Thuld

The fortress joins the battle

Once Level Three is active, the dungeon changes.

The party retraces its route through Level Two and Level One, but the return is not simply a repeat of earlier rooms. Doors close behind invading creatures. Defensive slits open. Stone barriers divide enemy groups. Construct defenders advance from previously sealed positions.

At the same time, the blight reacts aggressively. Creatures that had been scattered through the fortress begin retreating toward the breach, while stronger entities attempt to hold open their route to the surface.

Second Pass, Different Dungeon

Reuse familiar locations, but change their tactical conditions. A chamber that was dangerous because of a dwarven trap on the way down might become advantageous when that same mechanism is now operating under Ragna's control.

Sealing the Breach

The Emergency Stone-Seal Procedure

Reaching the breach is not enough. The damaged section is too large to close with an ordinary door and too unstable to repair during battle.

Barak Thuld therefore possesses an emergency system intended to permanently isolate a compromised outer section.

Ragna calls it the Stone-Seal Procedure.

It requires three actions performed at separate control points around the breached section.

Step One — Release the Anchors

☐ Open the ancient locking housings built into the surrounding walls.

Step Two — Set the Seal Stones

☐ Activate the rune-marked stone masses positioned above and beside the damaged passage.

Step Three — Strike the Closure

☐ Trigger the central mechanism, dropping and driving the seal stones into the breached section.

The final procedure can serve as the climax of the dungeon. While some party members operate the mechanisms, others must prevent blighted creatures from interrupting the sequence.

Each completed step makes the battlefield smaller.

The first closes secondary cracks. The second cuts off portions of the breach. The third brings the main seal down.

Stone screams against stone.

The first block drops from above and strikes hard enough to shake dust from the ceiling. A second slides sideways through the broken wall. Ancient runes flare across both surfaces as the gap narrows.

Roots snap.

Black growth writhes between the closing stones.

Then the final mechanism engages.

The entire outer section of Barak Thuld seems to move.

With one final grinding impact, the old wound disappears behind a wall of interlocked stone.

Once the Stone-Seal Procedure is complete, the blight no longer has a route into Barak Thuld from the forest.

Level Four — Optional Depths

Something the mission does not require

Level Four is optional and should not be required to activate the defenses or seal the breach.

Its purpose is to reward players who want to push deeper into Barak Thuld. The entrance can become accessible once the Gate Heart is restored on Level Three.

This level should feel different from the active war above. It has remained sealed longer, suffered less damage, and contains material the original defenders considered important enough to isolate.

Possible Uses for Level Four

☐ An intact dwarven vault containing treasure or equipment.
☐ A command archive with incomplete records from the fortress's final period of operation.
☐ A sealed workshop containing a unique dwarven mechanism.
☐ A dangerous guardian that has no connection to the current blight.
☐ A future-adventure hook that can be ignored without affecting the current mission.
                     LEVEL 4 — OPTIONAL DEPTHS

                       From Level Three
                              |
                              v
                     +----------------+
                     | 4A Sealed Gate |
                     +----------------+
                              |
                  +-----------+-----------+
                  |                       |
           +-------------+         +-------------+
           | 4B Archive  |         | 4C Workshop |
           +-------------+         +-------------+
                  |                       |
                  +-----------+-----------+
                              |
                     +----------------+
                     | 4D Deep Vault  |
                     +----------------+
                              |
                     Optional Discovery
  
Level Four Is Not Required

Nothing necessary to complete the Court of Seasons quest should be placed here. If the party ignores this level, they can still fully restore the defenses, drive out the blight, seal the breach, and return successfully.

Mission Flow

      COURT OF SEASONS
             |
             | Antidote delivered
             | Court dispatches war parties
             v
      FEY MILITARY OUTPOST
             |
             | Rest / Supplies / Information
             v
      LEVEL 1 — BREACHED HOLD
             |
             | Blight + Ancient Traps
             v
      LEVEL 2 — ACTIVE WARZONE
             |
             | Find Ragna Stonewake
             v
      MISSION PART 1
      ACTIVATE DEFENSES
             |
             v
      LEVEL 3 — DEFENSE NETWORK
             |
             | Stone Lung
             | Watch Engine
             | Gate Heart
             v
      BARAK THULD REACTIVATES
             |
             v
      OPTIONAL LEVEL 4
             |
             v
      MISSION PART 2
      DRIVE OUT THE BLIGHT
             |
             | Fight back through Level 2
             | Fortress defenses now assist
             v
      LEVEL 1
             |
             v
      MISSION PART 3
      STONE-SEAL PROCEDURE
             |
             | Release Anchors
             | Set Seal Stones
             | Strike Closure
             v
      BREACH SEALED
             |
             v
      RETURN TO WAR CAMP
             |
             v
      RETURN TO COURT OF SEASONS
  

Adventure End State

The party does not need to reclaim Barak Thuld for the dwarves, solve its history, or explore every sealed chamber.

Success means that the major defensive systems are active again, the blighted creatures occupying the fortress have been broken or driven out, and the old breach has been permanently sealed.

Ragna and the surviving defenses can remain within Barak Thuld after the party departs.

Outside, the Court's war parties continue using the antidote against the seedlings spreading through the Palakar.

Barak Thuld is no longer another front in that war.
Barak Thuld — Level Two

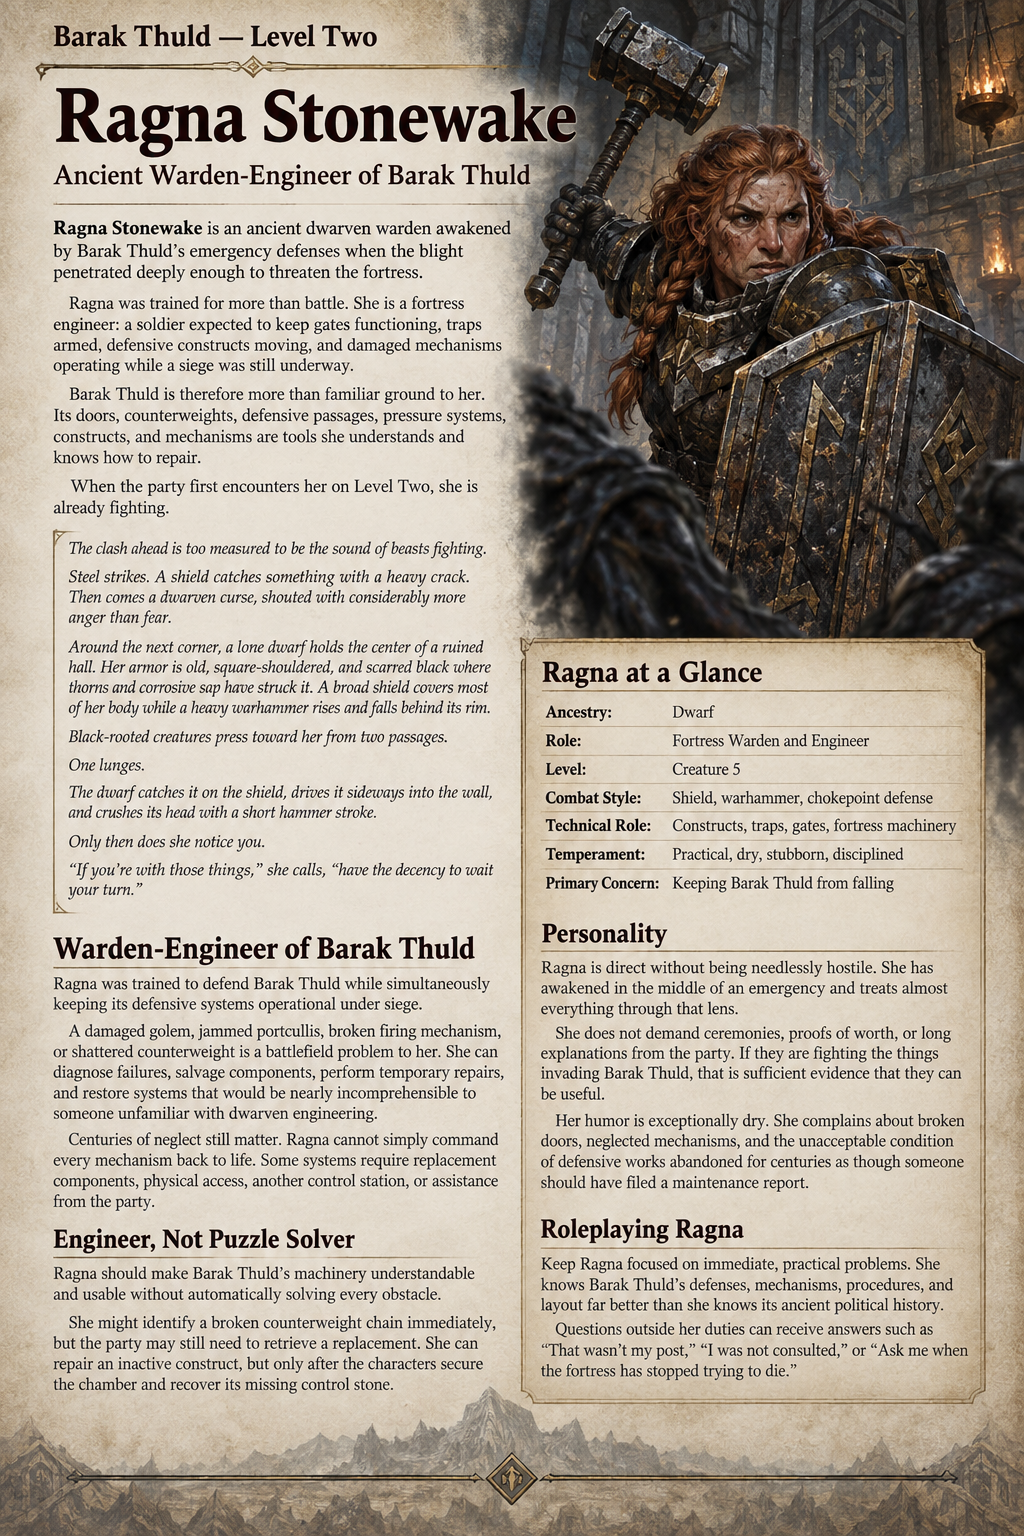
Ragna Stonewake

Ancient Warden-Engineer of Barak Thuld

Ragna Stonewake is an ancient dwarven warden awakened by Barak Thuld's emergency defenses when the blight penetrated deeply enough to threaten the fortress.

Ragna was trained for more than battle. She is a fortress engineer: a soldier expected to keep gates functioning, traps armed, defensive constructs moving, and damaged mechanisms operating while a siege was still underway.

Barak Thuld is therefore more than familiar ground to her. Its doors, counterweights, defensive passages, pressure systems, constructs, and mechanisms are tools she understands and knows how to repair.

When the party first encounters her on Level Two, she is already fighting.

The clash ahead is too measured to be the sound of beasts fighting.

Steel strikes. A shield catches something with a heavy crack. Then comes a dwarven curse, shouted with considerably more anger than fear.

Around the next corner, a lone dwarf holds the center of a ruined hall. Her armor is old, square-shouldered, and scarred black where thorns and corrosive sap have struck it. A broad shield covers most of her body while a heavy warhammer rises and falls behind its rim.

Black-rooted creatures press toward her from two passages.

One lunges.

The dwarf catches it on the shield, drives it sideways into the wall, and crushes its head with a short hammer stroke.

Only then does she notice you.

“If you're with those things,” she calls, “have the decency to wait your turn.”

Ragna at a Glance

Ancestry: Dwarf

Role: Fortress Warden and Engineer

Level: Creature 5

Combat Style: Shield, warhammer, chokepoint defense

Technical Role: Constructs, traps, gates, fortress machinery

Temperament: Practical, dry, stubborn, disciplined

Primary Concern: Keeping Barak Thuld from falling

Personality

Ragna is direct without being needlessly hostile. She has awakened in the middle of an emergency and treats almost everything through that lens.

She does not demand ceremonies, proofs of worth, or long explanations from the party. If they are fighting the things invading Barak Thuld, that is sufficient evidence that they can be useful.

Her humor is exceptionally dry. She complains about broken doors, neglected mechanisms, and the unacceptable condition of defensive works abandoned for centuries as though someone should have filed a maintenance report.

Roleplaying Ragna

Keep Ragna focused on immediate, practical problems. She knows Barak Thuld's defenses, mechanisms, procedures, and layout far better than she knows its ancient political history.

Questions outside her duties can receive answers such as “That wasn't my post,” “I was not consulted,” or “Ask me when the fortress has stopped trying to die.”

Warden-Engineer of Barak Thuld

Ragna was trained to defend Barak Thuld while simultaneously keeping its defensive systems operational under siege.

A damaged golem, jammed portcullis, broken firing mechanism, or shattered counterweight is a battlefield problem to her. She can diagnose failures, salvage components, perform temporary repairs, and restore systems that would be nearly incomprehensible to someone unfamiliar with dwarven engineering.

Centuries of neglect still matter. Ragna cannot simply command every mechanism back to life. Some systems require replacement components, physical access, another control station, or assistance from the party.

Engineer, Not Puzzle Solver

Ragna should make Barak Thuld's machinery understandable and usable without automatically solving every obstacle.

She might identify a broken counterweight chain immediately, but the party may still need to retrieve a replacement. She can repair an inactive construct, but only after the characters secure the chamber and recover its missing control stone.

What Ragna Knows

☐ The upper fortress has been breached.
☐ The blight has penetrated Level One and established positions on Level Two.
☐ Barak Thuld's major defensive network is currently inactive.
☐ The defense network can be restored from Level Three.
☐ The ancient breach cannot be permanently sealed until the defense network is functioning.
☐ Once activated, the fortress can help force the invading creatures back toward the breach.

Ragna's Plan

Ragna quickly reduces the situation to three objectives.

“First, we wake the fortress.”

“Then we kill everything in it that shouldn't be here.”

“Then we close the hole they came through.”

She looks toward the fighting behind her.

“In that order.”

Engineering Expertise

☐ Dwarven Constructs: Diagnose, repair, restart, and perform field maintenance on Barak Thuld's defensive constructs.
☐ Fortress Traps: Identify, disable, reset, bypass, or repair dwarven mechanical traps.
☐ Doors and Gates: Repair locks, counterweights, portcullises, shutters, barriers, and emergency gates.
☐ Defense Machinery: Restore firing mechanisms, pressure systems, moving barriers, signaling equipment, and similar fortress systems.
☐ Structural Diagnosis: Recognize weakened masonry, damaged supports, unsafe ceilings, and locations where deliberate reinforcement or collapse could alter a battlefield.
☐ Improvised Repair: Salvage intact parts from damaged mechanisms or destroyed constructs to restore another system.

Using Ragna with the Party

Ragna can accompany the party through Barak Thuld, but she should function as a supporting NPC rather than another full player character.

In combat, she holds chokepoints, protects vulnerable characters, and prevents enemies from surrounding the group. She should rarely be the party's primary source of damage.

During exploration, she understands where the party needs to go and what many dwarven mechanisms were designed to do, but she does not automatically remove the obstacles encountered along the way.

Keep the PCs in Charge

Ragna knows the mission. The players decide how to accomplish it.

She can identify a defense station without knowing why centuries of damage have jammed its controls. She can recognize a trap without automatically reaching its mechanism. She can tell the party where a passage once led even if that passage has since collapsed.

Ragna Stonewake

Creature 5

Unique Medium Dwarf Humanoid

Perception +12; darkvision

Languages Common, Dwarven

Skills Athletics +14, Crafting +15, Engineering Lore +15, Warfare Lore +13, Barak Thuld Lore +15, Intimidation +11

Str +4, Dex +1, Con +4, Int +3, Wis +3, Cha +1


AC 22; 24 while her shield is raised

Fort +15, Ref +10, Will +12

HP 78

Shield Hardness 7, HP 28, BT 14

Speed 20 feet

Hold the Passage [reaction]

Trigger A creature within Ragna's reach uses a move action to move past her or moves toward one of Ragna's allies.

Ragna makes a warhammer Strike against the triggering creature. On a hit, the creature's movement ends in the square where it was struck.

Shield Warden [reaction]

Trigger Ragna or an adjacent ally would take physical damage while Ragna has her shield raised.

Ragna interposes her shield. Reduce the damage by the shield's Hardness. Apply the remaining damage normally.


Melee

Warhammer +15, damage 2d8+7 bludgeoning.

Shield Boss +14, damage 2d6+7 bludgeoning.

Fortress Warden [one-action]

Ragna Raises her Shield and chooses one ally within 15 feet. Until the start of Ragna's next turn, that ally gains a +1 circumstance bonus to AC while adjacent to a wall, doorway, barricade, or other solid defensive position.

Drive Them Back [two-actions]

Ragna makes a warhammer Strike. If the Strike hits, she can immediately attempt to Shove the target. The Shove uses the same multiple attack penalty as the Strike.

Against a blighted creature, Ragna gains a +1 circumstance bonus to the Athletics check.

Fortress Engineer

Ragna can use Crafting or Engineering Lore to identify, repair, operate, or restore dwarven mechanical systems within Barak Thuld.

When appropriate, she can use Engineering Lore instead of Thievery to disable, bypass, or reset a purely mechanical dwarven trap.

This ability does not automatically bypass magical wards, unknown non-dwarven devices, or mechanisms missing essential components.

Emergency Repair [three-actions]

Manipulate

Ragna rapidly works on an adjacent dwarven construct, trap, or mechanical defense. She attempts a Crafting check against an appropriate DC.

Critical Success A construct regains 3d8+15 Hit Points, or a damaged mechanism immediately returns to full operation if it can reasonably be repaired in place.

Success A construct regains 2d8+10 Hit Points, or basic operation is restored to a damaged mechanism.

Failure The repair does not take hold.

Critical Failure The mechanism jams or the repair fails completely. Ragna must spend at least 10 minutes correcting the problem before attempting another Emergency Repair on that target.

Restore Defensive Construct

Ragna can spend 10 minutes repairing an inactive Barak Thuld construct whose essential components remain intact.

She attempts a Crafting check against a DC appropriate to the construct. On a success, the construct becomes functional with approximately half its normal Hit Points. On a critical success, it returns with nearly full functionality.

A badly damaged construct can require a replacement component before this activity can be attempted.

Reset Dwarven Defense

Ragna can spend 1 minute working on a disabled dwarven trap or defensive mechanism.

If the device is structurally intact, a successful Crafting or Engineering Lore check resets it. Damaged mechanisms might require replacement parts or additional time.

Jury-Rig the Fortress [two-actions]

Frequency once per encounter

Ragna performs an immediate battlefield repair or override on nearby Barak Thuld machinery. The exact effect depends on the surrounding mechanisms.

Possible effects include forcing a damaged door closed, raising a partial stone barrier, dropping a portcullis, releasing a counterweight, restarting a firing mechanism, activating a warning rune, or giving a damaged allied construct one final round of operation.

Barak Thuld Command

Ragna is recognized by surviving fortress systems as an authorized defender.

Once the Level Three defense network has been restored, she can activate designated doors, barriers, traps, and defensive mechanisms where the adventure specifically allows it.

This authority does not repair damaged systems or bypass mechanisms that require physical restoration.

Combat Behavior

Ragna fights like someone trained to defend corridors rather than chase enemies. She puts stone at her back, keeps opponents in front of her, and forces attackers to go through her to reach the rest of the group.

Typical Priorities

1. Establish a defensible position and Raise her Shield.
2. Keep enemies away from vulnerable party members.
3. Use Drive Them Back to clear doors and narrow passages.
4. Use fortress machinery whenever doing so provides a tactical advantage.
5. Repair allied constructs or defenses when that is more valuable than making another attack.
6. Fall back rather than pursue enemies into unsecured sections of the fortress.

Engineering During the Expedition

Damaged systems discovered while descending through Barak Thuld can become optional objectives. Repairing them gives the party advantages when they later fight their way back toward the breach.

Possible Repairs

☐ Repair a damaged stone guardian on Level Two. It later reinforces the dwarven defensive line.
☐ Restore a trap on Level One. During the return journey, the party can use it against retreating blight creatures.
☐ Repair a broken portcullis that can later divide a large group of enemies.
☐ Reconnect an old signaling system, allowing Ragna to communicate with surviving constructs elsewhere in Barak Thuld.
☐ Restore a ventilation or pressure conduit needed by a Level Three defense station.
☐ Salvage usable components from a destroyed construct to repair another.
Repairs Should Matter Later

Wherever possible, let repairs made during the descent visibly affect the return journey. A restored golem might be holding a junction. A repaired portcullis might cut off reinforcements. A reset trap might fire into the blight as the party retreats toward Level One.

This makes the expedition feel like the party is gradually restoring Barak Thuld rather than simply clearing rooms.

Why She Needs the Party

Ragna is capable, but Barak Thuld is too large and too badly compromised for one defender to restore alone.

Since awakening, she has spent most of her time keeping the defensive line on Level Two from collapsing completely. Every attempt to move deeper into the fortress risks surrendering ground behind her.

The party gives her something she has not had since awakening: enough mobile strength to stop merely containing the invasion and begin restoring the fortress.

“I've been winning this corridor for quite some time.”

Ragna glances at the black growth creeping over the far wall.

“The problem is that the corridor doesn't appear to have noticed.”

Barak Thuld Sketch
Barak Thuld
Barak Thuld - Level 1
Barak Thuld - Level 2
Barak Thuld - Level 3
Ragna Stonewake

Read-only syndicated snapshot · Syndicated Oct 28, 2026, 6:09 PM. Content updates when the author syndicates again in Adventure Maker.

Made with Amba. Want to try it? Check out Amba — free to use.