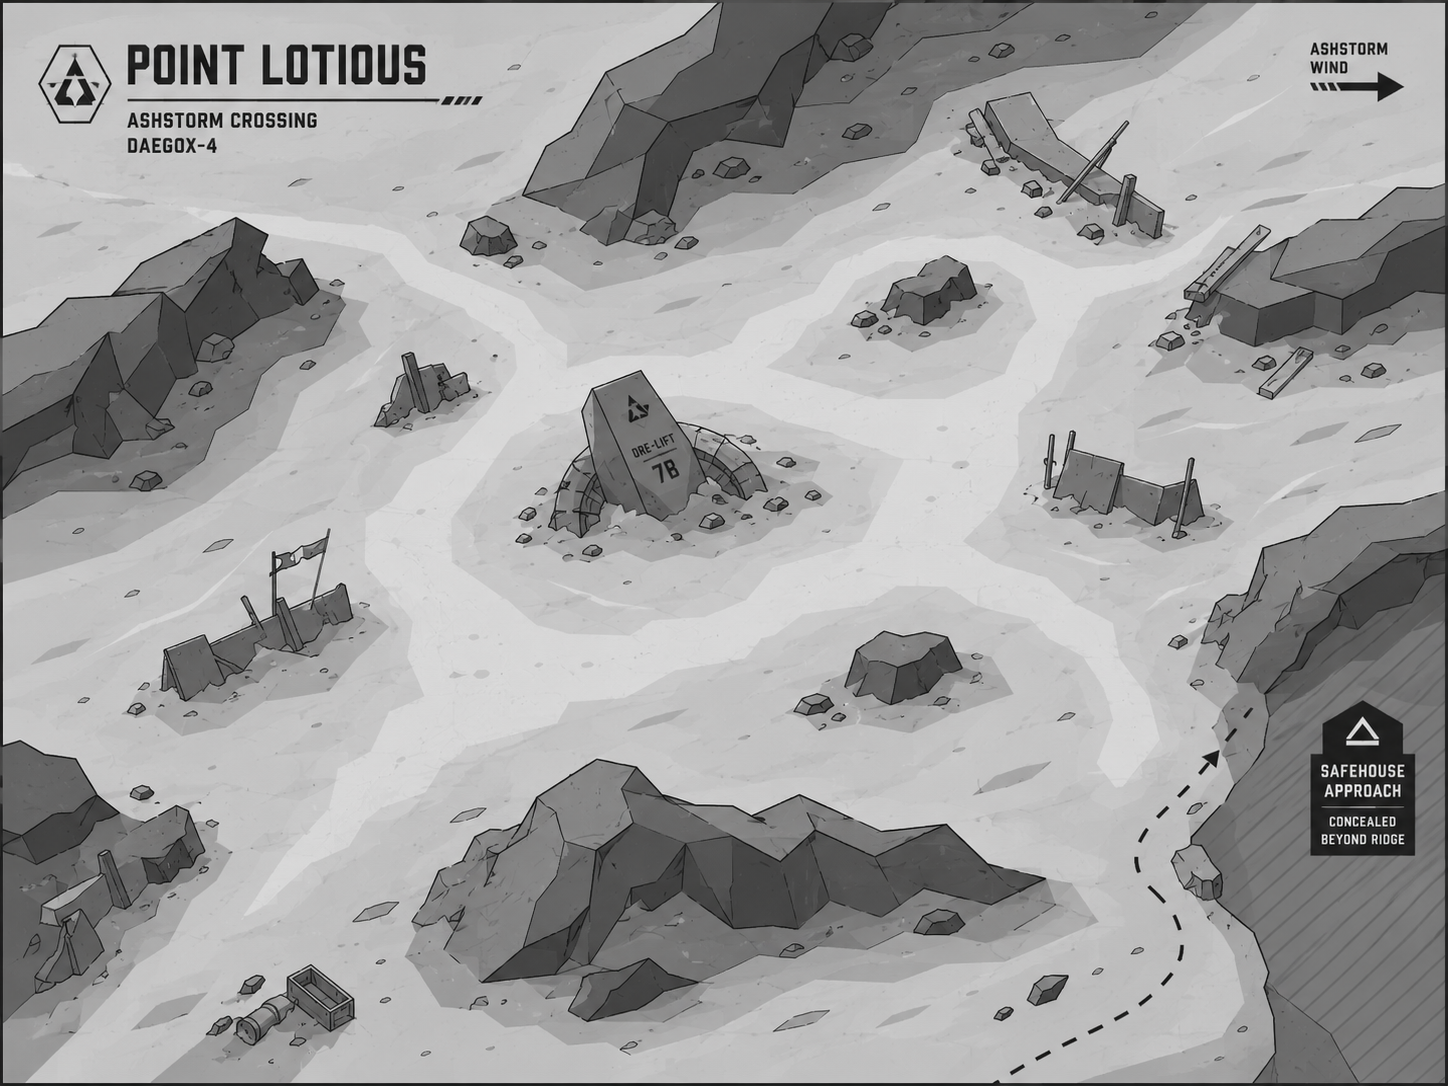
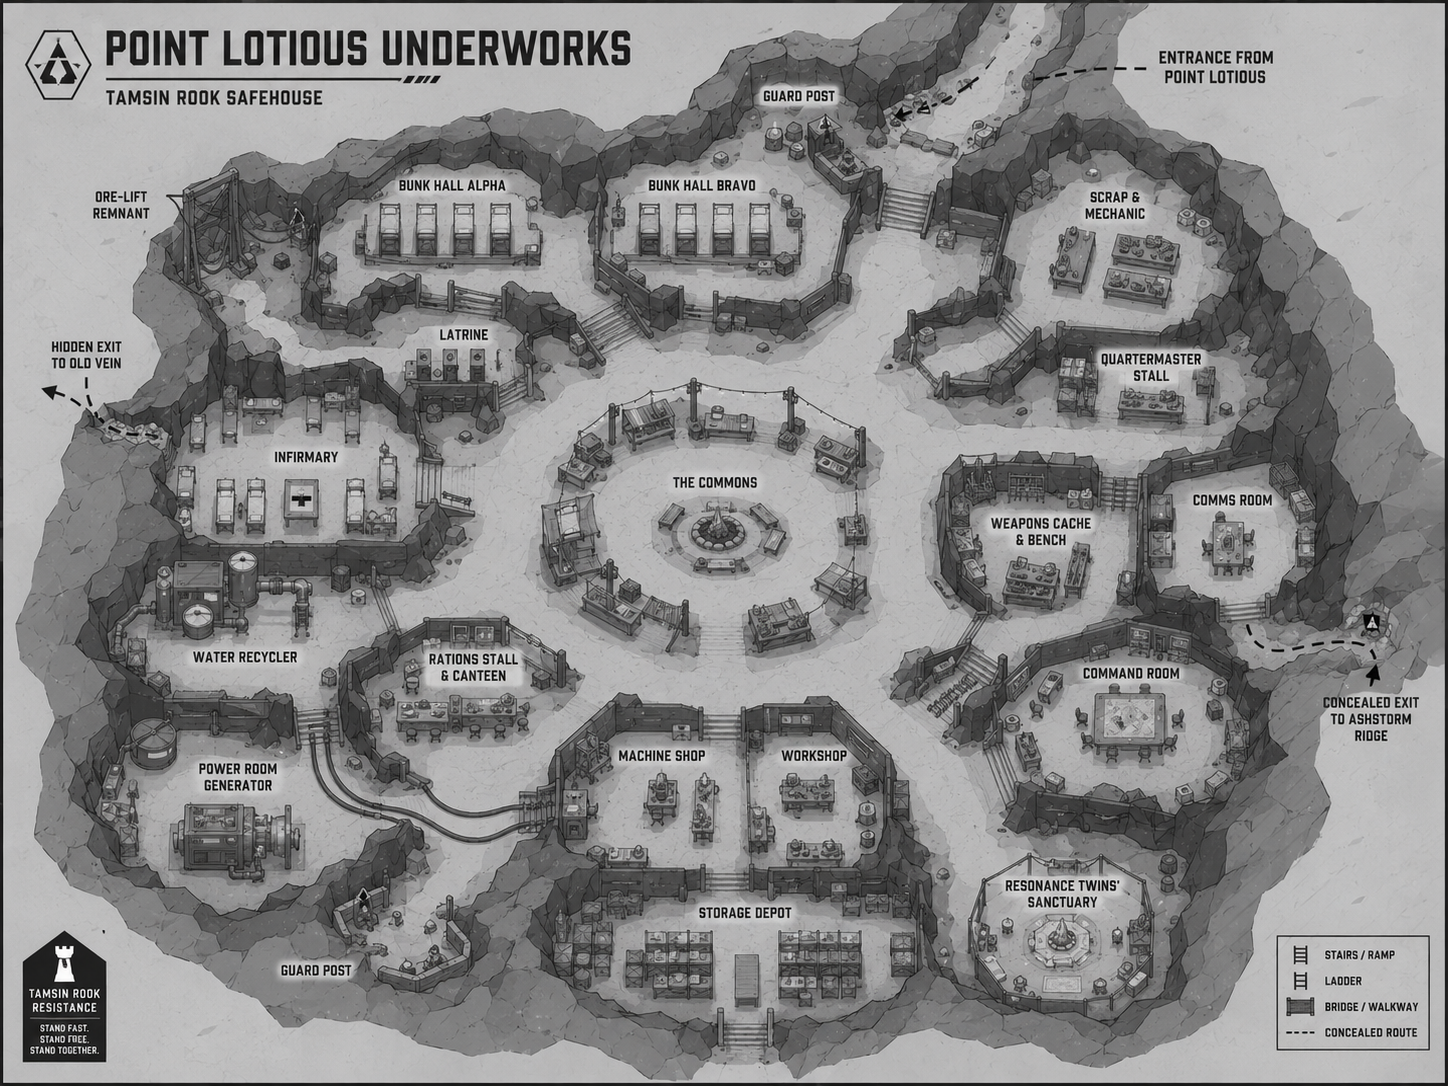
Act 2 — Planetary Evasion
Act 2 — Planetary Evasion
The crew must cross Daegox-4 while Helix Meridian turns the entire prison economy against them. Track Network Heat from 0 to 6. Heat rises when the crew uses monitored infrastructure, leaves witnesses who can identify them, or allows prison systems to complete a scan. It falls when the crew destroys a tracking chain, plants false evidence, or secures help from local communities.
| Planned Scene | Level | Core Choice |
|---|---|---|
| 1. The Hollow Vein | 2 | Trust Rook, negotiate independence, or take the twins elsewhere. |
| 2. Ghost Path / Force Path | 2 | Quiet environmental route versus direct route through corporate checkpoints. |
| 3. Dust Basin Settlement | 2 | Acquire supplies without exposing the safehouse network. |
| 4. Landing Pad 4 | 2 → 3 | Steal the blockade-runner, sabotage pursuit craft, and decide who escapes with the crew. |
Act 2 — The Rook Road
Level Range: 2–4 Primary Goal: Reach a hidden Tamsin Rook spaceport and escape Daegox-4 Structure: Open-route journey across the planet using safehouses, vehicles, wilderness paths, and covert transit corridors
Act Overview
Point Lotious is only the first link in a much larger resistance network.
The Tamsin Rooks maintain scattered refuges across Daegox-4: abandoned mines, buried worker shelters, disguised trading posts, mobile repair camps, and hidden settlements built inside old industrial ruins. Together, these locations form an underground route used to move escaped prisoners, defectors, witnesses, and contraband beyond Helix Meridian’s reach.
The party’s destination is Rookhaven Spaceport, a concealed launch facility built beneath an abandoned ore-processing basin.
Reaching it requires crossing several hundred kilometers of controlled territory.
The party does not need to visit every safehouse. Instead, the GM presents a regional route map with branching paths. Each safehouse offers a different advantage, but visiting more locations also gives Helix Meridian more opportunities to track the group.
The core decisions are:
- Travel quickly or remain concealed.
- Preserve vehicles or abandon them.
- Help threatened Rook cells or continue toward the spaceport.
- Trust local contacts or verify their identities.
- Keep the twins hidden or use their powers openly.
- Reduce Network Heat or accept pursuit in exchange for speed.
Regional Route Map
Act 2 should use a node-based regional map.
Point Lotious begins near the center-west of the map. Rookhaven Spaceport lies along the eastern edge beyond corporate-controlled mining territory.
The map should include approximately seven safehouse locations, but most groups will visit only three or four.
| Location | Type | Main Challenge | Benefit |
|---|---|---|---|
| Point Lotious | Underground settlement | Recovery and preparation | Starting supplies and route intelligence |
| Dustwell Station | Buried water depot | Environmental survival | Water, filters, and desert vehicles |
| The Walking Yard | Mobile crawler settlement | Vehicle repair and navigation | Heavy transport and mobile concealment |
| Glassroot Caverns | Natural cave refuge | Native wildlife | Low-Heat wilderness route |
| Relay Kestrel | Communications shelter | Prison signal interception | Patrol maps and false credentials |
| Red Quarry | Disguised worker camp | Corporate infiltration | Weapons, labor contacts, and explosives |
| Saint Ardin’s Rest | Medical and refugee shelter | Resource strain | Healing, guides, and rescued prisoners |
| Blackrail Junction | Abandoned mag-rail hub | Technical restoration | Fast route toward the spaceport |
| Rookhaven Spaceport | Hidden launch base | Siege and extraction | Escape from Daegox-4 |
Route One — The Dust Road
Style: Vehicles, exposure, pursuit Likely Stops: Dustwell Station, Walking Yard, Red Quarry
The Dust Road follows old mining routes across open ash plains.
It is the fastest conventional route, but it offers little concealment. Corporate aircraft, prison search vehicles, and orbital scans can detect travelers who remain exposed too long.
Typical Challenges
- Repairing or stealing a functioning ground vehicle
- Navigating ash dunes that bury roads overnight
- Outrunning prison interceptors
- Crossing a collapsed industrial bridge
- Protecting a slow refugee convoy
- Choosing whether to spend fuel avoiding checkpoints
- Surviving a vehicle breakdown during an ashstorm
Route Benefit
The party reaches Rookhaven quickly and may arrive with a functioning combat-capable vehicle.
Route Risk
Network Heat rises rapidly unless the party creates false trails or disables surveillance systems.
Route Two — The Deep Road
Style: Stealth, exploration, native life Likely Stops: Glassroot Caverns, Saint Ardin’s Rest, Blackrail Junction
The Deep Road passes through natural caverns, abandoned mine tunnels, and subterranean river channels.
Helix Meridian patrols rarely enter these regions, but the tunnels are unstable and occupied by native creatures.
Typical Challenges
- Crossing underground chasms
- Navigating without reliable signals
- Avoiding territorial predators
- Repairing ancient mine elevators
- Passing through flooded mineral caverns
- Protecting the twins from resonance-sensitive wildlife
- Choosing whether to rescue trapped miners or conserve supplies
Route Benefit
The party can cross large sections of Daegox-4 without increasing Network Heat.
Route Risk
Travel is slow, and damaged passages can trap the group far from help.
Route Three — The Ghost Line
Style: Technical infiltration, disguises, rail travel Likely Stops: Relay Kestrel, Red Quarry, Blackrail Junction
The Ghost Line uses abandoned communication relays, maintenance roads, and sections of the old ore-transport network.
This route passes closer to active Helix Meridian installations but allows skilled characters to manipulate the corporation’s own systems.
Typical Challenges
- Forging transport authorizations
- Rebuilding a mag-rail engine
- Redirecting automated cargo shipments
- Passing inspection checkpoints
- Hiding the twins inside industrial freight
- Spoofing prison tracking signals
- Discovering a corporate operative inside a Rook cell
Route Benefit
Successful technical operations can reduce Network Heat and misdirect corporate pursuit teams.
Route Risk
A single major failure may expose both the party and several safehouses.
Vehicles of Act 2
Vehicles should provide tactical choices without replacing normal character actions.
Ash Skimmer
A light, fast vehicle designed to glide across compact ash.
Use: Scouting, fast travel, courier missions Strength: Speed and maneuverability Weakness: Little protection and limited passenger space
An ash skimmer can carry two to four creatures depending on its design.
Mining Crawler
A large tracked industrial vehicle used to transport equipment and ore.
Use: Convoys, mobile shelter, heavy cargo Strength: Armor, carrying capacity, environmental protection Weakness: Slow and easy to detect
A damaged crawler can become a temporary mobile safehouse.
Rook Sandrail
A modified resistance vehicle built from mining equipment and aircraft components.
Use: Main party transport Strength: Modular upgrades and concealed compartments Weakness: Requires frequent maintenance
Possible upgrades include:
- Reinforced armor
- Signal masking
- Additional fuel storage
- Medical compartment
- Mounted weapon
- Drone rack
- Concealed passenger space
Corporate Interceptor
A Helix Meridian security vehicle designed for pursuit.
Use: Enemy pursuit or captured transport Strength: Fast, armed, and connected to corporate networks Weakness: Constantly trackable unless heavily modified
Capturing an interceptor provides speed but creates an immediate technical problem: removing its surveillance systems.
Ore Tram
An industrial rail vehicle operating on abandoned mining lines.
Use: Rapid long-distance travel Strength: Carries many passengers and supplies Weakness: Restricted to surviving tracks
The ore tram can become the centerpiece of a moving encounter involving drones, track switches, collapsing tunnels, and boarding enemies.
Native Animal Life
Daegox-4 is harsh but not lifeless. Most native creatures are adapted to ash, mineral dust, darkness, and sudden temperature changes.
Ashback Grazer
A large six-legged herbivore covered in overlapping mineral plates.
Ashbacks dig through hardened ash to reach buried fungi and root systems. They are usually calm but become dangerous when protecting young.
Adventure Uses:
- A herd blocks a vehicle route.
- Their migration indicates an approaching storm.
- Poachers have wounded one near a safehouse.
- Their hollowed trails provide shelter from aerial scans.
Glasswing Scavenger
A gliding predator with transparent mineral membranes.
Glasswings ride ashstorm winds and descend on exposed creatures or electrical activity.
Adventure Uses:
- They attack a communications mast.
- They follow the twins’ resonance field.
- A flock surrounds a disabled vehicle.
- Their shed wing material is useful for signal insulation.
Tunnel Maw
A burrowing ambush predator that senses vibration through stone.
Tunnel maws remain beneath old mining roads and strike at heavy vehicles or walking groups.
Adventure Uses:
- A crawler awakens a nesting pair.
- The party must cross without creating vibration.
- A Rook safehouse unknowingly sits above a breeding chamber.
- A captured juvenile may reveal a safer tunnel route.
Ember Mite Swarm
Small heat-seeking insects that nest inside generators and vehicle engines.
They are not dangerous individually, but a swarm can disable machinery and ignite leaking fuel.
Adventure Uses:
- A vehicle overheats during pursuit.
- A safehouse generator becomes infested.
- The mites can be redirected toward corporate equipment.
- Their presence reveals a hidden geothermal vent.
Resonance Stalker
A rare native predator that reacts to gravity disturbances.
It may have been altered by naturally occurring exotic minerals or by leaked corporate waste.
The creature becomes fascinated or enraged when the twins use their abilities.
Adventure Uses:
- It follows the party between safehouses.
- The twins may calm it through controlled resonance.
- Helix Meridian attempts to capture it.
- Its behavior suggests the twins’ powers interact with Daegox-4 itself.
Returning Threat — Prison Pursuit Forces
The Omicron-9 prison does not stop functioning after the escape.
CUSTOS-9 deploys prison recovery teams to reclaim the twins and capture surviving fugitives.
Prison Pursuit Elements
- Cyber-hound tracking packs
- Warden drones
- Automated checkpoints
- Prisoner-transport interceptors
- Contract bounty teams
- Captured prisoners forced to provide information
- Portable resonance-dampening equipment
Prison forces are direct and procedural. They want the twins returned alive but treat most other fugitives as expendable.
CUSTOS-9 continues speaking through public terminals, abandoned machinery, and captured communication channels.
It may offer reduced sentences, medical treatment, or amnesty to characters who betray the twins.
Returning Threat — Corporate Infiltrators
Helix Meridian understands that destroying every safehouse would scatter the Tamsin Rooks and make the twins harder to locate.
Instead, the corporation places agents inside the underground route.
These operatives pose as:
- Escaped prisoners
- Injured Rooks
- Vehicle mechanics
- Refugees
- Traders
- Couriers from another safehouse
- Former corporate workers seeking asylum
Corporate infiltrators gather route information, tag vehicles, sabotage equipment, and identify which Rook cells are sheltering the twins.
Signs of Infiltration
- A contact knows a correct password but uses it unnaturally.
- Equipment has been repaired with corporate-standard components.
- A refugee carries an implant that appears disabled.
- A safehouse receives supplies it never requested.
- Patrols repeatedly arrive shortly after the party leaves.
- Someone asks detailed questions about the twins’ capabilities.
- Route maps contain subtle but dangerous errors.
The infiltrators should not all be obvious villains. Some may be coerced workers, threatened family members, or captured Rooks forced to cooperate.
Network Heat
Network Heat represents how accurately Helix Meridian can track the party.
| Heat | Corporate Response |
|---|---|
| 0–1 | General regional searches |
| 2–3 | Checkpoints and vehicle patrols |
| 4–5 | Safehouse investigations and informants |
| 6–7 | Dedicated pursuit teams |
| 8–9 | Aircraft, orbital scans, and coordinated raids |
| 10 | Rookhaven is directly threatened |
Heat rises when the party:
- Uses the twins’ powers openly
- Fails infiltration checks
- Travels in identifiable vehicles
- Leaves surviving enemies able to report
- Uses compromised communications
- Remains at one safehouse too long
Heat falls when the party:
- Sends false signals
- Changes vehicles
- Destroys tracking devices
- Uses subterranean routes
- Exposes or turns an infiltrator
- Sabotages a regional surveillance node
Suggested Act Progression
Scene 1 — Leaving Point Lotious
The party chooses a route and secures transportation.
This scene introduces the regional map, Network Heat, and the first travel challenge.
Scene 2 — First Safehouse
The party reaches a functioning Rook refuge and sees how the underground route operates.
The location should offer supplies, information, and one optional local problem.
Scene 3 — The Road Tightens
Prison pursuit forces catch up.
This may be a vehicle chase, checkpoint infiltration, cyber-hound attack, or wilderness encounter complicated by active pursuit.
Scene 4 — The Compromised House
The party reaches a safehouse that has been infiltrated or placed under surveillance.
The characters must determine who can be trusted without alerting the operative.
Scene 5 — Broken Route
A planned safehouse is destroyed, abandoned, or inaccessible.
The party must change routes, enter dangerous wilderness, or use a damaged vehicle to continue.
Scene 6 — Blackrail or the Final Crossing
The different routes begin converging.
The party gains its final opportunity to reduce Network Heat, gather allies, or acquire transport for the approach to Rookhaven.
Scene 7 — Rookhaven Spaceport
The party reaches the hidden spaceport, but prison and corporate forces are closing in.
Act 2 ends with the party preparing a ship, defending the launch site, or discovering that an infiltrator has already compromised the escape plan.
Advancement
The party begins Act 2 at level 2.
Suggested advancement:
- Reach level 3 after completing two major safehouse or route challenges.
- Reach level 4 at Rookhaven or immediately after securing the escape ship.
Story XP should reward:
- Preserving safehouses
- Rescuing refugees
- Reducing Network Heat
- Capturing vehicles intact
- Resolving wildlife encounters without unnecessary killing
- Exposing infiltrators
- Keeping the twins hidden
- Recovering evidence of Helix Meridian’s operations
- Bringing additional Rooks safely to Rookhaven
Act 2 Roving Pursuit System
VantaCore and Helix Meridian are represented by separate enemy markers that move across the Act 2 regional map.
Neither faction remains tied to a specific encounter location. Their forces travel between safehouses, routes, settlements, and industrial sites while searching for the twins.
Pursuit Markers
Place two markers on the regional map:
| Marker | Force | Typical Assets |
|---|---|---|
| VantaCore Hunter Cell | Living operatives and mercenaries | Onyx agents, infiltrators, ash skimmers, capture specialists |
| Helix Recovery Pack | Fully automated recovery force | Cyber-hounds, drones, interceptors, restraint platforms |
The markers begin at different map edges or known corporate facilities.
Their exact starting locations can depend on how Act 1 ended.
Floating Across the Map
Each enemy marker occupies a map node but is not attached to a fixed encounter.
At the end of every pursuit interval, each marker can:
- Move one connected route toward the party.
- Investigate its current node.
- Remain in place to establish surveillance.
- Move toward a detected safehouse.
- Follow a false trail created by the party.
- Move toward Rookhaven if it loses the party completely.
Enemy markers do not need to use the same routes as the party. Helix drones may cross exposed terrain, while VantaCore operatives may use vehicles, bribed contacts, or commercial routes.
The GM should normally keep the markers visible. The players may know where enemy forces were last reported without knowing exactly what those forces intend to do next.
Pursuit Interval
Make one pursuit check after:
- Every four hours of significant travel
- Every completed route segment
- Every extended rest outside a secure safehouse
- Any major use of the twins’ resonance powers
- Any loud vehicle encounter or open firefight
Only make one check when several triggers happen during the same scene.
A quiet night inside an uncompromised safehouse does not normally require a pursuit check.
Heat Index
Heat measures how accurately the two enemy factions can track the party.
| Heat | Pursuit Condition |
|---|---|
| 0–1 | Search is scattered and unfocused |
| 2–3 | Regional patrols are active |
| 4–5 | The party’s likely route is known |
| 6–7 | Dedicated hunter forces are closing in |
| 8–9 | Most safe routes are under observation |
| 10 | Both factions know the party is approaching Rookhaven |
Increasing Heat
Heat usually increases by 1 when the party:
- Uses the twins’ powers openly
- Travels in a recognizable vehicle
- Leaves witnesses able to report them
- Fails a major infiltration or stealth challenge
- Uses compromised communications
- Remains at one safehouse too long
- Leads an enemy directly to a Rook location
A major failure or public battle may increase Heat by 2.
Reducing Heat
Heat can be reduced by:
- Changing vehicles
- Traveling through subterranean routes
- Destroying tracking devices
- Sending false transmissions
- Exposing an infiltrator
- Leaving a convincing false trail
- Temporarily shutting down a surveillance network
Heat should rarely fall below 0 or rise above 10.
Travel Posture
Before each route segment, the party selects a travel posture.
| Posture | Effect |
|---|---|
| Hustle | Reduce journey Delay, but take a –2 circumstance penalty to the pursuit check |
| Normal Travel | No modifier |
| Concealed Travel | Gain a +2 circumstance bonus to the pursuit check, but the route takes longer |
| False Trail | No travel progress; attempt a relevant skill check to move one enemy marker away from the party |
Useful skills for concealed travel or false trails include Stealth, Survival, Computers, Deception, and appropriate Lore skills.
Pursuit Check
At each pursuit interval, the GM makes a secret pursuit check.
Roll:
1d20 + current Heat + route modifiers
against DC 16.
The party’s travel posture modifies this roll:
- Concealed Travel applies –2 to the GM’s roll.
- Hustle applies +2 to the GM’s roll.
- Particularly exposed terrain can apply +1 or +2.
- Underground or shielded routes can apply –1 or –2.
Critical Success
Both factions accurately converge on the party’s current or next map node.
VantaCore and Helix encounter each other before either can complete its attack on the party.
The collision occurs close enough that the party can:
- Avoid the battle and continue traveling.
- Observe the fight.
- Intervene against one or both factions.
- Wait and attack the survivors.
- Slip through while both sides are occupied.
If the party avoids involvement, resolve a quick conflict between the two factions.
Success
The nearest enemy marker moves into the party’s node.
The party encounters that faction.
The encounter’s difficulty depends on Heat:
| Heat | Encounter Difficulty |
|---|---|
| 0–2 | Low |
| 3–5 | Moderate |
| 6–8 | Severe |
| 9–10 | Severe with reinforcements or an additional objective |
The other enemy marker moves one route segment toward the disturbance.
Failure
No direct encounter occurs.
Move each enemy marker one route segment according to its current information.
The party may notice signs of nearby pursuit, such as drone contrails, intercepted transmissions, disturbed ash, abandoned equipment, or frightened travelers.
Critical Failure
The party’s concealment, misinformation, or route choice sends both factions toward the wrong location.
Move both enemy markers into the same map node away from the party.
They encounter one another and fight while the party remains clear.
Resolve their clash using the quick conflict rules.
Quick Conflict Between Pursuers
Each enemy marker has a Force Rating.
| Force | Starting Rating |
|---|---|
| VantaCore Hunter Cell | 4 |
| Helix Recovery Pack | 4 |
Modify the rating when appropriate:
- Strong reinforcements: +1
- Previously weakened: –1
- Ambushed: –1
- Defensive position: +1
- Major vehicle or heavy unit present: +1
Each faction rolls:
1d20 + Force Rating
The higher result wins.
Conflict Results
| Result | Effect |
|---|---|
| Winner | Loses 1 Force Rating and remains on the map |
| Loser | Loses 2 Force Rating and retreats one route segment |
| Tie | Both lose 1 Force Rating and retreat in different directions |
| Victory by 10 or more | Loser loses 3 Force Rating instead of 2 |
The surviving or retreating factions continue hunting the party in their weakened state.
A faction reduced to Force Rating 0 is temporarily removed from the map.
It returns after two pursuit intervals with Force Rating 2, representing replacement units or a newly assembled hunter cell.
Effects of a Weakened Force
| Force Rating | Condition |
|---|---|
| 4–5 | Full-strength pursuit group |
| 3 | Normal encounter |
| 2 | Weak encounter or damaged vehicle group |
| 1 | Small survivor team, lone machine, or infiltrator pair |
| 0 | Temporarily eliminated |
A weakened force might appear with:
- Missing personnel
- Reduced ammunition
- Damaged vehicles
- Disabled communications
- Injured operatives
- Machines already below full Hit Points
- No access to its strongest special ability
The party may deliberately lure the two forces together to weaken both before reaching Rookhaven.
Enemy Movement Priorities
VantaCore
VantaCore follows people and information.
Its marker moves toward:
- A compromised Rook contact
- The party’s last known safehouse
- A stolen or tagged vehicle
- Reports of the twins
- Rookhaven
VantaCore is more likely to wait, infiltrate, or establish an ambush than attack immediately.
Helix Meridian
Helix follows signals and infrastructure.
Its marker moves toward:
- An active resonance signature
- Omicron-9 tracking data
- Helix-made vehicles or equipment
- Automated surveillance detections
- Major power or communications usage
- Rookhaven
Helix machines usually take the shortest available route and attack once they confirm a target.
Safehouse Detection
When an enemy marker enters a safehouse node, the safehouse is not automatically destroyed.
The GM determines what the enemy finds based on Heat and the party’s precautions.
| Circumstance | Result |
|---|---|
| Safehouse uncompromised, Heat 0–3 | Enemy finds no entrance |
| Safehouse recently evacuated | Enemy finds signs but no residents |
| Tracking device present | Enemy locates the outer defenses |
| Infiltrator active | VantaCore gains access or plants sabotage |
| Helix infrastructure still active | Automated systems may identify the location |
| Party remains inside | Run a defense, escape, or infiltration encounter |
This allows the pursuit markers to threaten the network without automatically removing every location they visit.
Reaching Rookhaven
Both markers continue floating across the map until the Rookhaven climax.
Their condition determines the attack.
| Act 2 Result | Rookhaven Effect |
|---|---|
| Both forces remain strong | Two major attacks arrive during the climax |
| One force is weakened | Its Rookhaven force arrives damaged or late |
| Both forces are weakened | The Rooks face smaller but unpredictable attacks |
| One force is temporarily eliminated | That faction arrives only during the final stage |
| Party reaches Heat 10 | Both factions know Rookhaven’s location |
| Party reaches Rookhaven at low Heat | The attack still occurs, but the Rooks receive more preparation time |
The party cannot completely prevent the climax, but it can determine when each enemy arrives, how strong it is, and whether the two hostile forces are already fighting each other.
Act 2 Climax — The Battle for Rookhaven
The journey across Daegox-4 ends at Rookhaven Spaceport, a concealed Tamsin Rook launch facility built beneath an abandoned ore-processing basin.
Helix Meridian and the Omicron-9 prison network both discover the spaceport during Act 2. Their forces launch a coordinated assault intended to seize the Resonance Twins, destroy the Rook escape network, and prevent any surviving witnesses from leaving the planet.
The attack occurs regardless of the party’s route. The party’s speed determines whether they arrive in time to prepare for it.
The Journey Clock
Track the party’s progress using Delay.
The party begins Act 2 with 0 Delay.
Delay increases when the party:
- Spends significant time at optional safehouses
- Fails major travel challenges
- Repairs heavily damaged vehicles
- Takes long rests in exposed locations
- Diverts to rescue civilians or Rook cells
- Backtracks after discovering a compromised route
Delay can be reduced when the party:
- Uses a fast vehicle route
- Restores Blackrail transport
- Acquires accurate weather or patrol data
- Sends pursuit teams toward false coordinates
- Skips optional safehouses
- Successfully uses corporate credentials or transport
Do not punish the party for roleplaying or helping people without warning. Present the tradeoff clearly: helping a location may provide allies, equipment, or defenses at Rookhaven, but it costs time.
Arrival Conditions
| Final Delay | Arrival State |
|---|---|
| 0–1 | The party reaches Rookhaven well before the assault |
| 2–3 | The party arrives shortly before enemy forces appear |
| 4–5 | The attack has just begun |
| 6+ | The spaceport is already under heavy assault |
The GM can adjust these ranges based on the length of Act 2.
Early Arrival — Prepare the Spaceport
If the party arrives before the attack, Rookhaven appears tense but operational.
Technicians are preparing escape ships, refugees are being assigned to transports, and scouts report enemy forces moving toward the basin.
The party receives a limited preparation window before the assault.
Preparation Structure
The party can complete a number of preparation tasks based on its arrival time.
| Arrival | Preparation Tasks |
|---|---|
| Well before the assault | 5 tasks |
| Shortly before the assault | 3 tasks |
| Attack imminent | 1 task |
Each task should require a short scene, several checks, or the expenditure of equipment.
Preparation Options
| Preparation | Primary Skills | Battle Benefit |
|---|---|---|
| Fortify the main approach | Crafting, Athletics | Add barricades and defensive cover |
| Repair defense turrets | Crafting, Computers | Activate one or more automated weapons |
| Conceal the launch hangars | Computers, Deception | Delay enemy targeting of the ships |
| Mine the vehicle approach | Crafting, Survival | Damage or delay corporate vehicles |
| Prepare medical stations | Medicine, Crafting | Improve battlefield recovery |
| Evacuate noncombatants | Diplomacy, Society | Prevent civilian casualties during the battle |
| Inspect ships for sabotage | Computers, Crafting, Thievery | Discover infiltrator tampering before launch |
| Establish sniper positions | Stealth, Perception | Grant defenders elevated firing positions |
| Secure the fuel depot | Crafting, Athletics | Prevent a major explosion |
| Create false launch signals | Computers, Deception | Split the attacking force |
| Train inexperienced defenders | Diplomacy, Warfare Lore | Improve the Rook militia |
| Prepare the twins’ resonance position | Occultism, Crafting, Diplomacy | Unlock a controlled battlefield resonance effect |
Safehouse Contributions
Earlier choices can add free preparations or improve existing ones.
| Act 2 Accomplishment | Rookhaven Benefit |
|---|---|
| Restore Relay Nine | Advance warning of the attack |
| Save a refugee or medical safehouse | Additional medics and medical supplies |
| Preserve a mining crawler | Heavy mobile cover |
| Repair Blackrail | Reinforcements arrive before the battle |
| Expose a corporate infiltrator | Sabotage is discovered early |
| Rescue stranded Rooks | Additional defenders |
| Recover corporate credentials | False orders confuse one enemy unit |
| Preserve Point Lotious’ workshops | Better repairs and additional equipment |
| Befriend or spare native creatures | Access to an unexpected wilderness route |
Late Arrival — Thrown into the Battle
If the party arrives after the attack begins, they enter through smoke, collapsing structures, and retreating defenders.
They receive no overview of the entire battlefield. The GM introduces objectives as the party encounters them.
The party may initially see:
- Corporate dropships descending into the basin
- Prison interceptors pushing through the outer barricades
- Cyber-hounds pursuing refugees
- Rook defenders falling back toward the hangars
- A damaged launch ship trapped on the pad
- Defense turrets firing at the wrong targets
- The twins reacting to resonance-dampening weapons
The battle should begin immediately, but the party should still have meaningful choices.
They are not required to defeat every enemy. Their objective is to keep the spaceport functioning long enough for the evacuation ships to launch.
Enemy Forces
The attack combines two distinct forces.
Helix Meridian Assault Force
The corporate force is organized, mobile, and focused on the twins.
Possible units include:
- Onyx Team assault operatives
- Corporate interceptors
- Dropship infantry
- Electronic warfare specialists
- Saboteurs already inside the spaceport
- Resonance-dampening weapons
- A corporate field commander linked to Ilex Mora
Helix Meridian attempts to capture the twins alive and destroy evidence stored at Rookhaven.
Omicron-9 Recovery Force
The prison force is controlled or coordinated by CUSTOS-9.
Possible units include:
- Warden drones
- Cyber-hound packs
- Automated sentry platforms
- Prisoner recovery teams
- Heavy restraint units
- A rebuilt or upgraded Warden Mech
- Remote-controlled mining equipment
The prison force follows rigid recovery directives and may clash with corporate personnel when their objectives differ.
This creates opportunities for the party to manipulate one enemy faction against the other.
Battlefield Zones
Rookhaven should function as a large, multi-objective battlefield.
| Zone | Threat | Objective |
|---|---|---|
| Outer Basin | Vehicles and advancing infantry | Delay the main assault |
| Refugee Concourse | Cyber-hounds and panic | Escort civilians to transports |
| Control Tower | Electronic warfare team | Restore launch control |
| Fuel Depot | Saboteurs and fire | Prevent catastrophic detonation |
| Main Hangar | Heavy assault force | Protect the escape ship |
| Secondary Pad | Damaged transport | Repair or evacuate stranded Rooks |
| Resonance Array | Dampening equipment | Free the twins’ powers |
| Maintenance Tunnels | Infiltrators | Stop internal sabotage |
| Launch Corridor | Warden Mech or heavy unit | Hold the final evacuation route |
The party cannot protect every zone. Their decisions determine what survives.
Battle Progress
Run the climax in three stages.
Stage 1 — The Outer Breach
Enemy forces enter the basin.
Early-arriving parties begin from prepared positions. Late-arriving parties encounter defenders already retreating.
Objectives may include:
- Destroying or disabling an interceptor
- Holding a barricade
- Saving scouts trapped outside
- Activating defenses
- Closing an exposed access tunnel
Stage 2 — The Spaceport Splinters
Multiple emergencies occur at once.
Present three objectives and make it clear the party can likely complete only two.
Example objectives:
- Stop the fuel depot from exploding
- Rescue civilians from the concourse
- Recover launch-control access
- Find and stop an infiltrator
- Protect the twins from a capture team
- Repair the primary escape ship
The ignored objective suffers a consequence but should not automatically end the act.
Stage 3 — The Final Launch
The last ships begin preparing to leave.
The party must hold the launch route while completing the final escape sequence.
Possible final threats include:
- An upgraded Warden Mech
- Onyx Team’s field commander
- A corporate gunship
- A resonance-dampening array
- CUSTOS-9 taking control of the launch systems
- An infiltrator aboard the escape ship
The twins can become central to the final defense, but the party should determine how their powers are used.
Twins’ Role in the Battle
At Rookhaven, the twins can maintain their three resonance channels:
| Channel | Example Effect |
|---|---|
| Personal | Protect themselves from capture or dampening |
| Allied | Defend Rook troops, refugees, or the party |
| Hostile | Slow enemy advances or disrupt technology |
The scale of the battle allows the twins to produce stronger area effects than earlier in the campaign.
Possible large-scale effects include:
- A kinetic dome protecting the launch pad
- A gravity field slowing enemy vehicles
- Energy resistance around the fuel depot
- Distorted targeting around the evacuation ships
- A repulsion wave clearing the launch corridor
Maintaining three channels for an extended period should carry a cost. The twins may become drained, injured, or temporarily unable to use their powers after launch.
Success Levels
Act 2 should end with escape from Daegox-4, but the state of Rookhaven changes what the party carries into Act 3.
Complete Victory
- The main escape ship launches intact
- Most civilians and Rooks escape
- The spaceport’s intelligence archive is preserved
- The twins remain free
- Enemy commanders are defeated or captured
Costly Victory
- The party escapes
- One or more ships, safehouse records, or important NPCs are lost
- Rookhaven is destroyed
- Survivors are scattered across multiple ships
Desperate Escape
- The party reaches a ship during the collapse
- Most of the spaceport falls
- The ship launches damaged or under pursuit
- Few Rooks escape with the party
Fail-Forward Result
If the party is defeated, surviving Rooks or the twins trigger an emergency launch.
The party awakens aboard a damaged ship leaving Daegox-4 while enemy vessels pursue them.
They escape the planet, but suffer major losses and begin Act 3 in immediate danger.
Story XP Opportunities
| Accomplishment | Suggested XP |
|---|---|
| Reach Rookhaven | 40 XP |
| Arrive before the attack begins | 30 XP |
| Complete a major preparation task | 10 XP each, maximum 40 XP |
| Save the refugee concourse | 30 XP |
| Stop the fuel depot explosion | 30 XP |
| Expose the internal infiltrator | 30 XP |
| Preserve launch control | 30 XP |
| Defeat or bypass the heavy gatekeeper unit | Encounter XP |
| Save an additional evacuation ship | 40 XP |
| Prevent capture of the twins | 30 XP |
| Launch from Daegox-4 | 80 XP major story award |
The party should reach level 4 at Rookhaven or immediately after escaping the planet.
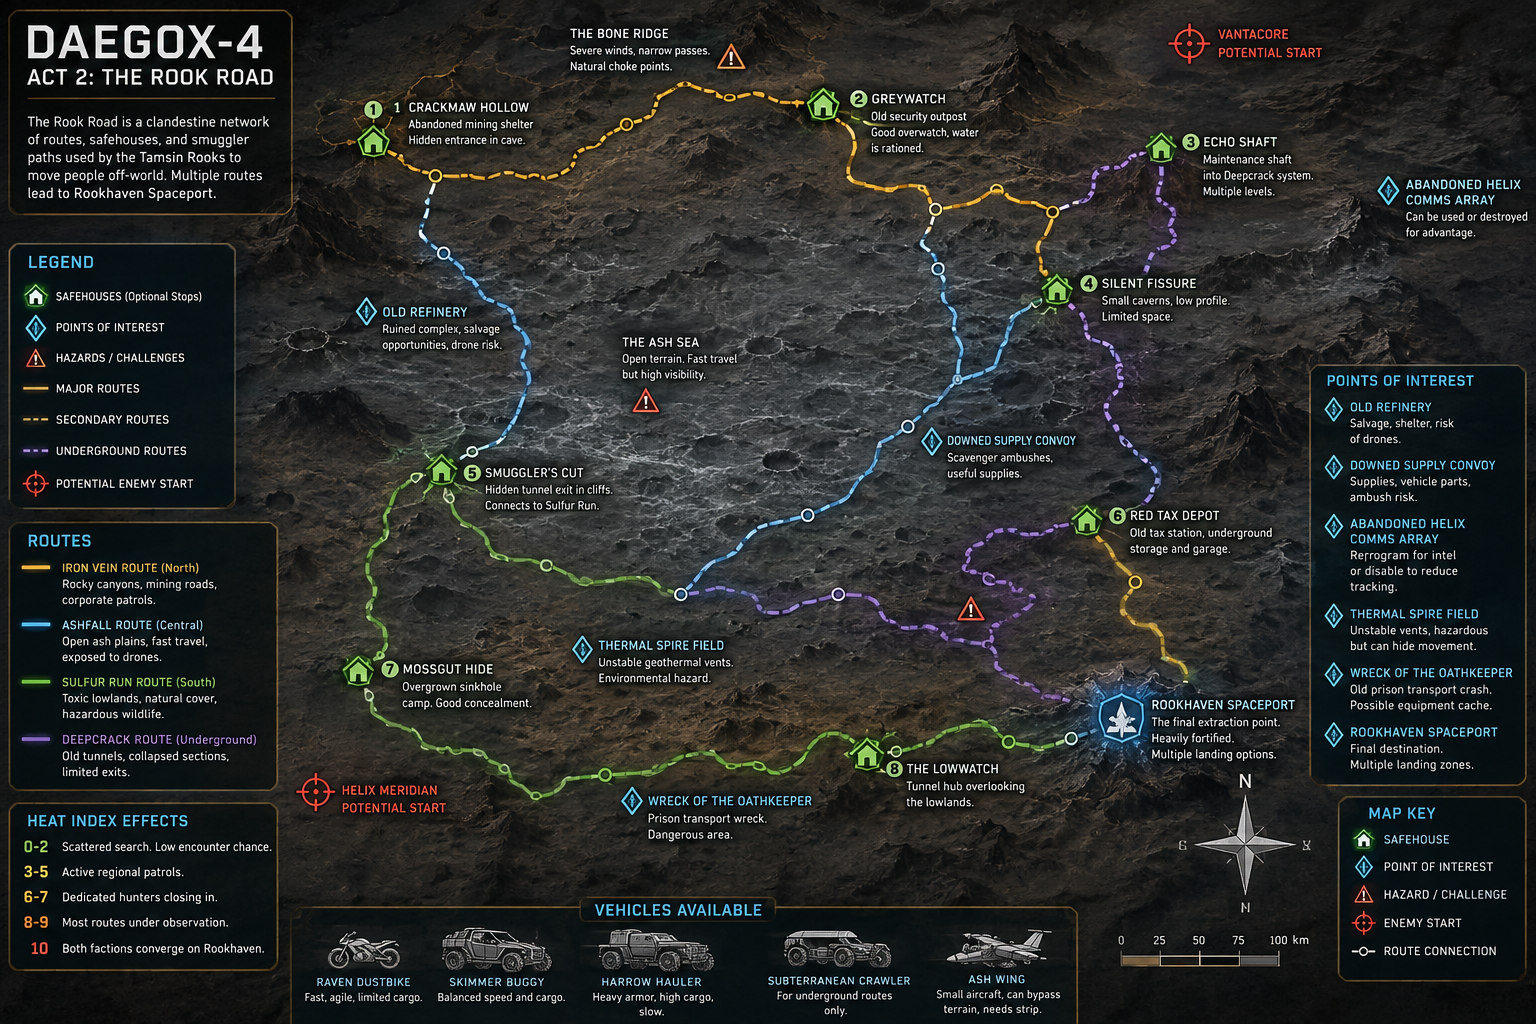
Network Heat
| Heat | Corporate Response |
|---|---|
| 0–1 | Local patrols search old routes; the crew retains surprise. |
| 2–3 | Checkpoints receive descriptions and passive scanners watch settlements. |
| 4–5 | Hunter teams, air surveillance, and asset freezes target known allies. |
| 6 | Planetary lockdown. Landing Pad 4 begins fully alerted and reinforced. |
Vehicles of the Rook Road
Vehicle Rules Primer
Piloting
The vehicle’s pilot controls its movement using the Piloting skill. Some vehicles allow alternate skills, usually at a higher DC.
| Action | Use |
|---|---|
| Board [one-action] | Enter or leave a vehicle. Boarding a moving vehicle requires Athletics or Acrobatics against the vehicle’s AC. |
| Drive [one-action] | Attempt the listed piloting check. On a success, move up to the vehicle’s Speed and turn normally. |
| Drive [two-actions] | Reckless. Move up to twice the vehicle’s Speed in a straight line. |
| Drive [three-actions] | Reckless. Attempt the piloting check with a –5 penalty and move up to three times the vehicle’s Speed in a straight line. |
| Run Over [three-actions] | Reckless. Move up to twice the vehicle’s Speed and inflict its collision damage on creatures in its path. |
| Stop [one-action] | Bring the vehicle to a stop. |
| Take Control [one-action] | Attempt a piloting check to become the pilot or regain control of an uncontrolled vehicle. |
A moving vehicle must be Driven again or Stopped on the pilot’s next turn. Otherwise, it becomes uncontrolled and continues moving along its previous heading.
Vehicle Weapon Mounts
The Rook vehicles use stabilized weapon mounts rather than a separate vehicle-weapon subsystem.
A mounted personal weapon:
- Uses the gunner’s normal attack modifier.
- Uses its normal damage, range, ammunition, and traits.
- Cannot be removed during an encounter without appropriate tools.
- Can fire only into the mount’s stated firing arc.
- Is operated by the pilot only when specifically stated.
- Still suffers the normal penalty for attacking from a moving vehicle unless the mount says otherwise.
The listed mount is normally empty unless the vehicle description states that a weapon is already installed.
Vehicle Cover
| Construction | Typical Protection |
|---|---|
| Open saddle | No cover |
| Roll cage or low side panels | Lesser cover |
| Armored cabin | Standard cover |
| Fully enclosed hull | Greater cover or blocks attacks entirely, depending on line of effect |
Broken Vehicles
At the vehicle’s Broken Threshold:
- Its Speeds are halved.
- It takes a –2 penalty to AC, saves, and collision DC.
- Its piloting DCs increase by 5.
At 0 HP, the vehicle is destroyed.
Raven Dustbike
Rook Model R-9 “Raven”
Vehicle 1 Uncommon, Medium, Tech
A stripped-down grav-bike with too much thrust, too little armor, and exactly enough frame left to bolt a rifle onto.
The Raven is the preferred machine of Rook scouts, couriers, and people who believe brakes are a corporate conspiracy. Its narrow gravitic runners skim over the ash rather than cutting through it, leaving a fading black wake behind the vehicle.
The bike is inexpensive, easy to hide, and fast enough to outrun most surface predators. It is also completely open. A rifle round that misses the pilot has a reasonable chance of hitting something important.
Road Profile
| Category | Rating |
|---|---|
| Role | Scout, courier, pursuit vehicle |
| Handling | Excellent |
| Protection | Minimal |
| Crew Capacity | Pilot and one passenger |
| Best Terrain | Open ash, mining roads, narrow trails |
| Main Weakness | Exposed crew and light construction |
Statistics
Price 400 credits Space 10 feet long, 5 feet wide, 4 feet high Crew 1 pilot Passengers 1 Piloting Check DC 15 Piloting or DC 17 Survival
AC 16 Fort +8 Hardness 5 HP 32; BT 16 Immunities object immunities
Speed 80 feet, hover within 3 feet of the ground Collision 2d6 bludgeoning, DC 16
Systems
Open Frame
The pilot and passenger gain no cover from the Raven.
Ash Skimmer
The Raven ignores difficult terrain caused by loose ash, shallow sand, or similar particulate ground. Greater difficult terrain affects it normally.
Needle Turn
When the pilot succeeds at a one-action Drive, the Raven can pass through a space only 5 feet wider than the vehicle without increasing the piloting DC.
Rear Weapon Clamp
The passenger can operate one mounted one-handed or two-handed ranged weapon in a rear-facing 180-degree arc.
The clamp absorbs most vibration. The passenger’s penalty for attacking after the Raven has moved is reduced from –2 to –1. It remains –4 if the Raven was uncontrolled or used a reckless action.
Kick the Grav [reaction]
Trigger: The Raven would take collision damage from a ground-based hazard or uneven terrain.
The pilot attempts a DC 17 Piloting check.
- Critical Success: The Raven avoids the damage.
- Success: The Raven takes half damage.
- Failure: The Raven takes normal damage.
- Critical Failure: The Raven takes normal damage and becomes uncontrolled.
Rook Road Use
The Raven reduces travel time but cannot transport the entire party unless several bikes are available. A party using Ravens gains an advantage when escaping a pursuit but has little protection during an ambush.
Heat: Ravens are small and difficult to detect while stationary. Openly using their full speed across the Ash Sea produces a visible dust trail.
Skimmer Buggy
Rook Model K-12 “Jackal”
Vehicle 2 Uncommon, Large, Tech
Four seats, six repulsors, one roll cage, and enough empty mounting brackets to make any gunner optimistic.
The Jackal is a common mining-survey buggy rebuilt for smugglers and Rook patrol teams. Its gravitic suspension carries it over broken ground while the independent repulsors allow sharp lateral movement.
The vehicle is fast, stable, and easy to repair. Its protection consists mostly of a roll cage, composite side panels, and confidence.
Road Profile
| Category | Rating |
|---|---|
| Role | Party transport, skirmisher |
| Handling | Very good |
| Protection | Light |
| Crew Capacity | Pilot and three passengers |
| Best Terrain | Ash flats, bad roads, rocky lowlands |
| Main Weakness | Open upper frame |
Statistics
Price 950 credits Space 15 feet long, 10 feet wide, 6 feet high Crew 1 pilot Passengers 3 Piloting Check DC 16 Piloting, DC 18 Computers, or DC 18 Survival
AC 17 Fort +10 Hardness 7 HP 50; BT 25 Immunities object immunities
Speed 60 feet, hover within 5 feet of the ground Collision 3d6 bludgeoning, DC 18
Systems
Roll Cage
Occupants gain lesser cover. Against attacks made from ground level outside the buggy, they instead gain standard cover.
All-Terrain Repulsors
The Jackal ignores difficult terrain caused by ash, sand, mud, shallow water, and broken road surfaces. It cannot cross large gaps or treat vertical surfaces as ground.
Lateral Burn
When using a one-action Drive, the pilot can move the Jackal up to 10 feet sideways without changing its heading. This movement is part of the vehicle’s normal movement and cannot increase the total distance traveled beyond its Speed.
Stabilized Pintle
A passenger can operate a mounted ranged weapon in a 360-degree arc.
Attacks made from the pintle take no penalty merely because the Jackal moved normally during the previous round. They still take the –4 penalty after reckless movement or while the vehicle is uncontrolled.
Emergency Lift [two-actions]
Frequency: Once per 10 minutes
The pilot overloads the repulsors. The Jackal leaps up to 20 feet horizontally and 10 feet vertically before landing.
The pilot attempts a DC 18 Piloting check.
- Critical Success: The vehicle lands safely and can change its heading.
- Success: The vehicle lands safely.
- Failure: The vehicle lands, takes 2d6 bludgeoning damage, and becomes uncontrolled.
- Critical Failure: As failure, but the vehicle and every occupant take the collision damage.
Rook Road Use
The Jackal is the most flexible vehicle for a normal adventuring party. It carries four people, can fight while moving, and handles most surface routes.
Heat: Moderate. A Jackal can hide inside ruins or terrain folds but is recognizable as a modified Rook vehicle during close inspection.
Harrow Hauler
Rook Model H-40 “Harrow”
Vehicle 3 Uncommon, Huge, Tech
It will not win a race. It will not fit in a parking bay. It will, however, carry your entire cell through a barricade and still have room for the barricade.
The Harrow is a six-wheeled mining transport rebuilt into an armored convoy vehicle. Heavy suspension, redundant motors, and a reinforced forward plate allow it to carry people and equipment across terrain that would destroy an ordinary cargo truck.
Many Harrows serve as mobile workshops, refugee transports, or improvised command vehicles.
Road Profile
| Category | Rating |
|---|---|
| Role | Armored transport, convoy anchor |
| Handling | Poor |
| Protection | Heavy |
| Crew Capacity | Pilot and eight passengers |
| Best Terrain | Mining roads, ash plains, open industrial ground |
| Main Weakness | Slow, loud, and difficult to conceal |
Statistics
Price 1,900 credits Space 30 feet long, 15 feet wide, 12 feet high Crew 1 pilot Passengers 8 Piloting Check DC 18 Piloting, DC 20 Computers, or DC 20 Crafting
AC 18 Fort +13 Hardness 10 HP 90; BT 45 Immunities object immunities
Speed 45 feet Collision 4d8 bludgeoning, DC 20
Systems
Armored Cabin
The pilot and front passenger gain greater cover from attacks outside the vehicle.
Passengers in the rear compartment are completely enclosed unless they open a hatch or firing port. An enclosed passenger normally lacks line of effect to targets outside the vehicle.
Firing Ports
The rear compartment contains four firing ports, two on each side.
Opening or closing a firing port requires an Interact action. A creature firing through one has standard cover but can attack only through that side of the Harrow.
Reinforced Ram
When the Harrow rams a creature, object, or vehicle with Run Over, increase its collision damage to 4d10.
The Harrow has resistance 5 against collision damage caused by its own ram. Its occupants also gain resistance 5 against that collision damage.
Cargo Configuration
The Harrow can be configured to carry:
- Eight passengers;
- Four passengers and a small workshop;
- Four passengers and two Raven dustbikes;
- A large quantity of cargo or supplies.
Changing its configuration requires at least 1 hour and appropriate equipment.
Grinding Advance
When a creature two or more sizes smaller than the Harrow critically fails its save against the Harrow’s Run Over, it is knocked prone after being moved to the nearest available space.
Emergency Smoke [one-action]
Frequency: Once per hour
The driver releases industrial smoke and reflective ash from the rear dispensers. The Harrow leaves a 30-foot-long line of smoke behind it. Creatures and vehicles inside the smoke are concealed. The smoke disperses at the beginning of the driver’s next turn.
Rook Road Use
The Harrow allows the party to bring rescued Rooks, supplies, and heavy equipment to Rookhaven. It is also effective as mobile cover during a pursuit encounter.
Heat: High. Starting the Harrow or moving it at speed adds a strong thermal and seismic signature. Helix sensors can detect it more easily than lighter vehicles.
Subterranean Crawler
Rook Model D-7 “Mole”
Vehicle 3 Uncommon, Huge, Tech
It does not go fast. It goes through.
The Mole began life as a geological survey and tunnel-maintenance vehicle. It runs on articulated crawler assemblies capable of gripping slopes, broken rails, and cavern walls. A rotary excavation head clears collapsed tunnels and soft stone.
The vehicle is slow, heavily enclosed, and nearly impossible to maneuver in open combat. Underground, it can go places no conventional vehicle can follow.
Road Profile
| Category | Rating |
|---|---|
| Role | Underground transport, exploration vehicle |
| Handling | Poor |
| Protection | Very heavy |
| Crew Capacity | Pilot, engineer, and six passengers |
| Best Terrain | Mines, tunnels, rubble, steep slopes |
| Main Weakness | Extremely slow in open terrain |
Statistics
Price 2,400 credits Space 25 feet long, 15 feet wide, 10 feet high Crew 2: pilot and systems engineer Passengers 6 Piloting Check DC 18 Piloting, DC 20 Crafting, or DC 20 Computers
AC 18 Fort +14 Hardness 12 HP 110; BT 55 Immunities object immunities Resistances acid 5, fire 5
Speed 30 feet; climb 20 feet Collision 4d8 bludgeoning, DC 20
Systems
Sealed Hull
The crew and passengers are completely enclosed. The hull provides filtered air and protects its occupants from ordinary ash, smoke, contaminated water, and thin or thick atmospheres.
Occupants have no line of effect outside the vehicle except through the forward viewport, equipment hatch, or opened doors.
Articulated Treads
The Mole ignores difficult terrain caused by rubble, loose stone, damaged rails, steep mining roads, and similar underground obstacles.
It treats greater difficult terrain of these types as ordinary difficult terrain.
Wall Crawler
The Mole can use its climb Speed only on stone, metal, or similarly solid surfaces capable of supporting its weight. While climbing, it must end every move on a surface no steeper than vertical.
Excavation Head
Outside encounter mode, the Mole can clear collapsed tunnels and excavate loose earth or badly fractured rock.
It clears approximately:
- 10 feet per minute through loose debris;
- 5 feet per minute through compacted earth;
- 5 feet per 10 minutes through ordinary stone.
Reinforced structures, force fields, and specially hardened materials require a separate challenge.
Grinder Ram
When the Mole uses Run Over against a stationary object, barricade, wall, or construct, its collision damage becomes slashing rather than bludgeoning, and it ignores 5 points of the target’s Hardness.
Systems Engineer
The required engineer occupies a secondary control station. The engineer can spend an action to prepare to Aid the pilot’s next Piloting check using Crafting or Computers.
If no engineer is present, the pilot can still operate the Mole, but Crafting and Computers are no longer available as alternate piloting skills.
Emergency Shoring [two-actions]
The engineer deploys hydraulic supports. Until retracted with another two-action activity:
- The Mole cannot move.
- Its Hardness increases by 3.
- Creatures can use its hull as standard cover.
- It cannot become uncontrolled.
Rook Road Use
The Mole opens routes through the Deepcrack network and can bypass several surface checkpoints. It provides excellent protection but adds substantial travel time.
Heat: Very low while underground. Once the Mole activates its excavation head, seismic sensors may detect it within the region.
Ash Wing
Rook Model A-3 “Ash Wing”
Vehicle 4 Rare, Huge, Tech
A survey aircraft with the serial numbers burned off, the cargo bay replaced by seats, and the flight computer trained to lie.
The Ash Wing is a compact tilt-thrust aircraft designed to survey mining claims and move specialists between isolated facilities. The Rooks modify each craft with ash filters, passive sensors, shielded compartments, and falsified identification systems.
An Ash Wing can bypass most ground hazards and carry a small team directly across Daegox-4. It is also visible to every functioning air-defense system on the planet.
Road Profile
| Category | Rating |
|---|---|
| Role | Rapid transport, reconnaissance aircraft |
| Handling | Good |
| Protection | Moderate |
| Crew Capacity | Pilot and five passengers |
| Best Terrain | Open air and prepared landing zones |
| Main Weakness | Detection, air defenses, catastrophic crash risk |
Statistics
Price 4,500 credits Space 25 feet long, 25 feet wide, 10 feet high Crew 1 pilot Passengers 5 Piloting Check DC 19 Piloting or DC 21 Computers
AC 19 Fort +12 Hardness 9 HP 72; BT 36 Immunities object immunities Resistances fire 5
Speed fly 100 feet Collision 4d10 bludgeoning, DC 21
Systems
Enclosed Aircraft
All occupants are enclosed and gain greater cover from attacks outside the vehicle. Closed hull panels block line of effect in both directions.
The pilot can see through the cockpit canopy and sensor display.
Vertical Thrust
The Ash Wing can take off and land vertically.
It does not require a runway, but landing on unstable, narrow, or heavily obstructed ground can require a Piloting check.
Ash-Sealed Turbines
The aircraft ignores ordinary environmental penalties caused by ash-filled air.
Severe storms, corrosive clouds, volcanic debris, or similar conditions can still increase its piloting DC.
Forward Weapon Mount
The pilot or front passenger can operate one mounted ranged weapon in a forward 90-degree arc.
The mount is stabilized. Its operator takes no attack penalty after normal vehicle movement but takes the usual –4 penalty if the Ash Wing used a reckless action or was uncontrolled.
Signal Masking
When traveling at half Speed or slower, the pilot can attempt a Computers check instead of Stealth to avoid electronic detection.
The DC is determined by the detecting system. On a critical failure, the Ash Wing broadcasts a clear identifying signature.
Terrain-Hugging Flight
The pilot can attempt a DC 21 Piloting check when beginning a movement no more than 20 feet above the ground.
- Critical Success: The Ash Wing remains below distant sensor coverage and gains a +2 circumstance bonus against electronic detection until its next turn.
- Success: It gains a +1 circumstance bonus.
- Failure: It gains no benefit.
- Critical Failure: It clips terrain or debris, takes 3d6 bludgeoning damage, and becomes uncontrolled.
Crash Harnesses
When the Ash Wing is destroyed or takes collision damage from striking terrain, its occupants gain resistance 5 against the resulting collision or falling damage.
Rook Road Use
The Ash Wing offers the fastest route to Rookhaven. A successful flight can remove considerable Delay and allow the party to arrive before the attack.
However, flying it creates a major detection risk. Helix Meridian can deploy automated interceptors, while VantaCore can track the aircraft through regional air-control networks.
Heat: Very high unless the crew uses terrain-hugging flight, restored weather data, or a compromised communications array to conceal the trip.
Vehicle Comparison
| Vehicle | Level | Speed | Crew and Passengers | Hardness | HP | Collision | Primary Role |
|---|---|---|---|---|---|---|---|
| Raven Dustbike | 1 | 80 feet | 1 + 1 | 5 | 32 | 2d6 | Scout and courier |
| Skimmer Buggy | 2 | 60 feet | 1 + 3 | 7 | 50 | 3d6 | Fast party transport |
| Harrow Hauler | 3 | 45 feet | 1 + 8 | 10 | 90 | 4d8 | Armored convoy vehicle |
| Subterranean Crawler | 3 | 30 feet | 2 + 6 | 12 | 110 | 4d8 | Underground transport |
| Ash Wing | 4 | Fly 100 feet | 1 + 5 | 9 | 72 | 4d10 | Rapid air transport |
Route Effects
| Vehicle | Travel Benefit | Pursuit Effect | Main Cost |
|---|---|---|---|
| Raven Dustbike | Fast movement on narrow routes | Bonus when escaping ground pursuit | Party needs several bikes |
| Skimmer Buggy | Reliable speed over most surface terrain | Balanced pursuit performance | Limited armor |
| Harrow Hauler | Carries allies, cargo, and rescued civilians | Can withstand roadblocks | Easy to track |
| Subterranean Crawler | Opens hidden underground routes | Avoids most surface patrols | Adds Delay |
| Ash Wing | Removes the most Delay | Can bypass ground encounters | Greatly increases detection risk |
Recommended Availability
The party should not simply purchase all five vehicles at Point Lotious.
| Vehicle | Suggested Access |
|---|---|
| Raven Dustbike | Available at Point Lotious or Dustwell Station |
| Skimmer Buggy | Repaired during a safehouse challenge |
| Harrow Hauler | Obtained from the Walking Yard or rescued convoy |
| Subterranean Crawler | Recovered at Echo Shaft or Blackrail Junction |
| Ash Wing | Hidden at Relay Kestrel or captured from a remote survey station |
Each vehicle should open routes while closing others. The choice is not merely which machine has the best statistics, but which risks the party is willing to accept on the road to Rookhaven.
Point Lotious Safehouse Sidequests
Sidequest 1 — A Signal Beneath the Skin
Location: Infirmary Primary Focus: Medicine, investigation, controlled resonance Recommended Level: 1 Expected Length: 30–45 minutes
Hook
The infirmary is already crowded when the party arrives. Injured Tamsin Rooks fill most of the cots, and the safehouse medic, Doctor Sera Vale, is working with scavenged equipment and dwindling supplies.
One of the Rooks rescued from Omicron-9, Joren Pell, begins suffering violent muscle spasms. A blue light pulses beneath the skin along his ribs. At first, everyone assumes he was struck by one of the twins’ resonance discharges.
Doctor Vale quickly determines that the object inside him is artificial.
“That is not shrapnel. It is transmitting.”
Helix Meridian implanted a medical tracking filament in Joren while he was briefly detained several weeks earlier. The device remained dormant until it detected the twins’ resonance field.
Unless it is removed or neutralized, it will begin transmitting Point Lotious’ location.
What Is Happening
The tracking filament is wrapped around a major nerve cluster. Cutting it out carelessly could paralyze or kill Joren. Leaving it active risks exposing the entire safehouse.
The party must gain 5 Treatment Points before accumulating 3 Trauma.
| Approach | Check | Result |
|---|---|---|
| Identify the filament’s attachment points | DC 15 Medicine check | Gain 1 Treatment Point; critical success gains 2 |
| Map its internal circuitry | DC 15 Computers check | Gain 1 Treatment Point |
| Build a signal suppressor | DC 15 Crafting check | Gain 1 Treatment Point and prevent the next transmission pulse |
| Carefully expose the implant | DC 15 Medicine or Thievery check | Gain 1 Treatment Point |
| Use the twins’ field to hold the filament still | DC 15 Medicine, Occultism, or Diplomacy check | Gain 1 Treatment Point, but a failure causes resonance feedback |
| Convince Joren to remain conscious and still | DC 15 Diplomacy check | The next Medicine check gains a +1 circumstance bonus |
A critical failure increases Trauma by 1. Some failures may also cause Joren to take minor electricity or persistent bleed damage.
Transmission Pulses
At the end of each round or major treatment step, the filament attempts to transmit.
A character monitoring the infirmary equipment can attempt a DC 15 Computers check.
- Critical Success: Block the pulse and gain 1 Treatment Point.
- Success: Block the pulse.
- Failure: The safehouse gains 1 Trace.
- Critical Failure: Gain 2 Trace.
At 3 Trace, Helix Meridian identifies the general region around Point Lotious. This does not immediately reveal the safehouse but increases Network Heat at the beginning of Act 2.
Success
At 5 Treatment Points, the party can remove or disable the filament.
Doctor Vale stores the intact device in a shielded container. It contains partial records showing that Helix Meridian has implanted similar trackers in other prisoners and corporate laborers.
Failure
At 3 Trauma, Joren begins crashing. Doctor Vale completes the operation, but Joren survives with lasting nerve damage.
The filament is destroyed, preventing the party from studying or reusing it.
Optional Choice
The party can deliberately allow one final transmission while feeding the implant false coordinates.
This requires a DC 17 Computers check.
On a success, Helix Meridian dispatches a search team to an abandoned mining complex several kilometers away. On a critical failure, the corporation gains a much more accurate trace on Point Lotious.
Rewards
| Accomplishment | Reward |
|---|---|
| Save Joren and neutralize the tracker | 30 XP story award |
| Remove the filament without reaching 2 Trauma | 10 XP |
| Successfully transmit false coordinates | 20 XP |
| Preserve the tracker for study | Evidence 1 |
| Complete the mission | Doctor Vale provides two common medical consumables |
Act 2 Benefit
If the tracker is removed before transmitting, reduce starting Network Heat by 1.
If the false transmission succeeds, the party gains a temporary advantage when traveling away from Point Lotious.
Sidequest 2 — The Underworks Are Thirsty
Locations: Scrap Mechanic, Power Room, Water Recycler Primary Focus: Crafting, Computers, Athletics Recommended Level: 1 Expected Length: 45–60 minutes
Hook
The arrival of the party, the twins, and the surviving Rooks pushes the safehouse beyond its intended capacity.
The lights begin dimming. Water pressure drops to a trickle. The ventilation fans slow enough for ash to creep through the intake filters.
The safehouse mechanic, Orrin Pike, explains that all three failures are connected.
“The recycler needs the pump. The pump needs the generator. The generator needs a coolant regulator that became scrap twenty years ago.”
Point Lotious has enough stored power to maintain two of the following systems, but not all three:
- Water purification
- Ventilation and life support
- Long-range communications
Unless the party repairs the old ore-lift power junction, one system must remain offline.
Route Through the Safehouse
| Area | Problem |
|---|---|
| Scrap Mechanic | Locate or construct a replacement regulator |
| Power Room | Install the regulator and stabilize the generator |
| Water Recycler | Restart the pump and clear the contaminated intake |
| Service Conduit | Repair the connection between all three systems |
Phase 1 — Find a Replacement
Orrin has several possible regulator components, but none is complete.
The party must gain 3 Fabrication Points.
| Approach | Check | Result |
|---|---|---|
| Sort compatible components | DC 15 Crafting check | Gain 1 Fabrication Point |
| Search old mining records | DC 15 Computers check | Gain 1 Fabrication Point |
| Recover a heavy coil from the ore-lift remnant | DC 15 Athletics check | Gain 1 Fabrication Point |
| Adapt a weapon battery or vehicle component | DC 17 Crafting check | Gain 2 points, but consumes the component |
| Ask the twins to stabilize the magnetic coil | DC 15 Crafting or Occultism check | Gain 1 point; critical failure causes a power surge |
Phase 2 — Generator Restart
Installing the regulator requires three simultaneous tasks:
- Hold the magnetic coupling in place.
- Synchronize the generator controls.
- Vent excess heat.
The group attempts three checks:
- DC 15 Athletics check
- DC 15 Computers check
- DC 15 Crafting check
Each success stabilizes one system. A critical success can compensate for one failed check.
If two or more checks fail, the generator starts but overloads the water system.
Phase 3 — Contaminated Intake
The water recycler has drawn metallic ash and biological waste into its intake chamber.
Characters entering the chamber must deal with slippery surfaces, poor visibility, and contaminated water.
Possible solutions include:
- Clear the intake manually with a DC 15 Athletics check.
- Flush the obstruction using a DC 15 Crafting check.
- Reverse the pump through the control system with a DC 17 Computers check.
- Identify and isolate contamination with a DC 15 Medicine or Survival check.
- Use a controlled kinetic resonance pulse to force the obstruction free.
A failure exposes the acting character to contaminated water. The character attempts a DC 15 Fortitude save or becomes sickened 1.
Complication — Maintenance Crawlers
If the party makes two critical failures during the sidequest, several damaged maintenance crawlers activate inside the service conduit.
The crawlers do not need to become a full combat encounter. They can be:
- Destroyed normally.
- Shut down with Computers.
- Trapped behind a pressure door.
- Reprogrammed to clean the water intake.
- Used as replacement parts.
If run as combat, use a Low-threat encounter appropriate to the party.
The Power Decision
If the repair succeeds, all systems return to normal.
If it fails, the party must choose one system to shut down until replacement parts can be obtained.
| Disabled System | Consequence |
|---|---|
| Water Recycler | Supplies at Point Lotious last only three days |
| Ventilation | Safehouse occupants become fatigued during extended stays |
| Long-Range Comms | The Rooks lose contact with outside cells |
| Defensive Sensors | Point Lotious becomes easier to approach undetected |
Rewards
| Accomplishment | Reward |
|---|---|
| Restore all three primary systems | 40 XP story award |
| Complete repairs without consuming valuable equipment | 10 XP |
| Reprogram the maintenance crawlers | 20 XP |
| Fully purify the contaminated water | 10 XP |
| Recover ore-lift engineering records | +1 circumstance bonus to one future transit repair challenge |
Services Unlocked
After completion, Orrin Pike can provide:
- Equipment repair
- Battery recharging
- Basic weapon maintenance
- Identification of technological items
- Installation of common upgrades when parts are available
The water station can also refill the party’s environmental protection and emergency water supplies before they leave Point Lotious.
Sidequest 3 — The Dead Channel
Location: Comms Room Primary Focus: Computers, investigation, signal deception Recommended Level: 1 Expected Length: 30–45 minutes
Hook
The Point Lotious communications array receives a brief transmission on a Tamsin Rook emergency frequency.
The message contains only six words:
“Black sky. Broken crown. Rooks scattered.”
The transmission repeats every forty-seven seconds. No identification code accompanies it.
Comms operator Nia Sol cannot determine whether the message came from a surviving Rook cell, a Helix Meridian trap, or an automated beacon.
The signal is growing weaker.
What the Message Means
“Black sky” identifies Daegox-4.
“Broken crown” is an old Tamsin Rook emergency phrase indicating that a leadership cell has been compromised.
“Rooks scattered” means survivors are operating without orders or a secure extraction route.
Someone is calling for help—but Helix Meridian may already be listening.
Signal Investigation
The party must identify the sender before responding.
| Investigation | Check | Information |
|---|---|---|
| Analyze transmission compression | DC 15 Computers check | The signal uses authentic but outdated Rook encryption |
| Compare the voice pattern | DC 15 Perception check | The message was assembled from several different recordings |
| Research the emergency phrase | DC 15 Society check | The code belonged to a Rook cell that disappeared six months ago |
| Examine signal distortion | DC 15 Crafting or Computers check | The transmission is bouncing through an old mining relay |
| Study its timing | DC 17 Computers check | A second hidden data packet follows each spoken message |
| Examine the hidden packet | DC 17 Computers or Thievery check | It contains partial coordinates and a Helix Meridian tracking routine |
The message is real, but Helix Meridian has attached a tracking routine to the transmission. A surviving Rook cell is attempting to make contact without realizing its signal has been compromised.
The Response Challenge
The party must send a warning without revealing Point Lotious.
They need 5 Signal Points before accumulating 3 Exposure.
| Action | Check | Result |
|---|---|---|
| Strip the corporate tracking routine | DC 15 Computers check | Gain 1 Signal Point |
| Route the response through abandoned relays | DC 15 Computers or Crafting check | Gain 1 Signal Point |
| Construct a convincing false origin | DC 15 Deception or Computers check | Gain 1 Signal Point |
| Recover the hidden coordinates | DC 17 Computers check | Gain 1 Signal Point |
| Strengthen the damaged antenna | DC 15 Crafting check | Gain 1 point and +1 to the next signal check |
| Interpret the Rook code accurately | DC 15 Society check | Gain 1 point |
| Use resonance interference to mask the reply | DC 15 Occultism or Crafting check | Gain 1 point but risks drawing attention to the twins |
A critical success earns 2 Signal Points. A critical failure adds 1 Exposure.
Complication — CUSTOS-9 Answers
After the party earns its third Signal Point, CUSTOS-9 detects their interference.
The prison intelligence enters the channel using Handler Ilex Mora’s voice.
“You have been abandoned. Return the paired anomaly subjects and your involvement will be classified as coercion rather than terrorism.”
CUSTOS-9 attempts to force the party to maintain the connection long enough to trace them.
The party can:
- Immediately terminate the transmission.
- Continue while feeding it false coordinates.
- Attempt to extract information from CUSTOS-9.
- Allow the twins to distort the signal.
- Broadcast evidence of Helix Meridian’s experiments.
Remaining connected grants a +1 circumstance bonus to the next attempt to recover corporate information but automatically increases Exposure by 1.
Success
At 5 Signal Points, the party warns the stranded Rooks and obtains their coordinates.
The survivors are hiding near an abandoned surface refinery. They cannot reach Point Lotious immediately, but they can provide intelligence about corporate patrols in Act 2.
Exposure 3
Helix Meridian narrows the transmission to the Point Lotious region.
The warning still reaches the stranded Rooks, but Network Heat increases by 1 and the safehouse must shut down long-range communications for several hours.
Optional Outcomes
The party may choose one additional objective:
| Objective | Check | Benefit |
|---|---|---|
| Send Helix Meridian a false safehouse location | DC 17 Deception or Computers check | Misdirect one corporate search team |
| Download part of CUSTOS-9’s pursuit map | DC 17 Computers check | Reveal a safer Act 2 route |
| Broadcast the research evidence | No check if the party has Evidence 1 | Increase public attention but also Network Heat |
| Invite the stranded Rooks to Point Lotious | No check | Gain future allies but strain safehouse supplies |
Rewards
| Accomplishment | Reward |
|---|---|
| Warn the stranded Rook cell | 30 XP story award |
| Prevent Helix Meridian from tracing Point Lotious | 20 XP |
| Recover the pursuit map | 20 XP |
| Successfully transmit false coordinates | 20 XP |
| Establish a secure channel | Gain a Tamsin Rook intelligence contact |
Act 2 Benefit
If the pursuit map is recovered, the party can learn one danger associated with each Act 2 route before choosing.
If a false safehouse location is transmitted, reduce the severity of the first pursuit complication encountered after leaving Point Lotious.
Using the Three Sidequests
The sidequests do not all need to occur immediately.
| Timing | Recommended Quest |
|---|---|
| Immediately upon arrival | A Signal Beneath the Skin |
| During the party’s first rest | The Underworks Are Thirsty |
| Before choosing an Act 2 route | The Dead Channel |
Completing all three sidequests should make Point Lotious feel like a functioning base the party helped preserve rather than a location they merely visited.
For milestone advancement, the party reaches level 2 after resting at Point Lotious and committing to an escape route. For XP advancement, these missions provide enough additional story awards to bring a party that missed optional objectives close to level 2.