The Shattered Veil (SV1) (Act 1 + 2) (gemini) (KEEP)

Snapshot · Aug 20, 2026, 2:59 AM

  • The Shattered Veil (SV1) (Act 1 + 2) (gemini) (KEEP)
    • narrativeAdventure Summary
    • narrativeAdventure Background
    • narrativeRunning This Adventure
    • articleGM Brief: Incorporeal Targets
    • articleGazetteer: Thornwick
    • Acts
      • actAct 1 — The Haunting of Thornwick
        • articleDM Guide: Act 1 Narrative Arc
        • articleThreshold Seeds
        • handoutPlayer Handout: Sister Mirela's Letter
        • mapThornwick Village Map
        • sceneThornwick Village
          • encounterThe Bleating Lamb
            • handoutGrist Mallow — Player Notes
          • encounterEchoes in the Cemetery
            • mapThornwick Cemetery Map
            • monster blockModerate — 4× Thornwick Echo
            • treasureLow — Cemetery Cache
          • encounterDAY Church of Pharasma
          • encounterNIGHT The Church Siege (3rd night)
            • articleSister Mirela Tactics
            • pageGM Note: Running Wave Transitions
            • mapThe Church of Pharasma - GM
            • mapThe Church of Pharasma - Players
            • monster block7x - Thornwick Echo
            • monster block1x - Coalesced Echo
            • monster block1x - Threshold-Resonant Echo
          • encounterThe Church Crypt
          • encounterOld Varla's Hut
          • encounterBlacksmith
          • encounterStable
          • encounterT8 - T9 — Woodcutter, Chicken Coop, Veggie Garden
        • sidebarGM Advice: Mirela's Offer - Act 2
        • narrativeAct 1 Epilogue
      • actAct 2 — The Ossuary of Forgotten Swords
        • narrativeAct 2 Prologue
        • narrativeSelene — GM Backstory
        • mapApproach to the Ossuary
        • sceneApproach to the Ossuary
          • monster blockIron Automation
          • subsceneArea W1 - The Broken Road Ambush
            • encounterRavine Ambush
            • encounterBandit Home
              • narrativeStealth and Hostage Rescue — Harrow Wayfarer Camp
              • pageAccomplishment XP — Marta’s Rescue
            • monster blockHarrow
            • mapHarrow Wayfarer Camp
          • encounterArea W2
            • monster blockWild Den
          • encounterArea W3 — Roadside Shrine
          • encounterArea W4 — Trader Encounter
          • encounterArea W5 — Puzzle Stairs
        • sceneThe Ossuary Depths
          • narrativeWhere the Party Discovers Selene's Name
          • mapOssuary Dungeon Map
          • encounterCombat — The Entry Warrens
            • monster blockModerate — 3× Bone Scavenger + 2× Cultist Lookout
          • encounterThe Hall of Blades
            • handoutHall of Blades — Visual Aid
          • encounterThe Cultist Shrine
            • monster blockModerate — Brother Alms + 6× Cultist Guard
            • monster blockCultist Guards
            • articleTactics & Wave Mechanics
            • treasureModerate — Cultist Shrine Loot
            • narrativeWhy the Flock is in the Ossuary
          • encounterCombat — The Soul-Hunger
            • sidebarGM Brief: The Soul-Hunger
            • monster blockExtreme — The Soul-Hunger (Selene)
            • monster blockEcho of the Slain
            • treasureModerate — Shard Chamber Treasure
            • narrativeBonus: Shard 2 & The Redemption Path (
      • actAct 3 — The Threshold of Souls
        • sceneThe Threshold Complex
          • encounterCourtyard of Passage
            • mapCourtyard of Passage
            • monster blockSevere — Veilbreaker's Champion + 5× Corrupted Echo
            • monster blockVeilbreaker's Champion
            • monster blockCorrupted Echo
            • monster blockThreshold Guardian
            • monster blockPsychopomp Defender
          • mapThreshold of Souls Map
          • encounterThe Hall of Weighing
            • handoutHall of Weighing — Player Handout
          • encounterThe Gallery of Faces
          • encounterThe Veilbreaker's Avatar
            • monster blockExtreme — Veilbreaker's Avatar (3-Phase Boss)
            • treasureHigh — Judgment Chamber Hoard
          • subsceneThe Fraying Veil (Climax)
            • sidebarGM Brief: Running the Climax
        • sidebarGM Brief: The Third Path
        • articleGM Brief: The Veilbreaker's Philosophy
      • bucketBucket
        • random tableRandom Echo Encounters (staged)
        • articleArea O2 — The Hall of Blades - Additonal Narrative
        • articleAct 1 — Echo Bestiary
        • handoutThornwick Village Rumors (staged)
        • articleThe Shattered God — Lore Reference
        • monster blockSevere - Church Siege
    • NPCs
      • npcSister Mirela Voss
        • handoutPathfinder Player Core Character Sheet (Remaster)
        • pageMain
        • pageGM Notes
      • npcBrother Alms
        • pageMain
      • npcKeth-Veyr, the Veilbreaker
        • pageMain
        • pageGM Notes: The Three Endings
      • npcOld Varla
        • pageMain
        • handoutPathfinder Player Core Character Sheet (Remaster)
      • npcThornwick (NPC Companion)
        • handoutPathfinder Player Core Character Sheet (Remaster)
        • pageMain

Harrow Wayfarer Camp

Map Note — Area W1: Harrow Wayfarer Camp

This map shows the main camp of the Harrow Wayfarers, a rough bandit stronghold hidden in a shallow basin behind a rocky ridge. The site is naturally defensive, with steep gravel slopes, scattered pines, and a narrow approach that funnels intruders straight into the camp’s prepared kill-zone.

The central feature of the camp is Vane’s tent, which serves as the command post. Around it are a few crude lean-tos, a fire pit, and stacks of looted supplies. Near the left side of the camp, Marta is tied to a captive post under guard, giving the party a clear rescue objective if they choose to engage the bandits directly.

The camp’s outer ring is built around improvised defenses. Barricades and rough timber obstacles protect parts of the perimeter, while the main entrance is trapped with both a tripwire hazard and a spike trap line. Two entrenched defender positions watch the lower approach, making a frontal assault dangerous if the camp is already on alert.

For a stealthier party, the most important terrain feature is the scout ridge at the upper right. From there, the characters can observe the camp layout, identify sentry movement, and potentially plan a surprise attack before the alarm is raised. The sentries patrol the interior perimeter, while defenders near the choke point are positioned to hold off anyone pushing up from the south.

Overall, this map is meant to support two different play styles. It works well as a tactical assault map, but it also rewards cautious scouting, rescue planning, and targeted strikes against key threats. If the party is clever, they can use the terrain, hazards, and camp layout against the Harrow Wayfarers instead of simply charging straight into the basin.
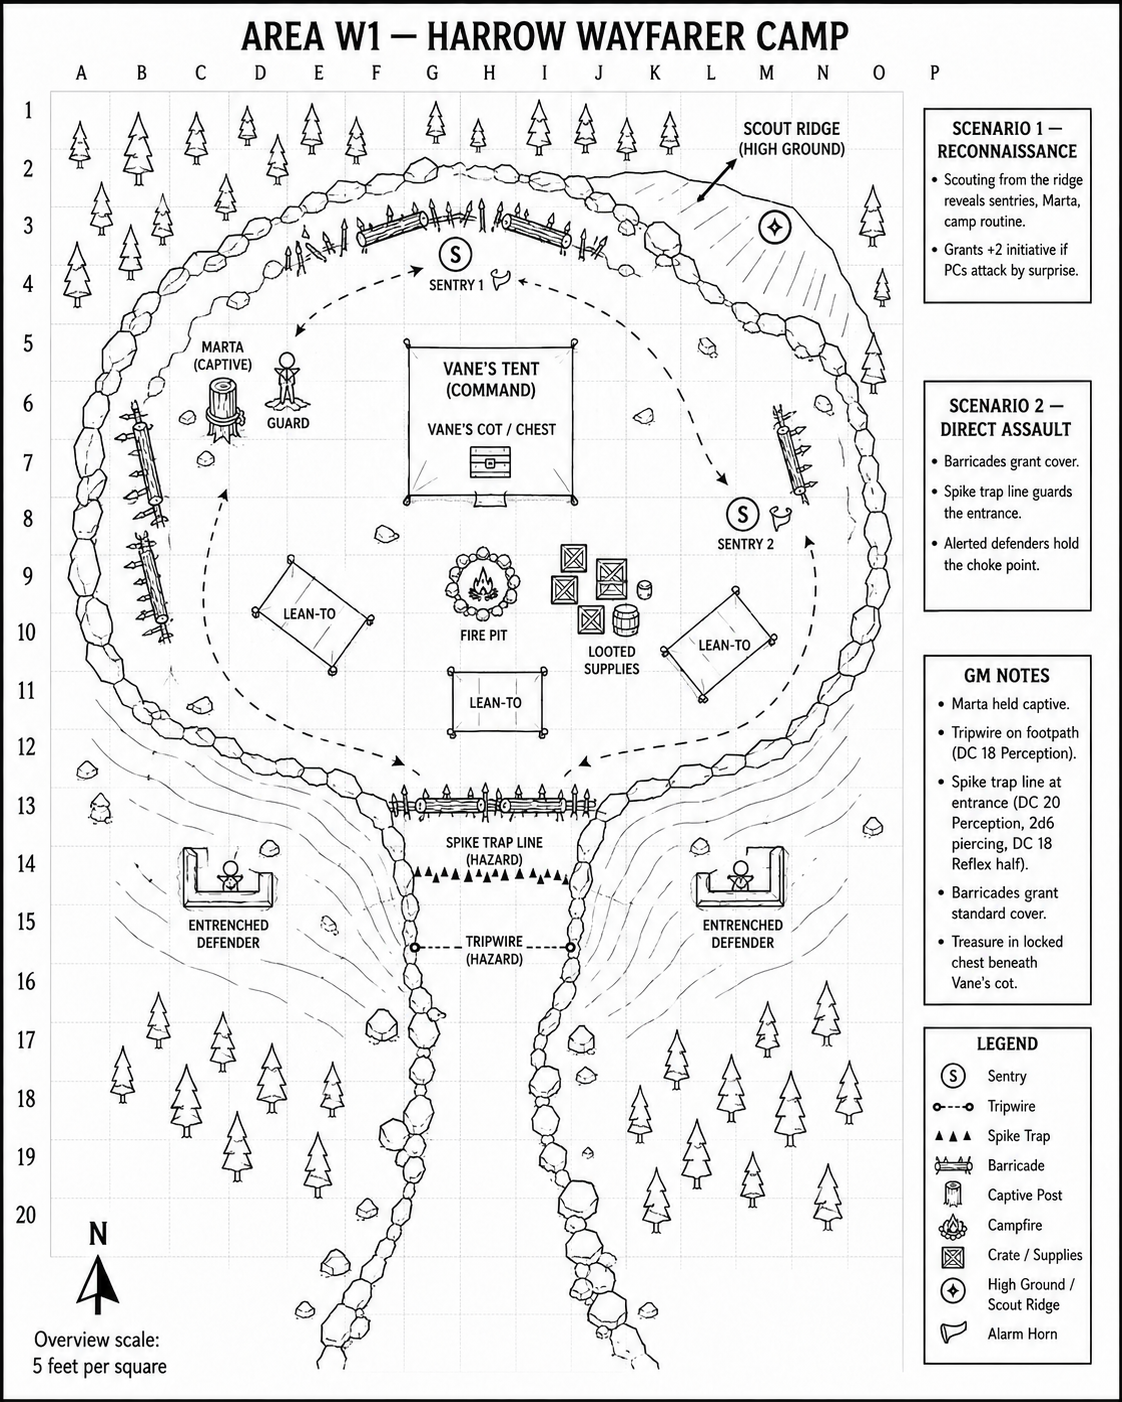
Harrow Wayfarer Camp

Read-only syndicated snapshot · Syndicated Aug 20, 2026, 2:59 AM. Content updates when the author syndicates again in Adventure Maker.

Made with Amba. Want to try it? Check out Amba — free to use.