The Shattered Veil (SV1) (Act 1 + 2) (gemini) (KEEP)

Snapshot · Aug 20, 2026, 2:59 AM

  • The Shattered Veil (SV1) (Act 1 + 2) (gemini) (KEEP)
    • narrativeAdventure Summary
    • narrativeAdventure Background
    • narrativeRunning This Adventure
    • articleGM Brief: Incorporeal Targets
    • articleGazetteer: Thornwick
    • Acts
      • actAct 1 — The Haunting of Thornwick
        • articleDM Guide: Act 1 Narrative Arc
        • articleThreshold Seeds
        • handoutPlayer Handout: Sister Mirela's Letter
        • mapThornwick Village Map
        • sceneThornwick Village
          • encounterThe Bleating Lamb
            • handoutGrist Mallow — Player Notes
          • encounterEchoes in the Cemetery
            • mapThornwick Cemetery Map
            • monster blockModerate — 4× Thornwick Echo
            • treasureLow — Cemetery Cache
          • encounterDAY Church of Pharasma
          • encounterNIGHT The Church Siege (3rd night)
            • articleSister Mirela Tactics
            • pageGM Note: Running Wave Transitions
            • mapThe Church of Pharasma - GM
            • mapThe Church of Pharasma - Players
            • monster block7x - Thornwick Echo
            • monster block1x - Coalesced Echo
            • monster block1x - Threshold-Resonant Echo
          • encounterThe Church Crypt
          • encounterOld Varla's Hut
          • encounterBlacksmith
          • encounterStable
          • encounterT8 - T9 — Woodcutter, Chicken Coop, Veggie Garden
        • sidebarGM Advice: Mirela's Offer - Act 2
        • narrativeAct 1 Epilogue
      • actAct 2 — The Ossuary of Forgotten Swords
        • narrativeAct 2 Prologue
        • narrativeSelene — GM Backstory
        • mapApproach to the Ossuary
        • sceneApproach to the Ossuary
          • monster blockIron Automation
          • subsceneArea W1 - The Broken Road Ambush
            • encounterRavine Ambush
            • encounterBandit Home
              • narrativeStealth and Hostage Rescue — Harrow Wayfarer Camp
              • pageAccomplishment XP — Marta’s Rescue
            • monster blockHarrow
            • mapHarrow Wayfarer Camp
          • encounterArea W2
            • monster blockWild Den
          • encounterArea W3 — Roadside Shrine
          • encounterArea W4 — Trader Encounter
          • encounterArea W5 — Puzzle Stairs
        • sceneThe Ossuary Depths
          • narrativeWhere the Party Discovers Selene's Name
          • mapOssuary Dungeon Map
          • encounterCombat — The Entry Warrens
            • monster blockModerate — 3× Bone Scavenger + 2× Cultist Lookout
          • encounterThe Hall of Blades
            • handoutHall of Blades — Visual Aid
          • encounterThe Cultist Shrine
            • monster blockModerate — Brother Alms + 6× Cultist Guard
            • monster blockCultist Guards
            • articleTactics & Wave Mechanics
            • treasureModerate — Cultist Shrine Loot
            • narrativeWhy the Flock is in the Ossuary
          • encounterCombat — The Soul-Hunger
            • sidebarGM Brief: The Soul-Hunger
            • monster blockExtreme — The Soul-Hunger (Selene)
            • monster blockEcho of the Slain
            • treasureModerate — Shard Chamber Treasure
            • narrativeBonus: Shard 2 & The Redemption Path (
      • actAct 3 — The Threshold of Souls
        • sceneThe Threshold Complex
          • encounterCourtyard of Passage
            • mapCourtyard of Passage
            • monster blockSevere — Veilbreaker's Champion + 5× Corrupted Echo
            • monster blockVeilbreaker's Champion
            • monster blockCorrupted Echo
            • monster blockThreshold Guardian
            • monster blockPsychopomp Defender
          • mapThreshold of Souls Map
          • encounterThe Hall of Weighing
            • handoutHall of Weighing — Player Handout
          • encounterThe Gallery of Faces
          • encounterThe Veilbreaker's Avatar
            • monster blockExtreme — Veilbreaker's Avatar (3-Phase Boss)
            • treasureHigh — Judgment Chamber Hoard
          • subsceneThe Fraying Veil (Climax)
            • sidebarGM Brief: Running the Climax
        • sidebarGM Brief: The Third Path
        • articleGM Brief: The Veilbreaker's Philosophy
      • bucketBucket
        • random tableRandom Echo Encounters (staged)
        • articleArea O2 — The Hall of Blades - Additonal Narrative
        • articleAct 1 — Echo Bestiary
        • handoutThornwick Village Rumors (staged)
        • articleThe Shattered God — Lore Reference
        • monster blockSevere - Church Siege
    • NPCs
      • npcSister Mirela Voss
        • handoutPathfinder Player Core Character Sheet (Remaster)
        • pageMain
        • pageGM Notes
      • npcBrother Alms
        • pageMain
      • npcKeth-Veyr, the Veilbreaker
        • pageMain
        • pageGM Notes: The Three Endings
      • npcOld Varla
        • pageMain
        • handoutPathfinder Player Core Character Sheet (Remaster)
      • npcThornwick (NPC Companion)
        • handoutPathfinder Player Core Character Sheet (Remaster)
        • pageMain

Courtyard of Passage

```html

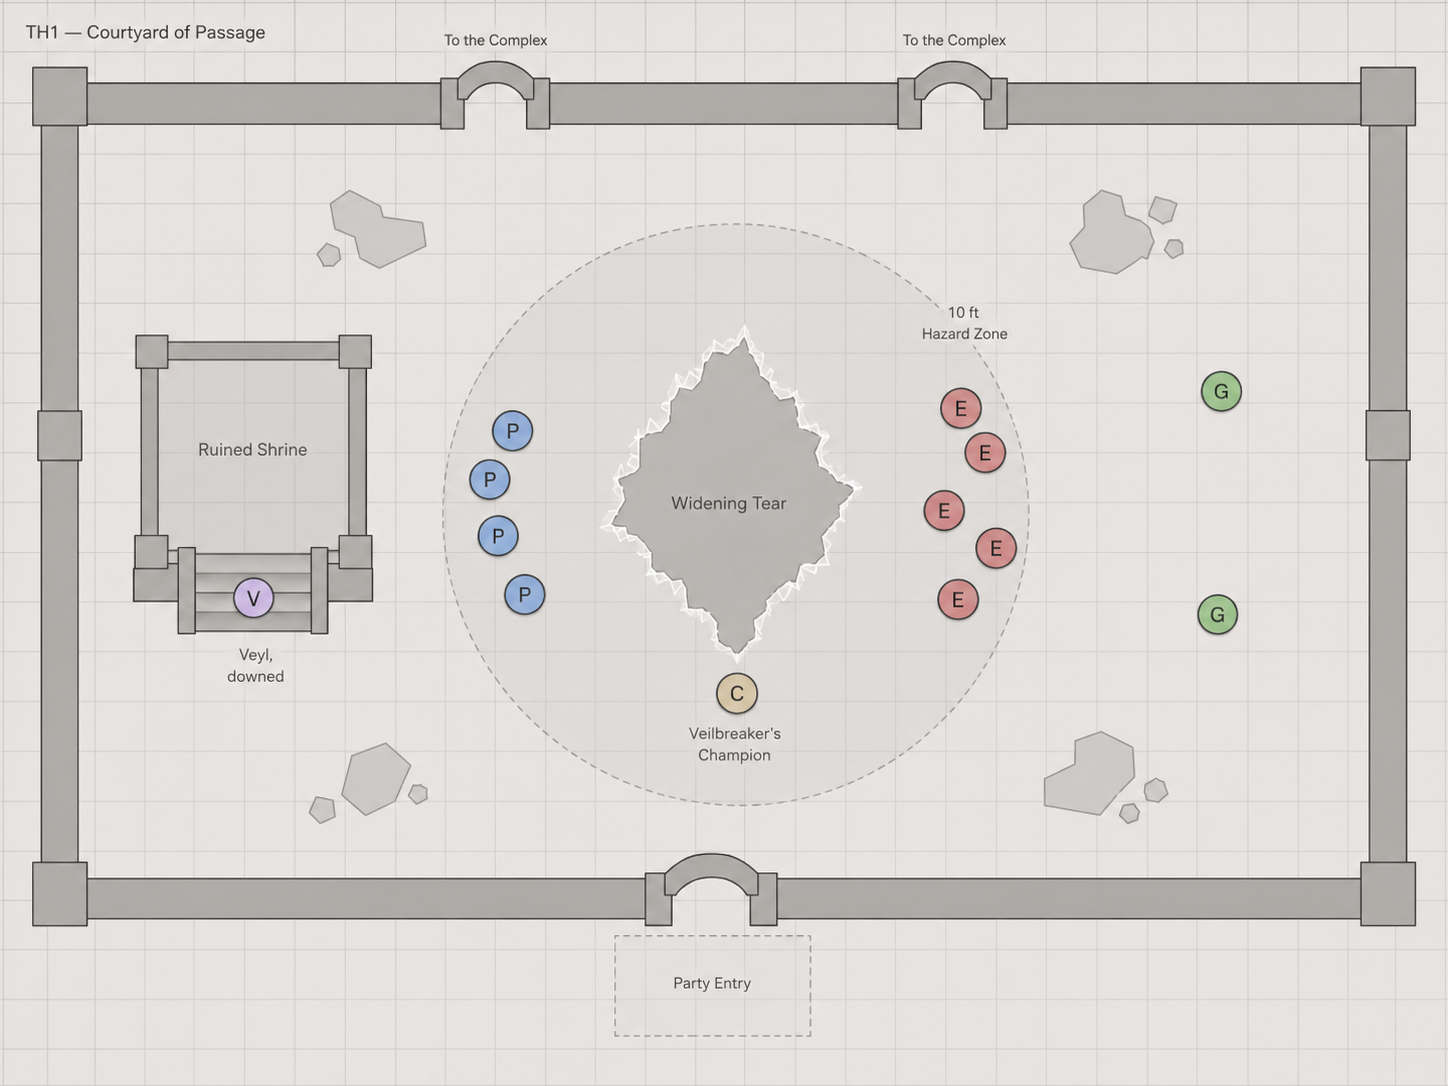
Map Overview

The map depicts the enclosed courtyard at the entrance to the Threshold of Souls. The heroes enter through the broad archway in the southern wall. Two exits stand opposite them to the north, but reaching either one means crossing a battlefield already slipping into chaos.

The jagged shape near the center of the courtyard marks the Widening Tear. The dashed circle around it shows the tear’s initial 10-foot hazard zone. This boundary does not remain fixed. As the rupture expands during the encounter, move or redraw the edge of the danger zone to match its new size.

Important Locations

Party Entry
The heroes enter through the southern archway. From here, they can see Veyl lying near the ruined shrine, the Veilbreaker’s Champion waiting ahead, and the larger battle raging around the central tear.
Widening Tear
The planar rupture hangs above a patch of shattered flagstones near the center of the courtyard. Creatures that stray too close feel it pulling at their bodies and thoughts. Anyone dragged into the heart of the tear disappears into the Gray.
Ruined Shrine
The structure along the western wall is all that remains of a small funerary shrine. Its cracked pillars, low walls, and broad steps provide cover and break lines of sight. The shrine also offers the safest route to Veyl without approaching the tear directly.
Northern Exits
The two archways in the northern wall lead toward the Hall of Weighing and the deeper portions of the Threshold. Both are visible from the entrance, though the Champion and the widening tear make a direct rush across the courtyard dangerous.

Map Tokens

Marker Represents Starting Position
V Veyl, wounded morrigna defender Collapsed on the steps of the ruined shrine
C The Veilbreaker’s Champion South of the tear, between the heroes and Veyl
P Psychopomp defenders Holding the western side of the courtyard
E Twisted echoes Pressing into the courtyard from the east
G Threshold Guardians Engaged on the eastern side until Round 3

Using the Battlefield

The courtyard is deliberately open. Its danger comes less from walls and narrow passages than from the shrinking amount of safe ground. As the tear expands, the heroes must decide whether to engage the Champion, reach the wounded Veyl, or push toward the northern exits before their route is cut off.

Scattered rubble and broken flagstones can be treated as difficult terrain where marked. The ruined shrine provides the best cover in the courtyard and gives cautious characters a route around the western edge of the tear. The Champion understands this and may move to block the shrine if the heroes attempt to reach Veyl.
GM Note: The Larger Battle

The psychopomps and echoes shown around the courtyard are part of the battle’s backdrop. Do not roll initiative or track Hit Points for each of them. Their struggle explains why the heroes initially face the Veilbreaker’s Champion without help and keeps the rest of the courtyard feeling active.

Describe fragments of the conflict at the end of each round: a guardian driven back toward the tear, an echo scattered by a psychopomp’s blade, or another section of the defensive line beginning to fail. These moments should add urgency without changing the encounter mechanically.

At the beginning of Round 3, two Threshold Guardians marked with G break away from the eastern fighting and join the heroes. Remove their background markers and place their combat tokens in the nearest open spaces along that side of the courtyard.

```
Courtyard of Passage

Read-only syndicated snapshot · Syndicated Aug 20, 2026, 2:59 AM. Content updates when the author syndicates again in Adventure Maker.

Made with Amba. Want to try it? Check out Amba — free to use.