Level 4
GM Map Notes: A1 - S8, Bridge Sinkhole Level 4
The Black Cavern · Descriptive Notes, Table Cues, and Tactical Guidance
This map should feel different from the upper sinkhole levels. Level 1 is broken natural cave, Level 2 is exposed Darklands masonry, Level 3 is Grath One-Eye's occupied lair, but Level 4 is something older and more silent. It is not a lair built by goblins. It is a natural Darklands cavern pushed upward by deep geological action, then accidentally exposed by the sinkhole collapse.
Reading the Map
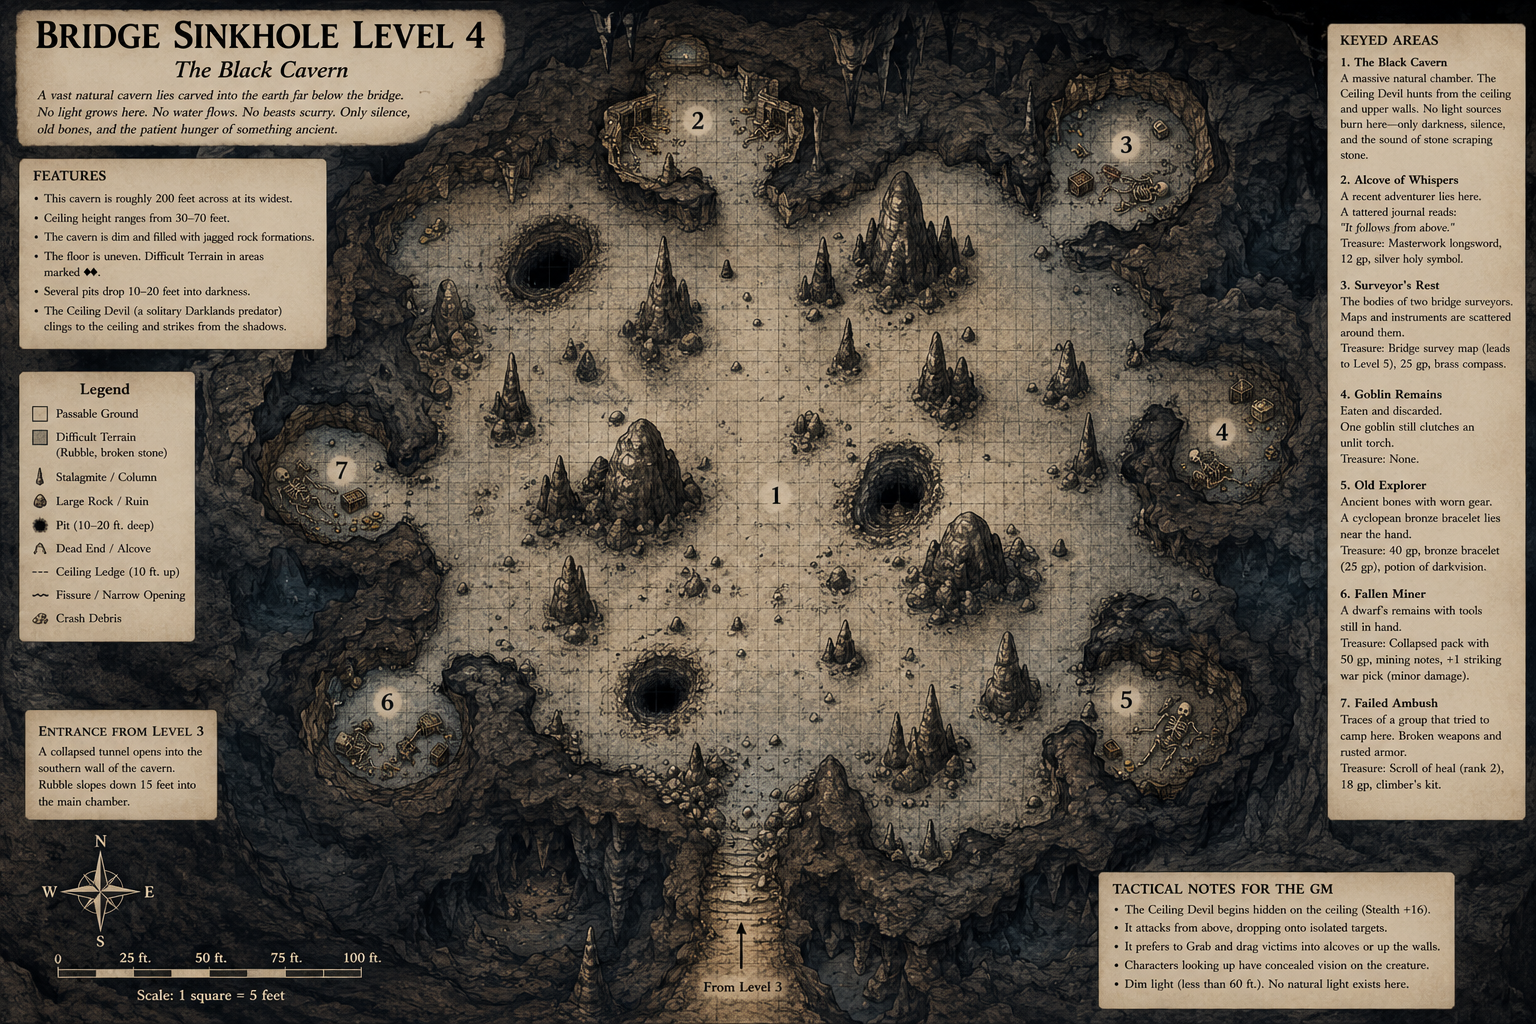
The main chamber is intentionally oversized. It gives the Ceiling Devil room to hunt vertically instead of standing in one place. The open center is dangerous not because it is empty, but because it exposes the party to attacks from above. The side alcoves are not separate encounters; they are evidence. Each one shows a previous failed expedition and tells the players that the monster has been killing intruders for years.
The numbered alcoves are placed around the cavern perimeter so the party has reasons to split up, investigate, and move away from the safest formation. That is the encounter's real trap. The treasure draws them outward. The story clues slow them down. The ceiling predator waits until someone becomes isolated.
Terrain Details
- Central floor: mostly passable, but uneven. Use normal movement unless a square is marked as rubble.
- Rubble fields: difficult terrain. Creatures moving quickly may kick loose stones and reveal their location.
- Stalagmites: provide cover. Larger formations block line of sight completely.
- Pits: 10-20 feet deep. Falling creatures take normal falling damage and may land prone.
- Ceiling: 30-70 feet high. The Ceiling Devil can move across it freely.
- Light: torches and low-light sources do not fully illuminate the ceiling. Darkvision reveals shapes, but not always distance.
GM Tactical Notes
Do not begin with initiative. Let the players explore. Let them find one or two bodies first. The Ceiling Devil should feel like an environmental threat before it becomes a monster.
- Start the Ceiling Devil hidden on the ceiling above the central chamber.
- Have it wait until at least one PC moves 20 feet or more away from the group.
- Target rear-line characters, scouts, healers, or anyone examining a body alone.
- Use Ceiling Ambush to open the fight from above.
- Use Dragged Screaming to pull victims toward alcoves, pits, or vertical walls.
- Do not keep the monster on the ground. It should climb, withdraw, and reappear.
- If the party clusters tightly, use falling stones or dust clouds to break their formation.
- If the party plays carefully, reward them. Good light, rope lines, readied actions, and ceiling checks should matter.
Player-Facing Hints
These clues should help careful players survive without revealing the monster too early.
- Bodies are dragged upward or sideways, not simply mauled where they fell.
- Scratch marks appear high on walls and along the underside of stone shelves.
- The cavern floor has fewer tracks than expected.
- Some blood spatters are on stalactites and ceiling stone.
- Loose coins and tools are scattered below, as if dropped from above.
- The goblin remains show fear, not battle discipline. They died running.
Running the Suspense
Use sound before sight. Scraping, clicking, a falling pebble, a rope twitching, a body shifting when no one touched it. If the party looks up, let them make Perception checks. On a success, they see something withdraw into the stone teeth above. On a critical success, they identify the exact square before the attack.
Using the Alcoves
Each alcove is both treasure placement and storytelling. They show different groups who reached this level and died: bridge surveyors, goblins, miners, and adventurers. This makes the cavern feel used without needing living inhabitants.
- E2 tells the party the threat comes from above.
- E3 connects the dungeon back to the bridge crisis.
- E4 explains why Grath's forces avoid Level 4.
- E5 hints that the cavern has been exposed before.
- E6 gives useful gear and points toward deeper stonework.
- E7 shows that even prepared adventurers failed here.
Ending the Encounter
Once the Ceiling Devil is defeated or driven off, the Black Cavern changes tone. The silence becomes safe enough to search. The party can recover the bridge survey map, confirm that the goblins were not responsible for all the disappearances, and discover signs that the deeper collapse continues below.