A1-S7 - Lower Sinkhole Exploration
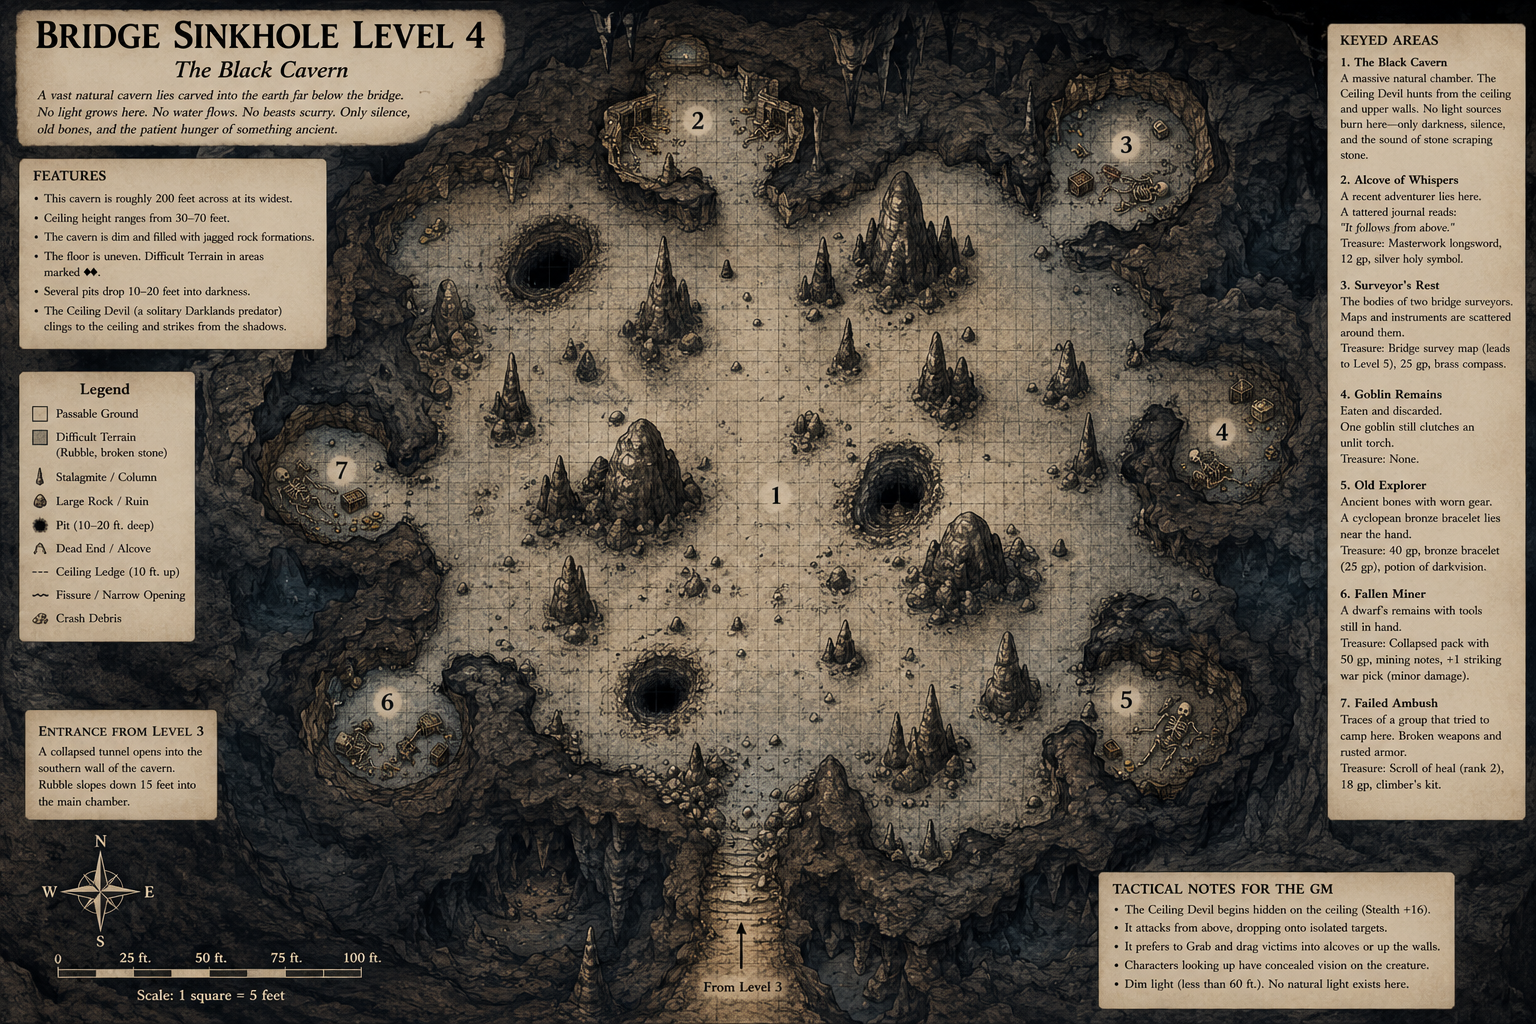
A1 - S8: Bridge Sinkhole Level 4
The Black Cavern
Level 4 is a single vast Darklands cavern exposed by the same deep upheaval that opened the sinkhole beneath Kridorfrost. No goblin patrols this level. No kobold slave is sent here. Grath One-Eye claims the upper levels, but even he refuses to enter the Black Cavern.
Level Features
- Scale: 1 square = 5 feet.
- Ceiling: 30–70 feet high, with jagged stone, fissures, and hanging stalactites.
- Light: No natural light. Dim light does not reveal the ceiling clearly.
- Sound: Sound carries strangely. Scraping stone may seem to come from the wrong direction.
- Terrain: Rubble, broken stone, stalagmites, and loose scree create difficult terrain in marked areas.
- Pits: Several holes drop 10–20 feet into black fissures.
Keyed Areas
A1 - S8 - E1. The Black Cavern
This enormous central cavern is the main hunting ground of the Ceiling Devil. The floor is broad, uneven, and scattered with stalagmites, old rubble, snapped bones, and ancient Darklands stonework pushed upward by the deeper collapse.
The Ceiling Devil begins hidden on the ceiling unless the party has already made loud preparations or used magic to scout above.
A1 - S8 - E2. Alcove of Whispers
A recent adventurer lies here, half-dragged beneath a stone shelf. A torn journal page reads: “It follows from above.”
Treasure: Masterwork longsword, 12 gp, silver holy symbol.
A1 - S8 - E3. Surveyor's Rest
Two bridge surveyors died here while trying to map the lower collapse. Their measuring rods and chalk lines still mark the floor.
Treasure: Bridge survey map, 25 gp, brass compass.
A1 - S8 - E4. Goblin Remains
Several goblin skeletons are scattered near a side nook. One still clutches an unlit torch. These remains explain why the goblins forbid travel below Level 3.
Treasure: None.
A1 - S8 - E5. Old Explorer
An ancient skeleton rests against the wall, surrounded by rotted packs and broken tools. A cyclopean bronze bracelet lies near one hand.
Treasure: 40 gp, bronze bracelet worth 25 gp, potion of darkvision.
A1 - S8 - E6. Fallen Miner
A dwarf miner's remains lie beside a collapsed pack. His tools are still usable, though badly rusted.
Treasure: 50 gp, mining notes, +1 striking war pick with minor cosmetic damage.
A1 - S8 - E7. Failed Ambush Camp
A group once tried to camp here and fight whatever hunted the cavern. Their trap lines were broken, their fire pit is cold, and their weapons are scattered.
Treasure: Scroll of heal, 18 gp, climber's kit.
Encounter: The Ceiling Devil
The Ceiling Devil does not attack immediately. It waits until the party separates, investigates bodies, or crosses the open center. It prefers isolated rear targets, spellcasters, or anyone looking into a pit.
Tactics
- Begins hidden on the ceiling.
- Attacks from above using Ceiling Ambush.
- Grabs one target, then uses Dragged Screaming to pull the victim toward an alcove or up the wall.
- Uses stalagmites and darkness to break line of sight.
- Retreats if reduced below one-third HP unless cornered.
Treasure Summary
- +1 striking war pick
- Masterwork longsword
- Scroll of heal
- Potion of darkvision
- Climber's kit
- Brass compass
- Cyclopean bronze bracelet
- 145 gp total mixed coin
- Bridge survey map pointing toward the deeper route
Clues
- The goblins did not kill the explorers on this level.
- Some bodies were dragged upward, not across the ground.
- Ancient Darklands stonework has been forced upward into the cavern.
- The deeper collapse is still active below this level.
- The route onward lies beyond the cavern, but the Ceiling Devil has prevented anyone from finding it safely.
GM Map Notes: A1 - S8, Bridge Sinkhole Level 4
The Black Cavern · Descriptive Notes, Table Cues, and Tactical Guidance
This map should feel different from the upper sinkhole levels. Level 1 is broken natural cave, Level 2 is exposed Darklands masonry, Level 3 is Grath One-Eye's occupied lair, but Level 4 is something older and more silent. It is not a lair built by goblins. It is a natural Darklands cavern pushed upward by deep geological action, then accidentally exposed by the sinkhole collapse.
Reading the Map
The main chamber is intentionally oversized. It gives the Ceiling Devil room to hunt vertically instead of standing in one place. The open center is dangerous not because it is empty, but because it exposes the party to attacks from above. The side alcoves are not separate encounters; they are evidence. Each one shows a previous failed expedition and tells the players that the monster has been killing intruders for years.
The numbered alcoves are placed around the cavern perimeter so the party has reasons to split up, investigate, and move away from the safest formation. That is the encounter's real trap. The treasure draws them outward. The story clues slow them down. The ceiling predator waits until someone becomes isolated.
Terrain Details
- Central floor: mostly passable, but uneven. Use normal movement unless a square is marked as rubble.
- Rubble fields: difficult terrain. Creatures moving quickly may kick loose stones and reveal their location.
- Stalagmites: provide cover. Larger formations block line of sight completely.
- Pits: 10-20 feet deep. Falling creatures take normal falling damage and may land prone.
- Ceiling: 30-70 feet high. The Ceiling Devil can move across it freely.
- Light: torches and low-light sources do not fully illuminate the ceiling. Darkvision reveals shapes, but not always distance.
GM Tactical Notes
Do not begin with initiative. Let the players explore. Let them find one or two bodies first. The Ceiling Devil should feel like an environmental threat before it becomes a monster.
- Start the Ceiling Devil hidden on the ceiling above the central chamber.
- Have it wait until at least one PC moves 20 feet or more away from the group.
- Target rear-line characters, scouts, healers, or anyone examining a body alone.
- Use Ceiling Ambush to open the fight from above.
- Use Dragged Screaming to pull victims toward alcoves, pits, or vertical walls.
- Do not keep the monster on the ground. It should climb, withdraw, and reappear.
- If the party clusters tightly, use falling stones or dust clouds to break their formation.
- If the party plays carefully, reward them. Good light, rope lines, readied actions, and ceiling checks should matter.
Player-Facing Hints
These clues should help careful players survive without revealing the monster too early.
- Bodies are dragged upward or sideways, not simply mauled where they fell.
- Scratch marks appear high on walls and along the underside of stone shelves.
- The cavern floor has fewer tracks than expected.
- Some blood spatters are on stalactites and ceiling stone.
- Loose coins and tools are scattered below, as if dropped from above.
- The goblin remains show fear, not battle discipline. They died running.
Running the Suspense
Use sound before sight. Scraping, clicking, a falling pebble, a rope twitching, a body shifting when no one touched it. If the party looks up, let them make Perception checks. On a success, they see something withdraw into the stone teeth above. On a critical success, they identify the exact square before the attack.
Using the Alcoves
Each alcove is both treasure placement and storytelling. They show different groups who reached this level and died: bridge surveyors, goblins, miners, and adventurers. This makes the cavern feel used without needing living inhabitants.
- E2 tells the party the threat comes from above.
- E3 connects the dungeon back to the bridge crisis.
- E4 explains why Grath's forces avoid Level 4.
- E5 hints that the cavern has been exposed before.
- E6 gives useful gear and points toward deeper stonework.
- E7 shows that even prepared adventurers failed here.
Ending the Encounter
Once the Ceiling Devil is defeated or driven off, the Black Cavern changes tone. The silence becomes safe enough to search. The party can recover the bridge survey map, confirm that the goblins were not responsible for all the disappearances, and discover signs that the deeper collapse continues below.
Tactical Guide: Beating the Ceiling Devil with the Full Party
A1 - S8 · Level 4 · Seven PCs + Grask
Core Tactical Assessment
The party wins by refusing to let the Ceiling Devil isolate one victim. The monster wants to ambush from above, Grab a weak target, drag them into darkness, and force the group to scatter. The PCs should instead move as two linked teams, anchor themselves with ropes, light the ceiling, and punish the monster every time it descends.
Pre-Fight Plan
- Light the ceiling first. Use magical light, torches thrown high, lantern poles, or ranged light sources.
- Rope the party in pairs. Kharzug-Caldris, Auren-Thoros, Brakkus-Vaelith, Nemeia-Grask nearby.
- Do not split into alcoves alone. Search alcoves in pairs while the rest overwatches the ceiling.
- Use Readied actions. Brakkus, Thoros, and Auren should be ready to shoot when the creature drops.
- Mark escape routes. Nobody should end a turn isolated in the open center.
Ideal Formation
| Position | Characters | Job |
|---|---|---|
| Front Anchor | Kharzug + Caldris | Hold the center, protect the casters, threaten reach zones. |
| Mobile Flank | Auren + Grask | Create off-guard opportunities and punish grounded targets. |
| Ranged Overwatch | Brakkus + Thoros | Ready ranged attacks against ceiling movement. |
| Support Core | Vaelith + Nemeia | Buff, debuff, control terrain, and keep light on the monster. |
Round-by-Round Guide
Before Initiative
- Auren: Seek traps, drag marks, and ceiling blood.
- Thoros: Hunt Prey if the creature is detected.
- Grask: Use scent and stay near Nemeia or Vaelith as bodyguard.
- Brakkus: Take cover and ready firearm shot.
- Vaelith: Prepare Inspire Courage.
- Nemeia: Prepare fog, control, or revealing magic.
- Caldris: Shield raised; ready Heal or Bless.
- Kharzug: Stand central with reach weapon ready.
Round 1
- Vaelith: Open with Inspire Courage. If possible, Lingering Composition.
- Brakkus: Shoot only when the monster is visible; do not waste reloads blindly.
- Thoros: Hunt Prey, then shoot. Use Gravity Weapon if already safe.
- Nemeia: Debuff the monster or deny its hiding space.
- Kharzug: Move under the monster’s descent path and threaten with reach.
- Caldris: Bless or hold Heal. Raise Shield if exposed.
- Auren: Stay mobile; do not rush alone. Prepare to flank after it lands.
- Grask: Guard a caster or prepare to bite if the monster comes low.
Round 2
If the Ceiling Devil grabs someone, the whole party shifts to rescue mode.
- Kharzug: Attack or Trip. Force it to drop the victim or stay threatened.
- Caldris: Heal the grabbed target or use shield/body blocking.
- Auren: Strike when the monster is off-guard; use Sneak Attack.
- Grask: Bite or Grapple if the creature is reachable.
- Brakkus: Fire into the monster once exposed. Use high-damage firearm shots.
- Thoros: Focus fire on hunted prey.
- Vaelith: Maintain Inspire Courage; Soothe if needed.
- Nemeia: Use control magic to slow, blind, reveal, or restrict the monster.
Round 3+
- Keep the party within 20 feet of each other.
- Rotate injured PCs behind Kharzug and Caldris.
- Do not chase the monster into dark alcoves one at a time.
- Ready actions when it climbs out of reach.
- Force it to spend actions moving instead of attacking.
Individual Roles
| Character | Best Use | Avoid |
|---|---|---|
| Auren | Scout, identify ambush signs, flank after the monster lands. | Entering alcoves alone. |
| Brakkus | Ranged overwatch, firearm burst damage, engineering checks on unstable stone. | Standing in the open without cover. |
| Kharzug | Central reach control, punishing descents, blocking drag routes. | Chasing into side tunnels alone. |
| Nemeia | Control, reveal, debuff, deny hiding spaces. | Standing under ceiling darkness without protection. |
| Caldris | Heal, Bless, shield wall, emergency rescue. | Using all healing too early. |
| Thoros | Hunt Prey, ranged pressure, Survival/Tracking reads. | Sending Grask too far ahead. |
| Vaelith | Inspire Courage, Soothe, Recall Knowledge, morale anchor. | Trying to duel or scout alone. |
| Grask | Bodyguard, flank partner, scent tracker, caster protector. | Climbing after the Ceiling Devil unsupported. |
Winning Strategy
- Detect the ceiling threat before full combat begins.
- Stay paired and roped.
- Force the Ceiling Devil to come down.
- Use Inspire Courage and focus fire.
- Rescue grabbed allies immediately.
- Never let the monster turn the fight into isolated duels.
PF2e Rules Note: Grabbed on the Ceiling
A1 - S8 · The Ceiling Devil · Grapple, Escape, Falling, and Rescue
What Happens When the Ceiling Devil Grabs a PC?
| Step | Rule | Table Effect |
|---|---|---|
| 1. Jaws hit | Jaws Strike applies Grab. | The target becomes grabbed: off-guard, immobilized, and at risk if it uses manipulate actions. |
| 2. Dragged upward | Ceiling Devil uses Dragged Screaming. | The PC is moved with the monster and takes scraping damage. |
| 3. Suspended | The PC remains grabbed while the monster clings to the ceiling. | The PC cannot use move actions until free. |
| 4. Escape or rescue | PC or allies act. | Escaping may cause a fall unless the PC has a rope, handhold, spell, or ally support. |
Escaping While Grabbed
A grabbed PC can use Escape ◆. They may roll their unarmed attack modifier, Acrobatics, or Athletics against the Ceiling Devil’s Athletics DC. Escape has the attack trait, so it suffers and increases multiple attack penalty. On a success, the PC is free; on a critical success, they may also Stride 5 feet, if they have somewhere to go. On a critical failure, they cannot try to Escape again until their next turn. :contentReference[oaicite:1]{index=1}
| Escape Result | Effect |
|---|---|
| Critical Success | PC gets free and may Stride 5 feet if physically possible. |
| Success | PC gets free. |
| Failure | PC remains grabbed. |
| Critical Failure | PC remains grabbed and cannot Escape again until next turn. |
If the PC Escapes While 30–70 Feet Up
If nothing is holding the PC after Escape, they fall. PF2e falling damage is bludgeoning damage equal to half the distance fallen, and if the fall deals damage, the creature lands prone. A 40-foot fall deals 20 bludgeoning damage. A 60-foot fall deals 30 bludgeoning damage. :contentReference[oaicite:2]{index=2}
| Ceiling Height | Fall Damage | Result |
|---|---|---|
| 20 feet | 10 bludgeoning | Land prone. |
| 30 feet | 15 bludgeoning | Land prone. |
| 50 feet | 25 bludgeoning | Land prone. |
| 70 feet | 35 bludgeoning | Land prone. |
Grab an Edge
If the escaping PC falls past a ledge, stalactite, rope, bridge chain, or stone shelf, they can use Grab an Edge ↺ as a reaction. They roll Acrobatics or Reflex, usually against the Climb DC. On a success, they stop the fall if they have a free hand; on a critical success, they grab even without a free hand and treat the fall as 30 feet shorter. :contentReference[oaicite:3]{index=3}
How Allies Can Help
| Ally Action | Suggested Rule | Effect |
|---|---|---|
| Cut or damage the grabbing limb | Strike the Ceiling Devil | On a critical hit, GM may allow the grabbed PC an immediate Escape attempt. |
| Throw or hold a rope | Interact ◆, then Athletics DC 16–20 | On success, PC gets +1 circumstance bonus to Grab an Edge or avoid falling; +2 on critical success. |
| Climb after the victim | Athletics to Climb | Useful but dangerous. The rescuer may become the next target. |
| Heal the victim | Heal, Soothe, Battle Medicine | Prevents the fall from becoming instantly fatal. |
| Force the monster to move | Trip, shove, forced movement, control spell | If the monster loses position or grip, the GM may end the grab or trigger a fall. |
Important GM Ruling for This Encounter
Fair ruling: Escaping from the Ceiling Devil ends the grab, but does not magically place the PC safely on the ground. If they are suspended in open air, they fall unless they have a rope, ledge, spell, fly speed, or can Grab an Edge.
Player Hint
Do not wait until someone is hanging 50 feet up to solve the problem. Use rope lines before crossing the cavern. Keep light on the ceiling. Ready ranged attacks. If someone is grabbed, rescue them immediately.
| Version | HP | AC | Use Case |
|---|---|---|---|
| Weak | 95–110 | 22 | Level 1–2 party |
| Standard | 125–140 | 24 | 7 PCs + Grask, fair hard boss |
| Elite | 150 | 25 | Very strong party / finale |
| Do not use casually | 170 | 26 | Likely PC death unless they are level 3+ |
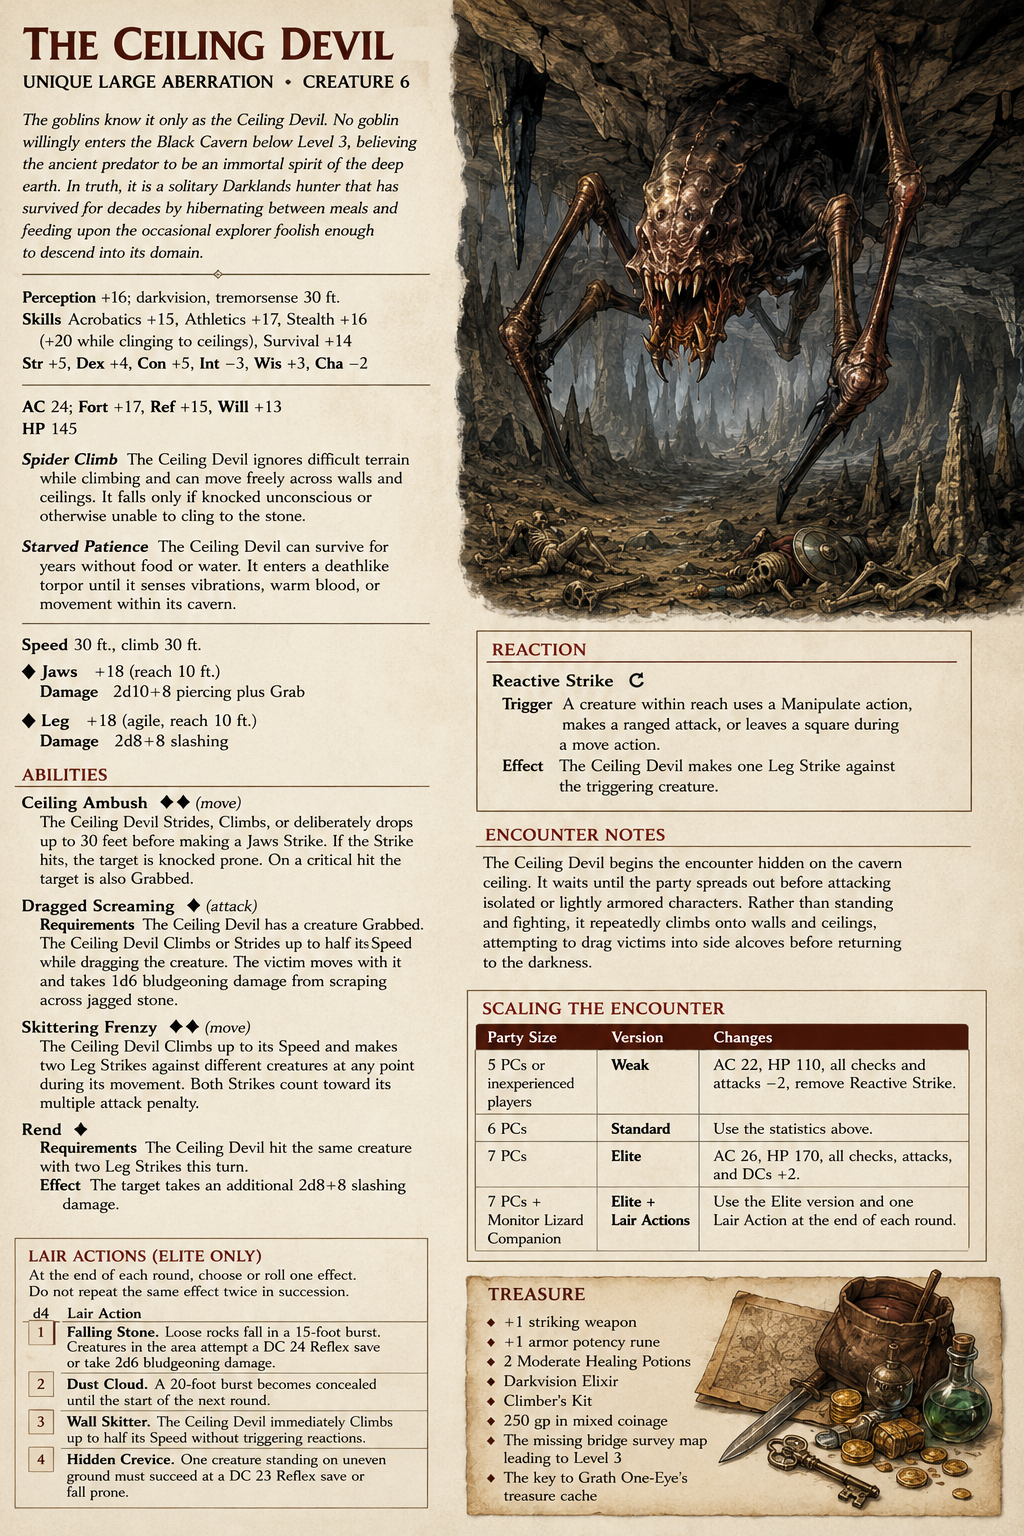
The Ceiling Devil
Unique Large Aberration Creature 6
The goblins know it only as the Ceiling Devil. No goblin willingly enters the Black Cavern below Level 3, believing the ancient predator to be an immortal spirit of the deep earth. In truth, it is a solitary Darklands hunter that has survived for decades by hibernating between meals and feeding upon the occasional explorer foolish enough to descend into its domain.
Perception +16; darkvision, tremorsense 30 ft.
Skills Acrobatics +15, Athletics +17, Stealth +16 (+20 while clinging to ceilings), Survival +14
Str +5, Dex +4, Con +5, Int –3, Wis +3, Cha –2
AC 24; Fort +17; Ref +15; Will +13
HP 145
Spider Climb The Ceiling Devil ignores difficult terrain while climbing and can move freely across walls and ceilings. It falls only if knocked unconscious or otherwise unable to cling to the stone.
Starved Patience The Ceiling Devil can survive for years without food or water. It enters a deathlike torpor until it senses vibrations, warm blood, or movement within its cavern.
Speed 30 ft., climb 30 ft.
Melee ◆ Jaws +18 (reach 10 ft.) Damage 2d10+8 piercing plus Grab
Melee ◆ Leg +18 (agile, reach 10 ft.) Damage 2d8+8 slashing
Abilities
Ceiling Ambush ◆◆
(move)
The Ceiling Devil Strides, Climbs, or deliberately drops up to 30 feet before making a Jaws Strike. If the Strike hits, the target is knocked prone. On a critical hit the target is also Grabbed.
Dragged Screaming ◆
(attack)
Requirements: The Ceiling Devil has a creature Grabbed.
The Ceiling Devil Climbs or Strides up to half its Speed while dragging the creature. The victim moves with it and takes 1d6 bludgeoning damage from scraping across jagged stone.
Skittering Frenzy ◆◆
(move)
The Ceiling Devil Climbs up to its Speed and makes two Leg Strikes against different creatures at any point during its movement. Both Strikes count toward its multiple attack penalty.
Rend ◆
Requirements: The Ceiling Devil hit the same creature with two Leg Strikes this turn.
Effect: The target takes an additional 2d8+8 slashing damage.
Reaction
Reactive Strike ↺
Trigger: A creature within reach uses a Manipulate action, makes a ranged attack, or leaves a square during a move action.
Effect: The Ceiling Devil makes one Leg Strike against the triggering creature.
Encounter Notes
The Ceiling Devil begins the encounter hidden on the cavern ceiling. It waits until the party spreads out before attacking isolated or lightly armored characters. Rather than standing and fighting, it repeatedly climbs onto walls and ceilings, attempting to drag victims into side alcoves before returning to the darkness.
Scaling the Encounter
| Party | Version | Changes |
|---|---|---|
| 5 PCs or inexperienced players | Weak | AC 22, HP 110, all checks and attacks –2, remove Reactive Strike. |
| 6 PCs | Standard | Use the statistics above. |
| 7 PCs | Elite | AC 26, HP 170, all checks, attacks, and DCs +2. |
| 7 PCs + Monitor Lizard Companion | Elite + Lair Actions | Use the Elite version and one Lair Action at the end of each round. |
Lair Actions (Elite Only)
At the end of each round, choose or roll one effect. Do not repeat the same effect twice in succession.
- Falling Stone. Loose rocks fall in a 15-foot burst. Creatures in the area attempt a DC 24 Reflex save or take 2d6 bludgeoning damage.
- Dust Cloud. A 20-foot burst becomes concealed until the start of the next round.
- Wall Skitter. The Ceiling Devil immediately Climbs up to half its Speed without triggering reactions.
- Hidden Crevice. One creature standing on uneven ground must succeed at a DC 23 Reflex save or fall prone.
Treasure
The scattered remains of previous explorers contain:
- +1 striking weapon
- +1 armor potency rune
- 2 Moderate Healing Potions
- Darkvision Elixir
- Climber's Kit
- 250 gp in mixed coinage
- The missing bridge survey map leading to Level 3
- The key to Grath One-Eye's treasure cache