The Twice-Damned Crown

Snapshot · Jul 15, 2026, 8:24 PM

  • The Twice-Damned Crown
    • narrativeAdventure Summary
    • narrativeMain
    • narrativeAdventure Background
    • articleGazetteer of Egorian
    • handoutVoren's Journal — Crown Mark Sketch
    • handoutPlayer Primer
    • handoutContract Fragment — Shadow Pact
    • imageEgorian City Map
    • Acts
      • actAct 1 — The Egorian Investigation
        • sceneScene 1 — Arrival in Egorian
          • handoutMission Briefing
          • trapFalling Block
        • sceneScene 2 — The Scene of the Crime
          • handoutDarian's Hidden Journal
        • sceneScene 3 — Interview with Lady Vexilla
          • handoutLady Vexilla's Profile
        • sceneScene 4 — Interview with Captain Aelar
          • handoutCaptain Aelar's Profile
        • sceneScene 5 — The Shadow Informant
          • encounterThe Shadow Informant
            • handoutVoren Kain's Profile
            • handoutVoren's Journal — Crown Mark Sketch
            • handoutContract Fragment — Shadow Pact
        • sceneSCENE 6 -- THE AMBUSH
          • encounterAmbush!
            • mapAmbush Alley Map
            • monster blockScarred Hand NPCs
            • articleTactics for NPCs
          • pagePost Encounter
        • handoutDarian Thrune's Murder Scene
        • sidebarGM Brief: Act 1 Investigation
      • bucketBucket
        • monster blockThe Shadow-That-Walks (Velstrac)
    • NPCs
      • npcThe Unseen
      • npcLady Vexilla Thrune
      • npcCaptain Aelar
      • npcVoren Kain
      • npcThe Shadow-That-Walks

Ambush Alley Map

✦ ✦ ✦

Map Correction — Swap Positions

Encounter 6.1 • The Twice-Damned Crown

Map: Scarred Hand Ambush Change: Swap F and S positions Correction Important

⚠️ POSITION CORRECTION — SWAP FIGHTERS & SPELLCASTER

The positions of the two Scarred Hand Fighters (F) and the Spellcaster (S) should be swapped.

Old positions: Fighters were in the northern half of the alley using the column for cover. Spellcaster was behind the column.

Corrected positions: Fighters move behind the column. Spellcaster moves forward to the northern half of the alley.

❌ BEFORE (INCORRECT)

North F F ⛧ S
Column
Fighters exposed — Spellcaster hidden

✅ AFTER (CORRECTED)

North S ⛧ F F
Column
Fighters shielded — Spellcaster in front

🎯 Why This Swap Matters

Tactical Reason: The fighters are meant to be the frontline, absorbing the party's initial assault while the spellcaster provides support from behind cover. Placing the fighters behind the column and the spellcaster in front exposes the spellcaster to the party's attacks and disrupts the encounter's balance.

Correct Placement:

  • Fighters (F): Behind the column, using it as cover. They can still benefit from Shield Wall (+2 AC) while being protected from ranged attacks.
  • Spellcaster (S): In the northern half of the alley, with the column in front to block attacks. This allows the spellcaster to support the fighters while staying protected.

📌 Updated Token Positions

  • Fighters (×2): Behind the collapsed column, using it as cover. One fighter is 5 ft north of the column, the other is 5 ft south of the column. (Was: Exposed in alley)
  • Spellcaster: In the northern half of the alley, 5 ft north of the fighters, with the column between them and the party. (Was: Behind the column)
  • Crossbowman: Remains in the second-story window (unchanged).

❗ Action Required: Update the map to reflect the new positions. The crossbowman (C) remains in the window. The fighters and spellcaster have swapped positions as described.

Quick Reference — Corrected Positions

Fighters (×2): Behind column
Spellcaster: North of fighters
Crossbowman: Window (unchanged)

Map Correction — Swap F and S • Pathfinder 2e • The Twice-Damned Crown

✦ ✦ ✦
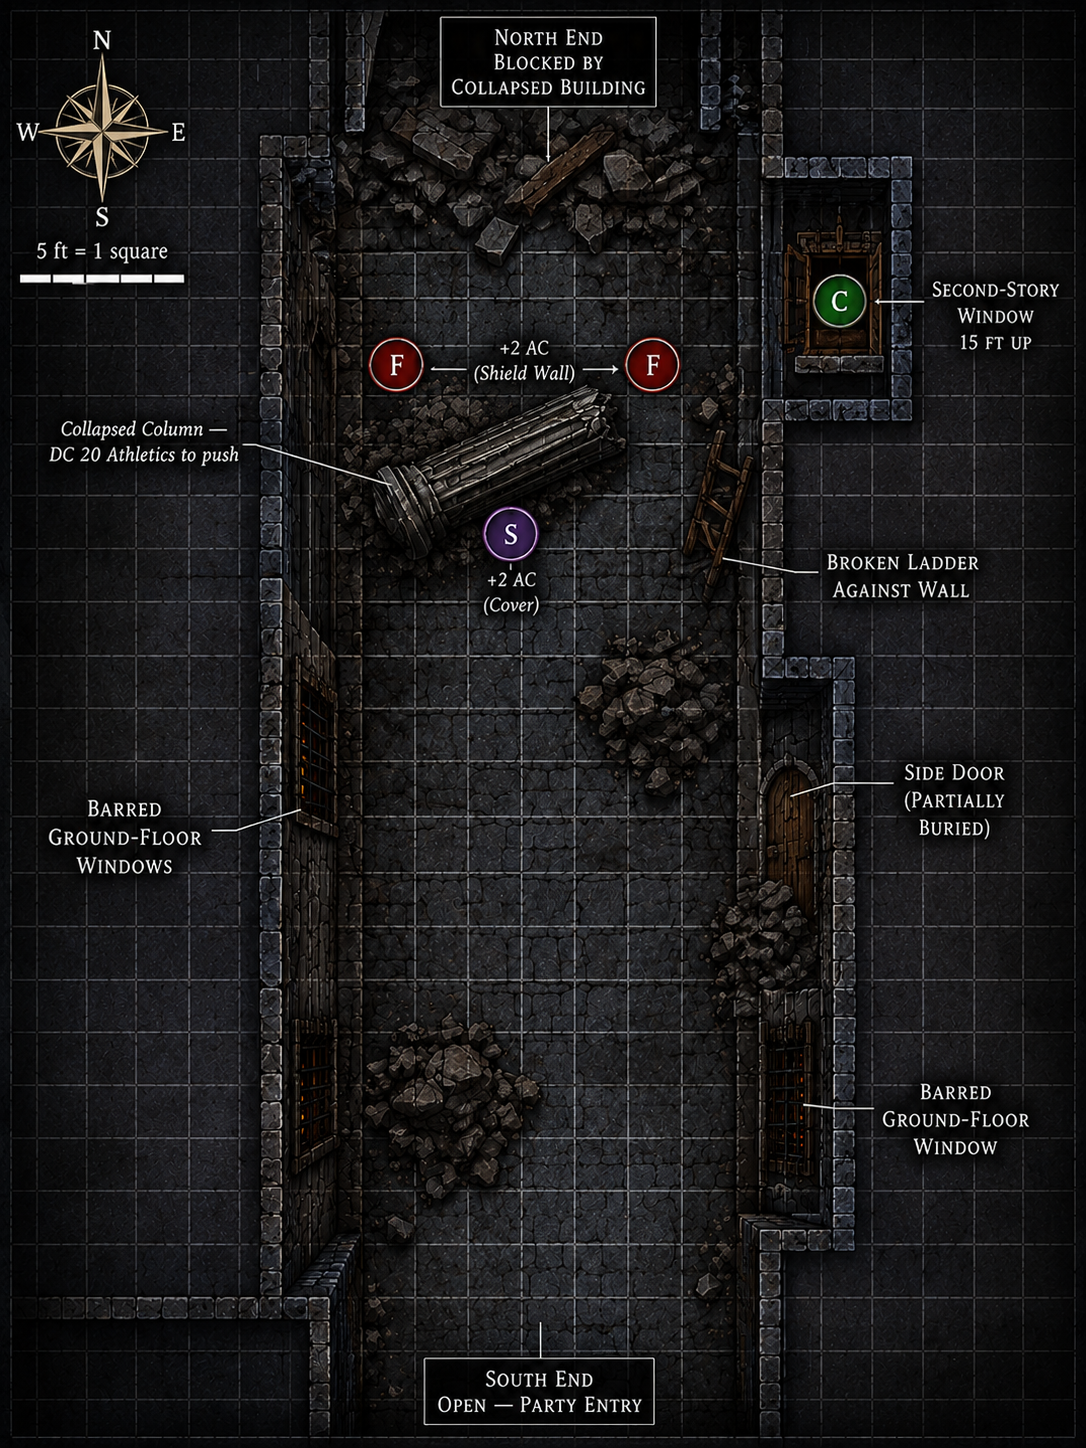
Ambush Alley Map

Click here to add a comment

Read-only syndicated snapshot · Syndicated Jul 15, 2026, 8:24 PM. Content updates when the author syndicates again in Adventure Maker.

Made with Amba. Want to try it? Check out Amba — free to use.