Ambush!
CombatEncounter 6.1 — The Ambush
The Twice-Damned Crown • Pathfinder 2e
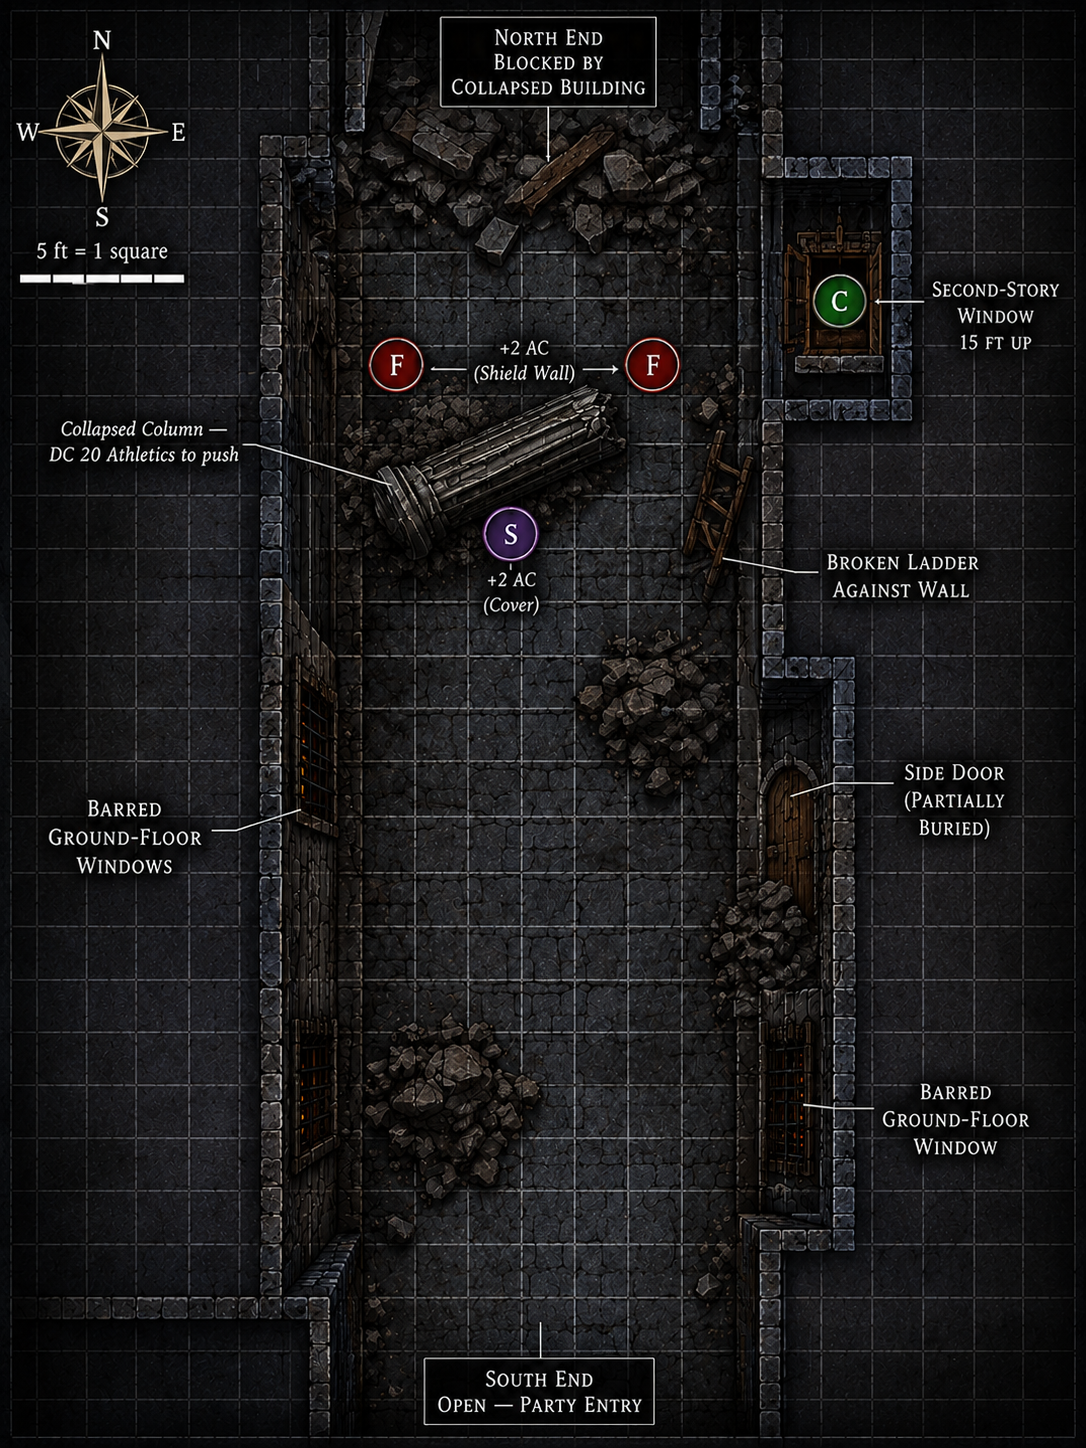
The alley erupts into violence. The ambushers have been waiting for you, and they are professionals. The crossbowman fires from the window above, the fighters surge from the rubble, and the spellcaster begins to weave their magic from behind a collapsed column.
You have walked into a kill zone. But you are not helpless. Fight back, break through, or turn the tables on the attackers.
Combat — The Scarred Hand Ambush
Encounter: Moderate (120 XP) Party Level: 6 Party Size: 4–5
⚔️ Scarred Hand Fighter (×2)
- Shield Wall: +2 AC when adjacent to another fighter
- Power Attack: Two-action attack, 3d8+6 damage
🏹 Scarred Hand Crossbowman (×1)
- Deadeye: Ignores cover on first shot
- Reload: 1 action to reload
🔮 Scarred Hand Spellcaster (×1)
- Spell Focus: +2 to spell attack rolls and DCs
- Reactive Shield: Casts Shield as a reaction when attacked
⚔️ Enemy Tactics
The Scarred Hand fighters move as a shield wall, advancing slowly to pin the party in the kill zone. The crossbowman provides suppressing fire from the window, targeting spellcasters and ranged attackers. The spellcaster hangs back, using Fear to disrupt the party and Magic Missile to finish off wounded targets.
Weakness: If the spellcaster is neutralized, the fighters lose their magical support. If the fighters are separated, they lose their shield wall bonus.
🏚️ Terrain — Narrow Alley
The alley is 15 feet wide and lined with rubble, collapsed walls, and debris. The fighters are using the rubble as cover, granting them a +2 bonus to AC. The crossbowman is in a second-story window, granting them a +2 circumstance bonus to ranged attacks. The spellcaster is behind a collapsed column, providing cover and concealment.
Interactive Elements: • Rubble piles can be used for cover • Collapsed columns can be pushed over (Athletics DC 20) • Windows can be climbed (Acrobatics DC 18)
⚖️ Easier Variant — 1 Less Attacker
If the party is struggling, or if you want a more forgiving encounter, reduce the number of Scarred Hand Fighters from 2 to 1. This changes the composition to:
Composition: 1× Scarred Hand Fighter, 1× Crossbowman, 1× Spellcaster (80 XP total)
Total XP: 80 — Low encounter
Ideal for: 4-player parties or groups with limited combat resources.
✅ Victory
The party defeats the Scarred Hand ambushers. They find a writ of payment on the spellcaster's body—a contract bearing the seal of House Thrune. The conspiracy has agents within the noble house itself.
❌ Defeat
The party is overwhelmed and captured by the Scarred Hand. They are taken to a hidden location in the Shadow District, where they are interrogated by a representative of the Shadow-That-Walks. The party must escape and continue their investigation.
Encounter 6.1 — The Ambush • Pathfinder 2e • The Twice-Damned Crown
⚔️ ✦ ⚔️Map Correction — Swap Positions
Encounter 6.1 • The Twice-Damned Crown
⚠️ POSITION CORRECTION — SWAP FIGHTERS & SPELLCASTER
The positions of the two Scarred Hand Fighters (F) and the Spellcaster (S) should be swapped.
Old positions: Fighters were in the northern half of the alley using the column for cover. Spellcaster was behind the column.
Corrected positions: Fighters move behind the column. Spellcaster moves forward to the northern half of the alley.
❌ BEFORE (INCORRECT)
✅ AFTER (CORRECTED)
🎯 Why This Swap Matters
Tactical Reason: The fighters are meant to be the frontline, absorbing the party's initial assault while the spellcaster provides support from behind cover. Placing the fighters behind the column and the spellcaster in front exposes the spellcaster to the party's attacks and disrupts the encounter's balance.
Correct Placement:
- Fighters (F): Behind the column, using it as cover. They can still benefit from Shield Wall (+2 AC) while being protected from ranged attacks.
- Spellcaster (S): In the northern half of the alley, with the column in front to block attacks. This allows the spellcaster to support the fighters while staying protected.
📌 Updated Token Positions
- Fighters (×2): Behind the collapsed column, using it as cover. One fighter is 5 ft north of the column, the other is 5 ft south of the column. (Was: Exposed in alley)
- Spellcaster: In the northern half of the alley, 5 ft north of the fighters, with the column between them and the party. (Was: Behind the column)
- Crossbowman: Remains in the second-story window (unchanged).
❗ Action Required: Update the map to reflect the new positions. The crossbowman (C) remains in the window. The fighters and spellcaster have swapped positions as described.
Quick Reference — Corrected Positions
Map Correction — Swap F and S • Pathfinder 2e • The Twice-Damned Crown
✦ ✦ ✦
Encounter 6.1 — Scarred Hand Ambush
Stat Blocks • The Twice-Damned Crown
⚔️ Scarred Hand Fighter — Frontline Soldier
Level: 5 • XP: 40 • Source: Custom (Scarred Hand Mercenary)
Melee [one-action] longsword +14 (versatile P), Damage 2d8+6 slashing
Melee [one-action] shield bash +12 (agile), Damage 1d6+4 bludgeoning
⚔️ Special Abilities
- Shield Wall: When adjacent to another Scarred Hand Fighter, gains +2 circumstance bonus to AC.
- Power Attack: [two-actions] Single longsword Strike. Damage: 3d8+6 slashing.
- Shield Block: [reaction] Reduce damage by 8 (shield's Hardness).
- Brave: +2 circumstance bonus to Will saves against fear effects.
Tactics: Work in pairs using Shield Wall. Use Power Attack against heavily armored targets. Disciplined and will not break formation easily.
🏹 Scarred Hand Crossbowman — Ranged Support
Level: 5 • XP: 40 • Source: Custom (Scarred Hand Mercenary)
Ranged [one-action] heavy crossbow +13 (range 120 ft., reload 1), Damage 2d8+4 piercing
Melee [one-action] dagger +10 (agile, finesse), Damage 1d4+2 piercing
🏹 Special Abilities
- Deadeye: Ignores cover on first ranged attack each encounter.
- Reload: Heavy crossbow requires one action to reload.
- Precise Shot: No penalty for shooting into melee.
- Rapid Reload: [one-action] Reload and fire as a single action (once per encounter).
Tactics: Positions in elevated or covered positions. Targets spellcasters and ranged attackers first. Uses Deadeye for accurate first shot.
🔮 Scarred Hand Spellcaster — Arcane Support
Level: 5 • XP: 40 • Source: Custom (Scarred Hand Mercenary)
Spell Attack +11, Spell DC 21
📜 Spells Prepared
🔮 Special Abilities
- Spell Focus: +2 circumstance bonus to spell attack rolls and spell DCs when concentrating on a single target.
- Reactive Shield: [reaction] Casts Shield when targeted by a physical attack, gaining +2 circumstance bonus to AC.
- Arcane Recovery: Once per day, recover one expended spell slot of 2nd level or lower.
Tactics: Hangs back behind cover. Uses Fear to disrupt the front line and Magic Missile to finish wounded targets. Saves Fireball for clustered enemies. Uses Invisibility to escape if threatened.
⚔️ Scarred Hand Sergeant — Ambush Leader
Level: 6 • XP: 80 • Source: Custom (Scarred Hand Mercenary Commander)
Melee [one-action] bastard sword +16 (versatile P), Damage 2d10+7 slashing
Melee [one-action] shield bash +14 (agile), Damage 1d6+5 bludgeoning
⚔️ Special Abilities
- Lead by Example: Allies within 30 feet gain +1 circumstance bonus to attack rolls and saves against fear.
- Shield Wall (Improved): When adjacent to at least one ally, gains +3 circumstance bonus to AC.
- Power Attack: [two-actions] Single bastard sword Strike. Damage: 4d10+7 slashing.
- Rally: [one-action] Grant a shaken ally +2 circumstance bonus to their next attack or save.
- Shield Block (Improved): Reduce damage from a physical attack by 12 (shield's Hardness).
🎯 Command Aura
- Orderly Advance: Directs fighters to move as a unit, granting an additional 5 ft. of movement on their first turn.
- Covering Fire: Signals the crossbowman to provide covering fire, imposing a -2 penalty to attacks against the sergeant.
Tactics: Leads from the front. Uses improved Shield Wall to protect allies. Uses Power Attack against the party's toughest fighter. Directs allies to maintain formation. Orders retreat if the encounter is going poorly.
Optional Boss: Use the sergeant as a leader encounter for larger parties (5+ players) or for a more challenging fight. Add to the encounter for severe difficulty.
⚖️ Encounter Summary
Standard Composition:
- 2× Scarred Hand Fighters (level 5)
- 1× Scarred Hand Crossbowman (level 5)
- 1× Scarred Hand Spellcaster (level 5)
Total XP: 120 (Moderate)
Easy Variant:
- 1× Scarred Hand Fighter (level 5)
- 1× Scarred Hand Crossbowman (level 5)
- 1× Scarred Hand Spellcaster (level 5)
Total XP: 80 (Low)
Hard Variant (with Sergeant):
- 1× Scarred Hand Sergeant (level 6)
- 2× Scarred Hand Fighters (level 5)
- 1× Scarred Hand Crossbowman (level 5)
- 1× Scarred Hand Spellcaster (level 5)
Total XP: 200 (Severe)
Encounter 6.1 — Scarred Hand Ambush • Pathfinder 2e • The Twice-Damned Crown
⚔️ ✦ ⚔️GM Tactics — Scarred Hand Ambush
Encounter 6.1 • The Twice-Damned Crown
📋 Encounter Overview
The Scarred Hand ambush is a coordinated attack designed to eliminate the party in a narrow kill zone. The attackers have prepared positions and work together to maximize their effectiveness. The party's ability to detect the ambush (Perception DC 26) and react strategically will determine the encounter's difficulty.
🏚️ Terrain Analysis
Narrow Alley — The Kill Zone
- Width: 15 feet — restricts movement and flanking.
- Rubble Piles: Provide +2 circumstance bonus to AC for anyone using them as cover.
- Collapsed Columns: Can be pushed over (Athletics DC 20) to create new cover or block paths.
- Windows: Can be climbed (Acrobatics DC 18) to access the building.
- Second-Story Window: The crossbowman's position — grants +2 circumstance bonus to AC (cover) and +2 circumstance bonus to ranged attacks (higher ground).
⚠️ Kill Zone: The alley is designed to funnel the party into a confined space where the fighters can engage them while the crossbowman and spellcaster provide support from safety. Breaking out of the kill zone is essential for the party's survival.
⚔️ Enemy Tactics — By Role
⚔️ Scarred Hand Fighters (×2)
Primary Role: Frontline engagement
- Shield Wall: Stay adjacent to each other for +2 AC.
- Power Attack: Use against heavily armored targets (2 actions, 3d8+6).
- Shield Block: Use reaction to reduce damage by 8.
- Brave: +2 to Will saves vs. fear.
Weakness: If separated, they lose their Shield Wall bonus. If one falls, the other loses the bonus.
🏹 Scarred Hand Crossbowman
Primary Role: Ranged support
- Deadeye: Use on first shot to ignore cover.
- Target Priority: Spellcasters > ranged attackers > frontline.
- Position: Second-story window — +2 AC (cover) and +2 to hit (higher ground).
- Rapid Reload: Use once per encounter to reload and fire as one action.
Weakness: Reload takes 1 action. Can be suppressed with ranged attacks or flushed out by climbing to the window.
🔮 Scarred Hand Spellcaster
Primary Role: Arcane support and disruption
- Opening Move: Magic Missile — 3 missiles (1d4+1 each) at the party's most threatening target.
- Disruption: Use Fear (DC 21) on the party's frontline to break their formation.
- Area Damage: Use Fireball (6d6, DC 21 Reflex) if the party clusters.
- Defense: Use Reactive Shield as a reaction when targeted by a physical attack (+2 AC).
- Escape: Use Invisibility to reposition or flee if threatened.
- Dispel Magic: Use to remove party buffs if needed.
Weakness: Low AC (19) and low HP (38). If the party can flank or close the distance, the spellcaster is vulnerable.
🎯 Cover & Penalties — Crossbowman's Position
🏹 Crossbowman — Second-Story Window
Cover: The crossbowman is behind a low wall/ledge, granting standard cover (+2 AC, +2 Reflex).
Higher Ground: Being above the party grants +2 circumstance bonus to ranged attacks.
Total Advantage: The crossbowman effectively has +2 AC and +2 to hit while in the window.
🔧 How the Party Can Neutralize the Crossbowman
- Ranged Attacks: Force the crossbowman to duck for cover or take damage. The crossbowman has only 45 HP.
- Climb the Building: Acrobatics DC 18 to scale the wall and reach the window. Once engaged in melee, the crossbowman loses their ranged advantage.
- Find the Stairs: The building's main entrance is blocked by rubble, but a side door (Perception DC 18) can be found. The stairs are guarded by a trap (see below).
- Smoke or Obscurement: Use spells like Obscuring Mist or smoke bombs to block the crossbowman's line of sight.
- Suppressing Fire: A ranged character can Ready an action to shoot when the crossbowman pops up, forcing them to stay in cover.
🚪 Entering the Building
- Front Door: Blocked by rubble. Clearing it takes 3 actions (Athletics DC 22).
- Side Door: Hidden (Perception DC 18). Leads to a hallway with a tripwire trap (Reflex DC 20).
- Stairs: The stairs are blocked by a barricade and guarded by a Glyph of Warding (DC 21).
- Windows: Climbing to the window is the fastest route but exposes the climber to attacks.
🔮 Spellcaster Tactics
🔮 Spellcaster — Arcane Support
Opening Move: The spellcaster leads with Magic Missile (3 missiles, 1d4+1 each) at the party's most dangerous target. This is unavoidable damage and sets the tone.
Buffs: The spellcaster has Reactive Shield available as a reaction. They do not pre-buff unless they detect the party coming (Perception DC 26).
Spell Slots: The spellcaster has 2 Fireballs, 3 Magic Missiles, and Fear. They will use these strategically.
Defense: The spellcaster stays behind full cover when possible, only stepping out to cast.
🔧 How the Party Can Neutralize the Spellcaster
- Close the Distance: The spellcaster has low AC (19) and low HP (38). Once engaged in melee, they are in trouble.
- Counterspell: If the party has a spellcaster with Dispel Magic or counterspell capabilities, they can negate the spellcaster's spells.
- Flanking: The spellcaster is hiding behind a collapsed column. If the party can flank around the column, they can catch the spellcaster off-guard.
- Ranged Attacks: The spellcaster has no physical damage resistance. A few good ranged shots can force them to retreat.
- Magic Missile: The party's own Magic Missile can guarantee damage against the spellcaster, bypassing cover.
⚔️ Fighter Tactics
⚔️ Scarred Hand Fighters — Frontline
Formation: The fighters stay adjacent to maintain their Shield Wall (+2 AC). They advance slowly, using the rubble for cover.
Target Priority: They engage the party's strongest melee fighter first, using Power Attack to break through defenses.
Shield Block: They use their reactions to block damage from heavy hits.
Morale: They are disciplined and will not break formation unless one of them falls.
🔧 How the Party Can Neutralize the Fighters
- Separate Them: If the fighters are separated, they lose their Shield Wall (+2 AC). Use forced movement, grease spells, or tactical positioning to split them.
- Focus Fire: Take down one fighter at a time. Once one falls, the other loses the Shield Wall bonus.
- Flanking: Use the rubble piles to flank the fighters and gain a +2 bonus to attacks.
- Disarm: The fighters rely on their shields for Shield Block. Disarming them removes this defense.
- Magic: Spells like Grease or Entangle can disrupt their formation and separate them.
🔄 Coordinated Tactics
Phase 1 — Initial Assault
- Crossbowman: Deadeye shot at the party's spellcaster or healer.
- Spellcaster: Magic Missile at the party's most dangerous target.
- Fighters: Advance behind shield wall, taking cover behind rubble.
Phase 2 — Engagement
- Fighters: Engage the party's frontline, using Power Attack and Shield Block.
- Crossbowman: Target ranged attackers and spellcasters.
- Spellcaster: Cast Fear on the party's frontline to break their formation.
Phase 3 — Pressure & Finishing
- Spellcaster: Use Fireball if the party clusters.
- Crossbowman: Continue suppressing fire.
- Fighters: Press the attack, focusing on wounded targets.
- All: If the party is winning, the sergeant (if present) orders a tactical retreat.
⚔️ Sergeant Tactics (Optional)
⚔️ Scarred Hand Sergeant
Role: Leader and morale anchor. The sergeant commands the ambush and boosts ally morale.
Abilities:
- Lead by Example: Allies within 30 feet gain +1 to attack rolls and saves against fear.
- Improved Shield Wall: When adjacent to an ally, gains +3 AC.
- Rally: Can grant an ally +2 to their next attack or save.
- Orderly Advance: Grants allies +5 ft. movement on their first turn.
Tactics: The sergeant leads from the front, using Power Attack against the party's toughest fighter. They use Rally to keep allies in the fight. If the encounter is going poorly, the sergeant will order a retreat.
🛡️ Party Counters & Smart Plays
🔍 Detection
- Perception DC 26: Detect the ambush before it springs.
- Stealth DC 24: Turn the tables by flanking.
- Society DC 22: Identify the Scarred Hand and their tactics.
⚔️ Separation
- Force Movement: Use Grease, Entangle, or shoves to separate the fighters.
- Flanking: Use the rubble piles to flank and gain +2 to hit.
- Bottleneck: Force the fighters to engage one at a time.
🎯 Neutralize the Crossbowman
- Ranged Pressure: Force them to stay in cover.
- Climb: Acrobatics DC 18 to reach the window.
- Smoke: Block line of sight with Obscuring Mist.
🔮 Neutralize the Spellcaster
- Close the Distance: Low AC (19) and HP (38).
- Counterspell: Use Dispel Magic or counterspell.
- Flank: Circle around the collapsed column.
GM Tactics — Scarred Hand Ambush • Pathfinder 2e • The Twice-Damned Crown
⚔️ ✦ ⚔️