The Lost Mansions of House Vhalek: Ash, Glass, and Thorn (imported)
Pathfinder Second Edition

Snapshot · Nov 1, 2026, 4:43 AM

  • The Lost Mansions of House Vhalek: Ash, Glass, and Thorn (imported)
    • Module artifacts
      • mapThe Mansions — Forest Overview Map
      • random tableTravel Encounters
    • Acts
      • actA0Arriving in Auginford To The Mansions
        • sceneS1The Lantern & Ledger Briefing
          • checklistThe Three Vhalek Keys — Recovery Checklist
          • articleWhy the Vhalek Keys Matter
          • articleDowntime in Auginford
          • articleWhen the Party Leaves Auginford
        • sceneS2Entry to the Mansion of Ash
          • encounterE1The Entry Meadow
          • mapApproach to the Ash Mansion
          • encounterE2The Freshwater Hollow
          • encounterE3The Open Meadow
            • monster block5× Netherworld Sprigjack
          • encounterE4The Fallen Adventurer
          • encounterE5Tormonshild’s Meadow
            • monster block3× Tormonshild
          • encounterE6The Hidden Door
      • actA1Mansion of Ash
        • sceneS1Lower Level: Mansion of Ash
          • encounterE1The Ash Intake
            • challengeS1-E1 — Ash Intake: Read and Turn the Wheels
          • mapMansion of the Ash
          • encounterE2The Counterweight Gallery
            • challengeS1-E2 — Read the Old Sequence
          • letterLetter found beneath the ash ledger
          • encounterE3The Twelvefold Sump
            • challengeS1-E3 — Twelvefold Basin Alignment
          • challengeS1 - The Twelvefold Alignment
          • encounterE4The Ash Lift
            • challengeS1-E4 — Open the Ash Lift
          • encounterE5The Soot Archive
            • mapS1-E5 · The Soot Archive Map
          • encounterE6The Ember Chapel
            • mapS1-E6 · The Ember Chapel Map
            • challengeMagical Lava Moat Crossing
            • itemThe Ember Chapel Treasury
          • encounterE7The Sootbound Quarters
            • mapS1-E7 · The Sootbound Quarters Map
          • encounterE8The Cinder Storehouse
            • mapS1-E8 · The Cinder Storehouse Map
          • encounterE9The Black Furnace
            • mapS1-E9 · The Black Furnace Map
        • sceneS2Upper Level: Mansion of Ash
          • encounterE1The Soot Gallery
            • itemEmber Key
            • challengeS2-E1 — The Soot Gallery Challenge
            • trapAshglass Portrait Snare
          • mapS2 — Upper Level Battle Map (Unlabeled VTT, No Connectors)
          • encounterE2The Portrait Hall
            • challengeS2-E2 — The Portrait Hall Challenge
          • mapS2 — Upper Level Map (Mansion of Ash, External Number Key)
          • encounterE3The Servants’ Stair
            • challengeS2-E3 — The Servants’ Stair Challenge
            • trapS2-E3 — Black-Thread Bellwire
          • encounterE4The Ash Conservatory
            • challengeS2-E4 — The Ash Conservatory Challenges
          • encounterE5The Sealed Stair
            • challengeS2-E5 — The Sealed Stair Challenge
          • encounterE6The Ash Lift
            • challengeS2-E6 — The Ash Lift Challenge
          • encounterE7The Ember Study
            • challengeS2-E7 — The Ember Study Challenge
scene

S1 — Lower Level: Mansion of Ash
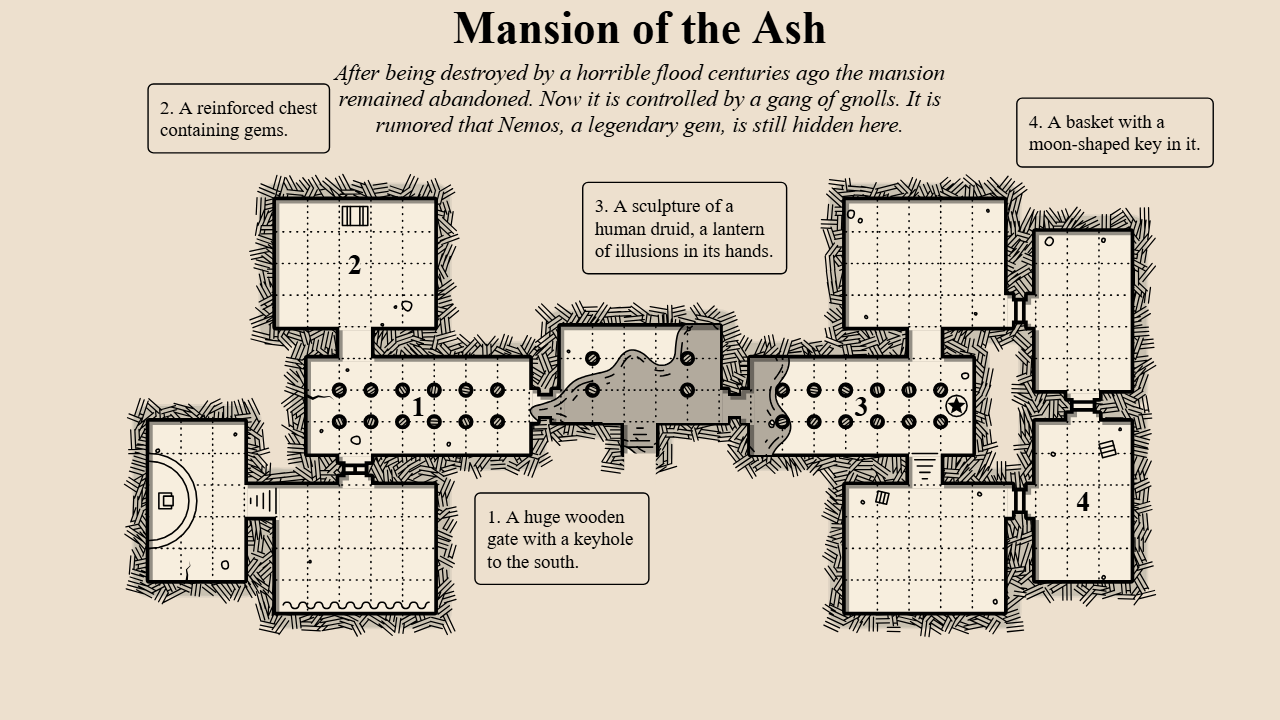
Mansion of the Ash
Dungeon · seed 914672308

To the next keeper of the mansion,

Do not force the Twelvefold Alignment from the hall. The first three rooms must answer one another before the machine will hold: begin at the Ash Intake, carry the mark through the Counterweight Gallery, and finish at the Twelvefold Sump. If the ripples return out of order, stop. The house is listening, and it will close its doors around anyone who mistakes noise for a signal.

When all three rooms answer, turn the final wheel once and leave the keyhole untouched until the bell sounds.

— M.

Challenge 1: The Twelvefold Alignment

Primary CheckThievery, Crafting, or Athletics DC 16 to set a matching mark; Perception DC 16 to call the correct pair.
The party coordinates the Intake, Counterweight Gallery, and Twelvefold Sump as one mechanism. Each round, the caller identifies a mark and the teams set its matching pair. Achieve 6 successes before 3 failures. A failed check raises the flood one step and advances the submerged threat, but the alignment always remains solvable.
Critical SuccessThe water drops immediately after the final pair, the Ash Lift opens, and the party gains a clear route through the basement.
SuccessOne matching pair is set and the next mark becomes available.
FailureThe flood rises one step and the next check is made under worsening footing.
Critical FailureThe mechanism bucks violently. Count 1 failure, raise the flood one additional step, and advance the submerged threat.

Click here to add a comment

Read-only syndicated snapshot · Syndicated Nov 1, 2026, 4:43 AM. Content updates when the author syndicates again in Adventure Maker.

Made with Amba. Want to try it? Check out Amba — free to use.